Blog Single Author Fullwidth

SunLith Energy World map showing optimal solar panel tilt angle and facing direction by latitude zone — from equatorial to polar regions

Solar Panel Tilt Angle by Location: The Complete World Guide to Maximum Output

Why the Tilt Angle Decision Matters Before You Buy a Single Panel

Most solar buyers spend hours comparing panel brands and inverter models. However, one of the most powerful performance variables costs nothing to optimise. In fact, it is decided before the first bolt is tightened: the solar panel tilt angle. Therefore, setting it correctly for your location means you capture every kilowatt-hour the Sun is offering. If you set it wrong, you permanently leave 20–40% of your system’s lifetime yield on the table — for the entire life of the installation.

This guide is the definitive reference for solar panel tilt angle by location. First, it explains the physics behind the tilt angle rule. Furthermore, it breaks down the optimal values by latitude zone. In addition, it provides a comprehensive 130+ city world database covering every country, all US state capitals, Canadian provinces, and major capitals across every continent. As a result, every value is cross-referenced against NREL and Global Solar Atlas irradiance data so you can act on it with confidence.

Whether you are designing a residential rooftop system, a commercial ground-mount, or a utility-scale solar-plus-storage plant, this guide is therefore your complete reference. Used alongside Sunlith’s Peak Sun Hours by Location guide and the Energy Storage Calculation guide, it gives you the complete input data you need to size a system correctly from the ground up.

Key Takeaway

Solar panel tilt angle rule: Set your tilt angle equal to your site latitude for maximum annual yield.

Northern Hemisphere → Face TRUE SOUTH.
Southern Hemisphere → Face TRUE NORTH.
Equatorial zone (0°–15°) → Minimum 10–15° tilt for drainage.
High latitudes → Steepen tilt toward 60–70°.

Single-axis trackers recover 15–25% more energy at any tilt angle setting.

1. The Physics Behind Solar Panel Tilt Angle

1.1 Why Tilt Angle Exists: Solar Declination and the Ecliptic Plane

The Earth orbits the Sun on a tilted axis — 23.5° relative to the ecliptic plane. As a result, the Sun’s path across the sky varies by season and latitude. In summer, the Sun arcs high; in winter, it tracks low and short. Consequently, a fixed solar panel set at the wrong tilt angle misses the bulk of available irradiance for large parts of the year. Setting the correct solar panel tilt angle therefore compensates for this by orienting the panel face as close to perpendicular to the Sun’s average annual path as possible.

Two angles fully define a solar panel’s orientation relative to the Sun. In addition, both must be set correctly for maximum output:

  • Azimuth angle: the compass direction the panel face points toward (e.g., 180° = true south in the Northern Hemisphere).
  • Tilt angle (inclination angle): how steeply the panel is inclined from horizontal — 0° is perfectly flat, 90° is vertical. This is therefore the primary focus of this guide.
SunLith Energy Diagram showing Earth's 23.5-degree axial tilt, the Sun's apparent arc at different seasons, and how solar panel tilt angle relates to latitude for maximum irradiance

1.2 Azimuth Direction: The Companion Setting to Tilt Angle

Tilt angle and azimuth direction must therefore be set together — each amplifies or undermines the other. The Sun transits across the sky from east to west. In the Northern Hemisphere, the Sun’s arc peaks in the southern sky. In the Southern Hemisphere, it consequently peaks in the northern sky. A panel tilted at the correct solar panel tilt angle but facing the wrong direction consequently captures far less irradiance than its theoretical potential.

  • Northern Hemisphere (latitudes > 0°): pair any tilt angle with azimuth 180° — TRUE SOUTH.
  • Southern Hemisphere (latitudes < 0°): pair any tilt angle with azimuth 0° — TRUE NORTH.
  • Near the Equator (±5°): tilt angle is the dominant variable; azimuth east-west deviation has minimal impact.

Important: compass south and TRUE geographic south can differ by several degrees depending on magnetic declination at your site. Therefore, always calibrate to true south using GPS coordinates or solar simulation tools such as PVGIS or the Global Solar Atlas — do not rely on a standard magnetic compass alone.

1.3 The Latitude Rule: How to Calculate Your Optimal Solar Panel Tilt Angle

Quick Summary: How to Orient Solar Panels by Location

  • Northern Hemisphere: Face panels true south (180° azimuth) at a tilt angle equal to the site latitude.
  • Southern Hemisphere: Face panels true north (0° azimuth) at a tilt angle equal to the site latitude.
  • Equatorial Regions (0°–15°): Set a minimum tilt angle of 10° to 15° to ensure proper rain drainage and self-cleaning.
  • High Latitudes (Above 55°): Steepen the tilt angle toward 60°–70° to capture the low-tracking winter sun.

The optimal solar panel tilt angle for a fixed-mount system is generally equal to the geographic latitude of your location. Setting the tilt angle to match your latitude balances seasonal solar changes, positioning the panels perpendicular to the sun’s average annual path to maximize total yearly energy yield.

  • London (51.5°N) → solar panel tilt angle ≈ 51°
  • New York (40.7°N) → solar panel tilt angle ≈ 41°
  • Dubai (25.2°N) → solar panel tilt angle ≈ 25°
  • Sydney (33.9°S) → solar panel tilt angle ≈ 34°, facing true north
  • Singapore (1.3°N) → solar panel tilt angle ≈ 10–15° (equatorial minimum for drainage)

Seasonal tilt adjustments can furthermore improve output by 5–10% for systems with adjustable racking. For example, increasing the tilt angle by 10–15° in winter compensates for the lower Sun; conversely, decreasing it by 10–15° in summer maximises longer daylight hours. As a result, fixed systems should use the annual average tilt angle equal to latitude as the default. The world city database in Section 4 applies this rule to 130+ locations globally so you have a ready reference for any site.

2. Solar Panel Tilt Angle by Latitude Zone: Five Regional Guides

SunLith Energy  Infographic showing five latitude zones from equatorial to polar, with recommended solar panel tilt angle and facing direction for each zone

Zone 1: Equatorial Region — Solar Panel Tilt Angle 10°–15° (0° – 15° Latitude)

Countries: Indonesia, Malaysia, Singapore, Kenya, Ecuador, Colombia, Nigeria, Ghana, Uganda, Sri Lanka

  • Optimal solar panel tilt angle: 10–15° minimum. Do not go lower — near-flat panels accumulate dust and water pools, accelerating soiling losses and potential corrosion.
  • Optimal direction: Can face either north or south — the Sun’s noon altitude is very high year-round (75°–90°), so azimuth deviation has minimal impact at these latitudes.
  • Key consideration: diffuse irradiance from overcast tropical skies contributes significantly to total annual yield. Bifacial panels recover 5–12% additional energy from sky-diffuse and ground-reflected radiation.
  • Seasonal variation: minimal — no major adjustment required.
Pro Tip

In equatorial climates, the biggest output losses are soiling and high cell temperatures — not tilt angle errors. Once you clear the 10–15° minimum tilt angle required for natural rain self-cleaning, shift your focus to establishing a regular panel washing routine and choosing modules featuring a low temperature coefficient (ideally below –0.35%/°C).

Zone 2: Subtropical Region — Solar Panel Tilt Angle 15°–35° (15° – 35° Latitude)

Countries/regions: India (south), Australia (north), Saudi Arabia, UAE, Mexico, Texas (USA), Egypt, South Africa (north), Morocco

  • Optimal solar panel tilt angle: 15°–35° — apply the latitude rule directly.
  • Optimal direction: True south (Northern Hemisphere) or true north (Southern Hemisphere) is important here, because the Sun arc is not as overhead as in the equatorial zone.
  • Desert sites in this zone carry the world’s highest Direct Normal Irradiance (DNI). However, soiling losses from fine dust can reach 15–25% without monthly panel cleaning — soiling management is therefore as critical as tilt angle optimisation.
  • Temperature coefficient loss: At a cell temperature of 70°C — common on black rooftop panels in subtropical summer — a standard monocrystalline panel consequently loses approximately 16% of its STC-rated output. This is separate from, and additive to, any tilt angle loss.

Zone 3: Temperate Region — Solar Panel Tilt Angle 35°–55° (35° – 55° Latitude)

Countries/regions: Most of Europe, northern USA, northern China, Japan, South Korea, New Zealand (South Island), southern Australia

  • Optimal solar panel tilt angle: 35°–55° matching latitude. This range consequently sees the greatest absolute yield difference between a correct and incorrect tilt angle — much more so than in tropical zones.
  • Optimal direction: True south (Northern Hemisphere) or true north (Southern Hemisphere). At these latitudes, a 45° azimuth deviation (e.g., facing SE instead of S) therefore costs 5–8% of annual yield — far more than in lower latitudes.
  • Winter considerations: Increasing the solar panel tilt angle by 10–15° above latitude (e.g., 55° instead of 45° in London) trades a small summer yield reduction for meaningfully better winter output — often the right trade-off where winter heating or storage demand is highest.
  • Bifacial panels on snowy ground: Reflected light from snow cover can increase bifacial yield by 10–25% in northern Europe, Canada, and the northern USA — an often-overlooked benefit of a steeper tilt angle in these climates.

Zone 4: Subarctic Region — Solar Panel Tilt Angle 55°–70° (55° – 70° Latitude)

Countries/regions: Scandinavia (Norway, Sweden, Finland), Alaska, Iceland, northern Russia, northern Canada

  • Optimal solar panel tilt angle: 55°–70°. At these latitudes the winter Sun barely clears the horizon, so a steep tilt angle is therefore essential to face the panel more directly toward the low solar disc.
  • Optimal direction: True south is non-negotiable. Any significant eastward or westward deviation consequently sharply reduces the already-limited winter irradiance.
  • System design consideration: Annual yield is dominated by the long summer days. As a result, the BESS must be sized to time-shift summer surplus and bridge the extended winter shortfall. Sizing decisions therefore begin with the correct tilt angle, then apply the minimum winter peak sun hours to determine storage requirements.
  • Trackers: dual-axis trackers can boost summer harvest by 30–40%, substantially improving the seasonal energy balance for subarctic sites.

Zone 5: Polar Region — Solar Panel Tilt Angle 70°–90° (70° – 90° Latitude)

Countries/regions: Northern Greenland, Svalbard, Arctic research stations, Antarctica

  • Optimal solar panel tilt angle: 70°–90° (near-vertical). The Sun never rises high in polar skies — a near-vertical panel therefore faces the low solar disc most directly during the brief productive hours.
  • Optimal direction: True south (Northern Hemisphere). During polar summer, when the Sun circles the sky for 24 hours, east-west orientation splits may consequently be considered to distribute capture around the clock.
  • Key consideration: Systems must be massively oversized relative to winter demand, or paired with complementary generation (wind, diesel) to survive multi-month polar night. As a result, the tilt angle decision at these latitudes is secondary to the fundamental seasonal energy gap.

3. Panel Facing Direction vs. Tilt Angle: The Combined Impact Table

3.1 How Direction Deviations Reduce Annual Yield

The solar panel tilt angle and azimuth direction interact closely. Therefore, the table below shows annual yield relative to a perfectly south-facing, latitude-matched tilt angle installation in the Northern Hemisphere. Use it to evaluate what you lose when roof orientation or planning constraints force a compromise on either variable.

Panel Facing DirectionAzimuthYield vs. True SouthBest Use Case
True South180°100% (Reference)Maximum annual yield
South-Southeast157°98–99%Negligible loss — acceptable
South-Southwest202°98–99%Slight afternoon bias — acceptable
Southeast135°92–95%Morning production emphasis
Southwest225°92–95%Afternoon / evening bias — better for TOU pricing
East90°78–82%Morning-heavy; good for morning demand sites
West270°78–82%Afternoon peak; matches evening demand; grid peak shaving
North55–65%Worst — avoid in Northern Hemisphere

3.2 When West-Facing Makes Commercial Sense

West-facing panels paired with a steeper tilt angle have gained significant commercial interest under Time-of-Use (TOU) tariff structures—a trend reflecting the shifting grid dynamics noted in the IEA World Energy Outlook 2024. The reason is that they shift generation toward peak afternoon grid pricing periods. As a result, even though west-facing arrays produce 18–22% less annual energy than true-south arrays, the higher value of that afternoon energy can consequently close the revenue gap. Furthermore, a Battery Energy Storage System (BESS) can maximise revenue from any panel orientation by decoupling solar generation time from dispatch time — making optimal tilt angle therefore the most important fixed parameter when the direction is constrained.

4. Solar Panel Tilt Angle Database: 130+ World Cities by Country, State & Capital

4.0 How to Use This Database

The following database provides the recommended solar panel tilt angle and optimal facing direction for 130+ world cities. Values are derived from geographic latitude and, furthermore, cross-referenced against PVGIS and Global Solar Atlas irradiance data. These are therefore authoritative starting values. However, always run a site-specific simulation using PVGIS or PVWatts to account for local shading, horizon obstructions, and microclimate before finalising your installation design.

SunLith Energy World map with city markers showing the recommended solar panel tilt angle for major cities across all continents

4.1 USA State Capitals & Major Cities — Southern & Central States (A–N)

All US states in the Northern Hemisphere use true south (180°) as the optimal azimuth. Therefore, the tilt angle is the only variable that changes by location — set it equal to your state capital’s latitude for maximum annual output.

City / StateLatitudeOptimal DirectionTilt AngleAnnual PSH (avg)
Phoenix, AZ33.4°NTrue South (180°)33°5.5–6.5 hrs
Los Angeles, CA34.1°NTrue South (180°)34°5.0–6.0 hrs
Sacramento, CA38.6°NTrue South (180°)39°4.8–5.6 hrs
Denver, CO39.7°NTrue South (180°)40°5.0–5.8 hrs
Hartford, CT41.8°NTrue South (180°)42°4.2–4.8 hrs
Tallahassee, FL30.4°NTrue South (180°)30°4.8–5.5 hrs
Atlanta, GA33.7°NTrue South (180°)34°4.5–5.2 hrs
Honolulu, HI21.3°NTrue South (180°)21°5.5–6.3 hrs
Boise, ID43.6°NTrue South (180°)44°4.5–5.3 hrs
Springfield, IL39.8°NTrue South (180°)40°4.2–5.0 hrs
Indianapolis, IN39.8°NTrue South (180°)40°4.0–4.8 hrs
Des Moines, IA41.6°NTrue South (180°)42°4.2–5.0 hrs
Topeka, KS39.0°NTrue South (180°)39°4.5–5.3 hrs
Frankfort, KY38.2°NTrue South (180°)38°4.0–4.8 hrs
Baton Rouge, LA30.5°NTrue South (180°)31°4.5–5.2 hrs
Augusta, ME44.3°NTrue South (180°)44°3.8–4.5 hrs
Annapolis, MD38.9°NTrue South (180°)39°4.0–4.8 hrs
Boston, MA42.4°NTrue South (180°)42°4.0–4.7 hrs
Lansing, MI42.7°NTrue South (180°)43°3.8–4.5 hrs
St. Paul, MN44.9°NTrue South (180°)45°3.8–4.5 hrs
Jackson, MS32.3°NTrue South (180°)32°4.5–5.2 hrs
Jefferson City, MO38.6°NTrue South (180°)39°4.2–5.0 hrs
Helena, MT46.6°NTrue South (180°)47°4.0–5.0 hrs
Lincoln, NE40.8°NTrue South (180°)41°4.5–5.3 hrs
Carson City, NV39.2°NTrue South (180°)39°5.5–6.5 hrs

4.1b USA State Capitals — Northern & Western States (N–W) + DC & Territories

As a result of increasing latitude, northern states consistently require steeper tilt angles. For example, Juneau, Alaska (58.3°N) uses a 58° tilt angle — nearly twice that of Honolulu, Hawaii (21°). Furthermore, northern states also see lower peak sun hours, which makes setting the correct tilt angle even more critical to capturing every available hour of irradiance.

City / StateLatitudeOptimal DirectionTilt AngleAnnual PSH (avg)
Concord, NH43.2°NTrue South (180°)43°3.9–4.6 hrs
Trenton, NJ40.2°NTrue South (180°)40°4.0–4.8 hrs
Santa Fe, NM35.7°NTrue South (180°)36°5.5–6.5 hrs
Albany, NY42.7°NTrue South (180°)43°3.9–4.6 hrs
New York City, NY40.7°NTrue South (180°)41°4.0–4.8 hrs
Raleigh, NC35.8°NTrue South (180°)36°4.5–5.2 hrs
Bismarck, ND46.8°NTrue South (180°)47°4.2–5.0 hrs
Columbus, OH40.0°NTrue South (180°)40°3.9–4.7 hrs
Oklahoma City, OK35.5°NTrue South (180°)36°4.8–5.5 hrs
Salem, OR44.9°NTrue South (180°)45°3.5–4.5 hrs
Harrisburg, PA40.3°NTrue South (180°)40°4.0–4.8 hrs
Providence, RI41.8°NTrue South (180°)42°4.0–4.7 hrs
Columbia, SC34.0°NTrue South (180°)34°4.5–5.2 hrs
Pierre, SD44.4°NTrue South (180°)44°4.5–5.2 hrs
Nashville, TN36.2°NTrue South (180°)36°4.5–5.0 hrs
Austin, TX30.3°NTrue South (180°)30°5.0–5.8 hrs
Salt Lake City, UT40.8°NTrue South (180°)41°5.0–5.8 hrs
Montpelier, VT44.3°NTrue South (180°)44°3.8–4.5 hrs
Richmond, VA37.5°NTrue South (180°)38°4.2–5.0 hrs
Olympia, WA47.0°NTrue South (180°)47°3.2–4.0 hrs
Charleston, WV38.4°NTrue South (180°)38°3.8–4.5 hrs
Madison, WI43.1°NTrue South (180°)43°3.8–4.5 hrs
Cheyenne, WY41.1°NTrue South (180°)41°5.0–5.8 hrs
Juneau, AK58.3°NTrue South (180°)58°2.5–3.5 hrs
Washington, DC38.9°NTrue South (180°)39°4.0–4.8 hrs

4.2 Canada — Provincial & Territorial Capitals

City / ProvinceLatitudeOptimal DirectionTilt AngleAnnual PSH (avg)
Victoria, BC48.4°NTrue South (180°)48°3.5–4.5 hrs
Edmonton, AB53.5°NTrue South (180°)54°3.5–4.5 hrs
Regina, SK50.5°NTrue South (180°)51°4.0–5.0 hrs
Winnipeg, MB49.9°NTrue South (180°)50°4.0–5.0 hrs
Toronto, ON43.7°NTrue South (180°)44°3.8–4.5 hrs
Quebec City, QC46.8°NTrue South (180°)47°3.8–4.5 hrs
Fredericton, NB45.9°NTrue South (180°)46°3.7–4.4 hrs
Halifax, NS44.6°NTrue South (180°)45°3.7–4.4 hrs
Charlottetown, PEI46.2°NTrue South (180°)46°3.6–4.3 hrs
St. John’s, NL47.6°NTrue South (180°)48°3.5–4.2 hrs
Whitehorse, YT60.7°NTrue South (180°)61°3.0–4.0 hrs
Yellowknife, NT62.5°NTrue South (180°)63°3.0–4.0 hrs
Iqaluit, NU63.7°NTrue South (180°)64°2.5–3.5 hrs

4.3 Europe — Country Capitals & Major Cities

City / CountryLatitudeHemisphereOptimal DirectionTilt AnglePSH (avg)
Reykjavik, Iceland64.1°NNorthernTrue South (180°)64°2.5–3.5 hrs
Helsinki, Finland60.2°NNorthernTrue South (180°)60°2.8–3.8 hrs
Oslo, Norway59.9°NNorthernTrue South (180°)60°2.8–3.8 hrs
Stockholm, Sweden59.3°NNorthernTrue South (180°)59°3.0–4.0 hrs
Tallinn, Estonia59.4°NNorthernTrue South (180°)59°2.9–3.8 hrs
Riga, Latvia56.9°NNorthernTrue South (180°)57°3.0–3.9 hrs
Vilnius, Lithuania54.7°NNorthernTrue South (180°)55°3.1–4.0 hrs
Moscow, Russia55.8°NNorthernTrue South (180°)56°3.0–4.0 hrs
Copenhagen, Denmark55.7°NNorthernTrue South (180°)56°3.0–4.0 hrs
Edinburgh, Scotland55.9°NNorthernTrue South (180°)56°2.8–3.8 hrs
Amsterdam, Netherlands52.4°NNorthernTrue South (180°)52°3.0–4.0 hrs
Brussels, Belgium50.9°NNorthernTrue South (180°)51°3.0–4.0 hrs
Warsaw, Poland52.2°NNorthernTrue South (180°)52°3.2–4.2 hrs
Prague, Czech Rep.50.1°NNorthernTrue South (180°)50°3.3–4.2 hrs
Berlin, Germany52.5°NNorthernTrue South (180°)53°3.2–4.2 hrs
Vienna, Austria48.2°NNorthernTrue South (180°)48°3.5–4.5 hrs
Bern, Switzerland46.9°NNorthernTrue South (180°)47°3.5–4.8 hrs
Paris, France48.9°NNorthernTrue South (180°)49°3.2–4.2 hrs
London, UK51.5°NNorthernTrue South (180°)52°2.7–3.7 hrs
Dublin, Ireland53.3°NNorthernTrue South (180°)53°2.6–3.5 hrs
Lisbon, Portugal38.7°NNorthernTrue South (180°)39°4.5–5.5 hrs
Madrid, Spain40.4°NNorthernTrue South (180°)40°4.5–5.5 hrs
Rome, Italy41.9°NNorthernTrue South (180°)42°4.2–5.2 hrs
Athens, Greece37.9°NNorthernTrue South (180°)38°4.5–5.5 hrs
Nicosia, Cyprus35.2°NNorthernTrue South (180°)35°5.0–6.0 hrs
Valletta, Malta35.9°NNorthernTrue South (180°)36°5.0–6.0 hrs
Zagreb, Croatia45.8°NNorthernTrue South (180°)46°3.8–4.8 hrs
Sarajevo, Bosnia43.9°NNorthernTrue South (180°)44°3.8–4.8 hrs
Belgrade, Serbia44.8°NNorthernTrue South (180°)45°3.8–4.8 hrs
Bucharest, Romania44.4°NNorthernTrue South (180°)44°4.0–5.0 hrs
Sofia, Bulgaria42.7°NNorthernTrue South (180°)43°4.0–5.0 hrs
Budapest, Hungary47.5°NNorthernTrue South (180°)48°3.7–4.7 hrs
Bratislava, Slovakia48.2°NNorthernTrue South (180°)48°3.6–4.6 hrs
Ljubljana, Slovenia46.1°NNorthernTrue South (180°)46°3.7–4.7 hrs
Kyiv, Ukraine50.5°NNorthernTrue South (180°)51°3.5–4.5 hrs
Minsk, Belarus53.9°NNorthernTrue South (180°)54°3.2–4.2 hrs
Chisinau, Moldova47.0°NNorthernTrue South (180°)47°3.8–4.8 hrs
Tirana, Albania41.3°NNorthernTrue South (180°)41°4.2–5.2 hrs
Skopje, N. Macedonia42.0°NNorthernTrue South (180°)42°4.2–5.2 hrs
Podgorica, Montenegro42.4°NNorthernTrue South (180°)42°4.2–5.2 hrs
Pristina, Kosovo42.7°NNorthernTrue South (180°)43°4.0–5.0 hrs
Andorra la Vella42.5°NNorthernTrue South (180°)43°4.5–5.5 hrs
Luxembourg City49.6°NNorthernTrue South (180°)50°3.2–4.2 hrs
Valletta, Malta35.9°NNorthernTrue South (180°)36°5.0–6.0 hrs

4.4 Asia — Country Capitals & Major Cities

City / CountryLatitudeHemisphereOptimal DirectionTilt AnglePSH (avg)
Tokyo, Japan35.7°NNorthernTrue South (180°)36°3.8–4.8 hrs
Beijing, China39.9°NNorthernTrue South (180°)40°4.5–5.5 hrs
Shanghai, China31.2°NNorthernTrue South (180°)31°3.8–4.8 hrs
Seoul, South Korea37.6°NNorthernTrue South (180°)38°3.8–4.8 hrs
Pyongyang, N. Korea39.0°NNorthernTrue South (180°)39°4.0–5.0 hrs
Ulaanbaatar, Mongolia47.9°NNorthernTrue South (180°)48°4.5–5.8 hrs
New Delhi, India28.6°NNorthernTrue South (180°)29°4.5–5.5 hrs
Mumbai, India19.1°NNorthernTrue South (180°)19°5.0–6.0 hrs
Chennai, India13.1°NNorthernTrue South (180°)13°5.0–6.0 hrs
Islamabad, Pakistan33.7°NNorthernTrue South (180°)34°5.0–6.0 hrs
Dhaka, Bangladesh23.7°NNorthernTrue South (180°)24°4.5–5.5 hrs
Kathmandu, Nepal27.7°NNorthernTrue South (180°)28°4.5–5.5 hrs
Colombo, Sri Lanka6.9°NNorthernTrue South/Flat10–15°5.0–6.0 hrs
Male, Maldives4.2°NEquatorialTrue South/Flat10–15°5.5–6.5 hrs
Kabul, Afghanistan34.5°NNorthernTrue South (180°)35°5.5–6.5 hrs
Tehran, Iran35.7°NNorthernTrue South (180°)36°5.0–6.0 hrs
Baghdad, Iraq33.3°NNorthernTrue South (180°)33°5.5–6.5 hrs
Riyadh, Saudi Arabia24.7°NNorthernTrue South (180°)25°5.5–6.5 hrs
Dubai, UAE25.2°NNorthernTrue South (180°)25°5.5–6.5 hrs
Doha, Qatar25.3°NNorthernTrue South (180°)25°5.5–6.5 hrs
Kuwait City, Kuwait29.4°NNorthernTrue South (180°)29°5.5–6.5 hrs
Muscat, Oman23.6°NNorthernTrue South (180°)24°5.5–6.5 hrs
Sana’a, Yemen15.4°NNorthernTrue South (180°)15°5.5–6.5 hrs
Amman, Jordan31.9°NNorthernTrue South (180°)32°5.0–6.0 hrs
Beirut, Lebanon33.9°NNorthernTrue South (180°)34°5.0–6.0 hrs
Jerusalem, Israel31.8°NNorthernTrue South (180°)32°5.0–6.0 hrs
Ankara, Turkey39.9°NNorthernTrue South (180°)40°4.5–5.5 hrs
Tashkent, Uzbekistan41.3°NNorthernTrue South (180°)41°4.8–5.8 hrs
Almaty, Kazakhstan43.3°NNorthernTrue South (180°)43°4.5–5.5 hrs
Bishkek, Kyrgyzstan42.9°NNorthernTrue South (180°)43°4.5–5.5 hrs
Dushanbe, Tajikistan38.6°NNorthernTrue South (180°)39°4.8–5.8 hrs
Ashgabat, Turkmenistan37.9°NNorthernTrue South (180°)38°5.0–6.0 hrs
Baku, Azerbaijan40.4°NNorthernTrue South (180°)40°4.5–5.5 hrs
Tbilisi, Georgia41.7°NNorthernTrue South (180°)42°4.3–5.3 hrs
Yerevan, Armenia40.2°NNorthernTrue South (180°)40°4.5–5.5 hrs
Kuala Lumpur, Malaysia3.1°NEquatorialSouth/Flat10–15°4.5–5.5 hrs
Singapore1.3°NEquatorialSouth/Flat10–15°4.3–5.3 hrs
Bangkok, Thailand13.8°NNorthernTrue South (180°)14°4.8–5.8 hrs
Hanoi, Vietnam21.0°NNorthernTrue South (180°)21°4.5–5.5 hrs
Manila, Philippines14.6°NNorthernTrue South (180°)15°4.8–5.8 hrs
Jakarta, Indonesia6.2°SSouthernTrue North (0°)10–15°4.5–5.5 hrs
Phnom Penh, Cambodia11.6°NNorthernTrue South (180°)12°5.0–6.0 hrs
Vientiane, Laos17.9°NNorthernTrue South (180°)18°5.0–6.0 hrs
Naypyidaw, Myanmar19.7°NNorthernTrue South (180°)20°4.8–5.8 hrs
Kathmandu, Nepal27.7°NNorthernTrue South (180°)28°4.8–5.8 hrs
Thimphu, Bhutan27.5°NNorthernTrue South (180°)28°4.5–5.5 hrs

4.5 Africa — Country Capitals & Major Cities

City / CountryLatitudeHemisphereOptimal DirectionTilt AnglePSH (avg)
Cairo, Egypt30.1°NNorthernTrue South (180°)30°5.5–6.5 hrs
Tunis, Tunisia36.8°NNorthernTrue South (180°)37°5.0–6.0 hrs
Algiers, Algeria36.7°NNorthernTrue South (180°)37°5.0–6.0 hrs
Rabat, Morocco34.0°NNorthernTrue South (180°)34°5.0–6.0 hrs
Tripoli, Libya32.9°NNorthernTrue South (180°)33°5.5–6.5 hrs
Khartoum, Sudan15.6°NNorthernTrue South (180°)16°6.0–7.0 hrs
Addis Ababa, Ethiopia9.0°NNorthernTrue South (180°)5.5–6.5 hrs
Nairobi, Kenya1.3°SSouthernTrue North (0°)10–15°5.5–6.5 hrs
Kampala, Uganda0.3°NEquatorialSouth/Flat10–15°5.0–6.0 hrs
Dar es Salaam, Tanzania6.8°SSouthernTrue North (0°)7–15°5.5–6.5 hrs
Kigali, Rwanda1.9°SSouthernTrue North (0°)10–15°5.5–6.5 hrs
Bujumbura, Burundi3.4°SSouthernTrue North (0°)10–15°5.5–6.5 hrs
Lusaka, Zambia15.4°SSouthernTrue North (0°)15°5.5–6.5 hrs
Harare, Zimbabwe17.8°SSouthernTrue North (0°)18°5.5–6.5 hrs
Maputo, Mozambique25.9°SSouthernTrue North (0°)26°5.5–6.5 hrs
Lilongwe, Malawi14.0°SSouthernTrue North (0°)14°5.5–6.5 hrs
Gaborone, Botswana24.7°SSouthernTrue North (0°)25°5.5–6.5 hrs
Windhoek, Namibia22.6°SSouthernTrue North (0°)23°5.8–6.8 hrs
Pretoria, South Africa25.7°SSouthernTrue North (0°)26°5.5–6.5 hrs
Cape Town, S. Africa33.9°SSouthernTrue North (0°)34°5.0–6.0 hrs
Johannesburg, S. Africa26.2°SSouthernTrue North (0°)26°5.5–6.5 hrs
Lagos, Nigeria6.5°NNorthernTrue South (180°)10–15°4.5–5.5 hrs
Abuja, Nigeria9.1°NNorthernTrue South (180°)5.0–6.0 hrs
Accra, Ghana5.6°NNorthernTrue South (180°)10–15°5.0–6.0 hrs
Dakar, Senegal14.7°NNorthernTrue South (180°)15°5.5–6.5 hrs
Bamako, Mali12.6°NNorthernTrue South (180°)13°5.5–6.5 hrs
Niamey, Niger13.5°NNorthernTrue South (180°)14°6.0–7.0 hrs
Ouagadougou, Burkina12.4°NNorthernTrue South (180°)12°6.0–7.0 hrs
Ndjamena, Chad12.1°NNorthernTrue South (180°)12°6.0–7.0 hrs
Kinshasa, DRC4.3°SSouthernTrue North (0°)10–15°4.5–5.5 hrs
Brazzaville, Congo4.3°SSouthernTrue North (0°)10–15°4.5–5.5 hrs
Libreville, Gabon0.4°NEquatorialSouth/Flat10–15°4.5–5.5 hrs
Yaounde, Cameroon3.8°NEquatorialSouth/Flat10–15°4.5–5.5 hrs
Malabo, Eq. Guinea3.8°NEquatorialSouth/Flat10–15°4.5–5.5 hrs
Mogadishu, Somalia2.0°NEquatorialSouth/Flat10–15°5.5–6.5 hrs
Djibouti City11.6°NNorthernTrue South (180°)12°6.0–7.0 hrs
Asmara, Eritrea15.3°NNorthernTrue South (180°)15°6.0–7.0 hrs
Antananarivo, Madagascar18.9°SSouthernTrue North (0°)19°5.0–6.0 hrs

4.6 South America — Country Capitals & Major Cities

City / CountryLatitudeHemisphereOptimal DirectionTilt AnglePSH (avg)
Bogota, Colombia4.7°NEquatorialSouth/Flat10–15°4.5–5.5 hrs
Caracas, Venezuela10.5°NNorthernTrue South (180°)11°5.0–6.0 hrs
Georgetown, Guyana6.8°NEquatorialSouth/Flat10–15°5.0–6.0 hrs
Paramaribo, Suriname5.9°NEquatorialSouth/Flat10–15°4.5–5.5 hrs
Cayenne, French Guiana5.0°NEquatorialSouth/Flat10–15°4.5–5.5 hrs
Quito, Ecuador0.2°SEquatorialSouth/Flat10–15°4.8–5.8 hrs
Lima, Peru12.0°SSouthernTrue North (0°)12°4.5–5.5 hrs
La Paz, Bolivia16.5°SSouthernTrue North (0°)17°5.5–6.5 hrs
Brasilia, Brazil15.8°SSouthernTrue North (0°)16°5.0–6.0 hrs
Sao Paulo, Brazil23.5°SSouthernTrue North (0°)24°4.5–5.5 hrs
Rio de Janeiro, Brazil22.9°SSouthernTrue North (0°)23°4.8–5.8 hrs
Asuncion, Paraguay25.3°SSouthernTrue North (0°)25°5.0–6.0 hrs
Montevideo, Uruguay34.9°SSouthernTrue North (0°)35°4.5–5.5 hrs
Buenos Aires, Argentina34.6°SSouthernTrue North (0°)35°4.5–5.5 hrs
Santiago, Chile33.5°SSouthernTrue North (0°)34°4.8–5.8 hrs
Punta Arenas, Chile53.1°SSouthernTrue North (0°)53°3.0–4.0 hrs

4.7 Oceania — Capitals & Major Cities

City / CountryLatitudeHemisphereOptimal DirectionTilt AnglePSH (avg)
Canberra, Australia35.3°SSouthernTrue North (0°)35°4.8–5.8 hrs
Sydney, Australia33.9°SSouthernTrue North (0°)34°4.8–5.8 hrs
Melbourne, Australia37.8°SSouthernTrue North (0°)38°4.3–5.3 hrs
Brisbane, Australia27.5°SSouthernTrue North (0°)28°5.0–6.0 hrs
Perth, Australia31.9°SSouthernTrue North (0°)32°5.5–6.5 hrs
Adelaide, Australia34.9°SSouthernTrue North (0°)35°5.0–6.0 hrs
Darwin, Australia12.5°SSouthernTrue North (0°)13°5.5–6.5 hrs
Wellington, New Zealand41.3°SSouthernTrue North (0°)41°4.0–5.0 hrs
Auckland, New Zealand36.9°SSouthernTrue North (0°)37°4.3–5.3 hrs
Port Moresby, PNG9.4°SSouthernTrue North (0°)10–15°4.8–5.8 hrs
Suva, Fiji18.1°SSouthernTrue North (0°)18°5.0–6.0 hrs
Nuku’alofa, Tonga21.1°SSouthernTrue North (0°)21°5.0–6.0 hrs
Honiara, Solomon Is.9.4°SSouthernTrue North (0°)10–15°4.8–5.8 hrs
Apia, Samoa13.8°SSouthernTrue North (0°)14°5.0–6.0 hrs
Port Vila, Vanuatu17.7°SSouthernTrue North (0°)18°5.0–6.0 hrs
Tarawa, Kiribati1.3°NEquatorialSouth/Flat10–15°5.5–6.5 hrs
Funafuti, Tuvalu8.5°SSouthernTrue North (0°)10–15°5.5–6.5 hrs
Palikir, Micronesia7.0°NNorthernTrue South (180°)10–15°5.5–6.5 hrs
Majuro, Marshall Is.7.1°NNorthernTrue South (180°)10–15°5.5–6.5 hrs
Ngerulmud, Palau7.5°NNorthernTrue South (180°)10–15°5.5–6.5 hrs

5. Fixed Tilt Angle vs. Solar Trackers: Yield Gain vs. Cost Trade-Off

SunLith Energy Side-by-side comparison of a fixed tilt angle solar panel array (left) and a single-axis solar tracker field (right) showing annual yield difference
Solar Panel Fixed Tilt Angle vs Single Axis Tracker Field Comparison

Solar trackers dynamically adjust the solar panel tilt angle and/or azimuth throughout the day to follow the Sun’s path. The yield benefit is consequently well-established. However, trackers add cost, moving parts, and maintenance requirements. Therefore, here is a clear framework for when each approach makes engineering and financial sense:

System TypeYield Gain vs. FixedBest ForKey Trade-Off
Fixed Tilt Angle (Latitude-Matched)Reference (0%)Rooftops, constrained sites, low CAPEX priorityLowest cost, lowest maintenance
Single-Axis Tracker (adjusts azimuth E-W)+15–25% yield vs. fixed tilt angleGround-mount utility & C&I projects, flat terrainHigher CAPEX, maintenance, moving parts
Dual-Axis Tracker (full tilt angle + azimuth follow)+30–40% yield vs. fixed tilt angleHigh-latitude sites, CPV, research stationsHighest cost and complexity — specialist use only

For residential and commercial rooftop systems, a fixed tilt angle at latitude therefore remains the dominant choice for its simplicity and zero maintenance. For ground-mount projects on flat terrain, single-axis trackers consequently deliver the best LCOE improvement. When paired with a Battery Energy Storage System, even a fixed tilt angle installation can furthermore be optimised for revenue through intelligent charge and dispatch scheduling — the BESS compensates for suboptimal solar timing rather than suboptimal panel geometry.

6. Real-World Constraints: When You Cannot Set the Ideal Tilt Angle

6.1 Fixed Roof Pitch — Working With What You Have

Most residential rooftops have a fixed pitch that may not match the ideal solar panel tilt angle for the site latitude. Therefore, here is a practical decision hierarchy for constrained installations:

  1. Measure the existing roof pitch angle. A 4/12 pitch = approximately 18°; a 6/12 pitch = approximately 27°. This is consequently your actual tilt angle before any additional racking.
  2. Compare the existing pitch to your target solar panel tilt angle (= your latitude). Calculate the deficit.
  3. Evaluate tilt-up racking mounts that can add 5–15° of additional tilt angle without significant structural impact. In addition, check manufacturer wind load ratings for your region.
  4. Check for shading from chimneys, neighboring buildings, and trees using winter solstice Sun angles — shading loss often exceeds the yield gain from correcting tilt angle on a partially shaded plane.
  5. If multiple roof planes exist, compare yield across orientations. Sometimes the secondary roof plane at a better tilt angle and azimuth consequently outperforms the primary plane, even at a smaller usable area.

6.2 Flat Roof Installations — Full Tilt Angle Freedom

Flat-roof commercial buildings have complete freedom to set any solar panel tilt angle and azimuth direction. Best practices for flat roof systems:

  • Use ballasted racking to achieve the optimal tilt angle (= site latitude) without roof penetrations. Ballasted systems are reversible and avoid waterproofing risk.
  • Orient all rows in the true south direction (Northern Hemisphere) or true north (Southern Hemisphere) before setting the tilt angle — direction lock-in is permanent once installed.
  • Apply correct inter-row spacing to prevent self-shading. The minimum row gap = panel height × sin(tilt angle) / tan(winter solstice solar altitude angle at the site latitude).
  • In very hot climates, a tilt angle of 10–15° rather than the full latitude value reduces wind uplift loads and soiling accumulation at the cost of a 2–5% yield reduction — often acceptable in exchange for lower structural requirements.
SunLith Energy Commercial flat roof solar panel installation with optimal tilt angle racking and correct inter-row spacing to prevent self-shading

7. Tools to Calculate Your Site-Specific Solar Panel Tilt Angle

7.1 Free Online Tilt Angle Calculators

The tilt angle values in this guide are reliable starting points derived from the latitude rule. However, every site has unique shading, horizon obstructions, albedo, and microclimate factors that therefore affect the optimal tilt angle. As a result, always use one of these authoritative free tools to confirm your site-specific solar panel tilt angle before installation:

  • PVGIS (European Commission JRC): — The gold standard for tilt angle optimisation in Europe, Africa, and Asia. Enter GPS coordinates; the tool consequently returns the optimal tilt angle, azimuth, and monthly energy yield for any fixed or tracking configuration.
  • PVWatts (NREL):— The primary tool for US sites, with global coverage. Input your tilt angle and azimuth to get annual and monthly energy output. In addition, it calculates financial payback estimates.
  • Global Solar Atlas (World Bank):— Provides irradiance maps and explicitly states the optimal tilt angle for any location worldwide. Furthermore, it is completely free with no registration required.

7.2 On-Site Verification Tools

After calculating your solar panel tilt angle using the tools above, verify it on-site before committing to a racking layout. The following tools help you confirm true south direction and check shading:

  • Solargis:— High-resolution irradiance data with tilt angle optimisation tools. Free prospecting tier available for initial screening.
  • Sun Surveyor / SunCalc: mobile and web tools for visualising the Sun’s path and checking horizon shading at your exact tilt angle and azimuth before installation day.

Once you have confirmed your solar panel tilt angle and direction, the next step is full system sizing. Use Sunlith’s Energy Storage Calculation Guide and Peak Sun Hours by Location together — both tools use your tilt-angle-corrected peak sun hours as the key input for battery and solar capacity calculations.

8. Solar Panel Tilt Angle and BESS Integration: How They Interact

SunLith Energy System diagram showing correctly tilted and south-facing solar panels feeding a Battery Energy Storage System (BESS) through a PCS with grid and load connections

The solar panel tilt angle is not an isolated parameter — it directly shapes how your BESS must be sized and controlled. Understanding this interaction prevents the common mistake of under-sizing storage to compensate for a suboptimal panel setup, or over-building solar capacity to make up for an incorrect tilt angle.

8.1 How Tilt Angle Shapes the BESS Charge Profile

A south-facing array at the correct solar panel tilt angle (= site latitude) produces a symmetrical bell-curve output peaking at solar noon. This predictable profile makes BESS scheduling highly efficient: the charge controller begins ramping up in the early irradiance rise, reaches full state of charge before midday peak, and begins discharging as afternoon irradiance declines. The Power Conversion System (PCS) manages this charge-to-discharge transition bidirectionally, responding to real-time irradiance readings and grid price signals. An incorrect tilt angle that flattens or shifts the generation curve forces the PCS to operate across a wider, less predictable range — reducing dispatch efficiency.

8.2 East-West Split Arrays and Tilt Angle with BESS

When a ridge-line roof forces an east-west split, the tilt angle on each plane becomes even more important. A steeper tilt angle on the west plane (closer to site latitude) captures more afternoon irradiance and complements a BESS discharging into the evening peak. East-facing panels at a shallower tilt produce a morning surge ideal for charging the BESS before the midday load period. Matching tilt angles to each plane’s orientation and season is the most cost-effective optimisation step before adding storage.

8.3 Tilt Angle Errors Increase Required BESS Capacity

Every degree of tilt angle error that reduces annual solar yield must be compensated by either more panel capacity or more battery storage — both add cost. A correctly set solar panel tilt angle is the cheapest system optimisation available. For complete sizing methodology using tilt-angle-corrected peak sun hours, see the Sunlith How to Choose Solar Panels and Batteries guide and the kWp vs kWh Solar Guide.

9. Frequently Asked Questions on Solar Panel Tilt Angle

What is the correct solar panel tilt angle for my location?

The correct solar panel tilt angle for a fixed system is equal to your site’s geographic latitude. For example: New York (41°N) → tilt angle 41°; London (51.5°N) → tilt angle 52°; Dubai (25.2°N) → tilt angle 25°; Sydney (33.9°S) → tilt angle 34°. In equatorial regions below 15° latitude, use a minimum tilt angle of 10–15° for panel self-cleaning regardless of latitude. See the full city database in Section 4 for your specific location.

What direction should the solar panel face at the correct tilt angle?

In the Northern Hemisphere, set the tilt angle facing TRUE SOUTH (azimuth 180°). In the Southern Hemisphere, set the tilt angle facing TRUE NORTH (azimuth 0°). At equatorial latitudes (within 5° of the equator), the tilt angle is the primary variable and the facing direction matters far less. Always calibrate to true geographic south, not magnetic compass south, as magnetic declination can introduce several degrees of error.

Does changing the solar panel tilt angle by season improve output?

Yes. Adjusting the tilt angle seasonally can improve annual yield by 5–10% compared to a fixed tilt angle at latitude. In winter, increase the tilt angle by 10–15° above latitude to compensate for the lower Sun. In summer, reduce the tilt angle by 10–15° below latitude. Adjustable racking systems or dual-axis trackers automate this optimization. For fixed systems, the latitude-matched tilt angle remains the best single setting for maximum annual energy.

What solar panel tilt angle should I use on a flat roof?

On a flat roof, you have complete freedom to set any tilt angle. Use your site latitude as the target tilt angle. In very hot or dusty climates, a tilt angle of 10–15° is often used to reduce wind load and racking cost, with only a 2–5% yield reduction. For latitudes above 35°, always use the full latitude-matched tilt angle for maximum winter performance.

Does a wrong solar panel tilt angle really make a significant difference?

Yes — significantly. A tilt angle that is 20° too shallow or too steep can reduce annual yield by 8–15% in temperate climates and by 15–25% at high latitudes above 50°. Over a 25-year system life, that compounds into a very large energy and revenue loss. Correcting the tilt angle at installation costs nothing — correcting it post-installation on a racked rooftop system can require new mounting hardware.

What solar panel tilt angle should I use in Australia?

In Australia, face panels TRUE NORTH and set the tilt angle equal to your site latitude. Sydney (34°S) → tilt angle 34°, Melbourne (38°S) → 38°, Brisbane (27.5°S) → 28°, Perth (32°S) → 32°, Darwin (12.5°S) → 13°, Adelaide (35°S) → 35°, Canberra (35.3°S) → 35°. Use PVGIS or PVWatts for site-specific validation, especially if your roof pitch differs significantly from your latitude value.

Conclusion: Get the Solar Panel Tilt Angle Right First — Everything Else Follows

The Universal Tilt Angle Rules

The solar panel tilt angle is the most underrated variable in solar system design. It costs nothing to set correctly at installation. However, a wrong tilt angle silently drains 10–40% of your system’s lifetime output depending on your latitude. As a result, getting it right before installation is the single highest-ROI decision in solar system design. The rules are simple and consistent everywhere on Earth:

  • Set solar panel tilt angle = your site latitude for maximum annual yield.
  • Northern Hemisphere: combine that tilt angle with true south facing (azimuth 180°).
  • Southern Hemisphere: combine that tilt angle with true north facing (azimuth 0°).
  • Equatorial zone: use a minimum tilt angle of 10–15° regardless of latitude — never install flat.
  • High latitudes (above 55°): steepen the tilt angle toward 60–70° to capture the low winter Sun.

Your Next Steps

First, use the world city database in Section 4 to find your city’s recommended tilt angle. Then validate it with PVGIS or PVWatts using your exact GPS coordinates and horizon data. As a result, you will have a site-specific confirmed tilt angle rather than a generic approximation. Finally, size your complete system — panels, inverter, and BESS — using tilt-angle-corrected peak sun hours as the foundational input for all capacity calculations.

The solar panel tilt angle is therefore where correct solar design begins. In addition, use Sunlith’s Energy Storage Calculation Guide and Peak Sun Hours by Location to complete your system sizing with the same engineering rigour.

SunLith Energy liquid-cooled BESS 0.5C vs 1C cycle life (LFP Data)

0.5C vs 1C Cycle Life in Liquid-Cooled BESS (LFP Data)

Choosing a charge rate for a battery energy storage system affects more than dispatch speed; it determines how long the asset lasts and what it costs to keep running. This comprehensive engineering guide compares liquid-cooled BESS 0.5C vs 1C cycle life using published LFP cell data, real thermal load calculations, and DCIR degradation analysis to give EPCs, developers, and asset managers the technical foundation they need to write a bankable specification. All cycle figures refer to LFP prismatic cells — the dominant technology in grid-scale and C&I liquid-cooled BESS today.

C-rate is defined here using the standard BESS C-rate definition — the ratio of power to energy capacity expressed as a multiple per hour. A 1C rate on a 1,000 kWh BESS means the system draws or delivers 1,000 kW. A 0.5C rate on the same system means 500 kW over two hours.

SunLith Energy Infographic of a BESS discharge loop showing 0.5C path: battery modules → BMS → PCS → load/grid, with thermal management and heat rejection; 8% total loss appears on left. A second, lower path shows 1C discharge with 12% loss and similar components to compaire liquid-cooled BESS 0.5C vs 1C cycle life

What Is C-Rate and Why Does It Matter for Cycle Life?

Why 1C Heat Generation Grows Faster Than 0.5C BESS Expectations

Heat inside a lithium-ion cell scales with the square of current. This is the I²R relationship. Doubling the C-rate from 0.5C to 1C therefore quadruples cell-level heat generation — not doubles it. Moreover, liquid cooling becomes essential above 0.5C because air cooling cannot remove heat fast enough to keep cells below the 35°C threshold needed for rated cycle life.

However, the heat penalty does not stop at the cell level. System efficiency also falls at higher C-rate. Both effects compound simultaneously. The formula below shows how to size the thermal management loop for each rate.

Pheat = Pdischarge × (1 − ηone-way)

Where:
  Pheat      = Thermal power the cooling loop must reject (kW)
  Pdischarge = Rated discharge power (kW) = C-rate × Capacity (kWh)
  ηone-way   ≈ √RTE (One-way efficiency, from round-trip efficiency)

At 0.5C:
  RTE ≈ 92% → ηone-way ≈ 0.959 → Pheat = Pdischarge × 0.041

At 1C:
  RTE ≈ 88% → ηone-way ≈ 0.938 → Pheat = Pdischarge × 0.062

Result: Moving from 0.5C to 1C increases continuous thermal rejection by ~50% per second.

Consider a 1 MWh system. At 0.5C, P_discharge = 500 kW and the cooling loop must reject roughly 20.5 kW. At 1C, P_discharge = 1,000 kW and the cooling load rises to roughly 62 kW — a 3× increase in absolute thermal load, not 2×. Both the power level and the efficiency penalty increase together. Consequently, a cooling system sized for 0.5C is materially undersized when the operator later dispatches the same asset at 1C.

Practical Takeaway: Sizing the Cooling Loop

Cold-plate loops for 0.5C typically need 8–15 litres per minute per module. At 1C, that requirement rises to 15–25 L/min. Furthermore, the heat exchanger, pump, and glycol reservoir must all be upsized accordingly. Under-specifying the cooling loop is one of the most common causes of field degradation exceeding warranted projections.

Therefore, always specify the maximum continuous C-rate in the thermal management scope of work — not the average dispatch rate. For detailed TMS component sizing, see the C&I BESS thermal management guide.

How Liquid Cooling Interacts with C-Rate Stress

0.5C Operation: Steady-State Thermal Comfort

When evaluating liquid-cooled BESS 0.5C vs 1C profiles, the 0.5C operation represents a state of steady thermal comfort where a well-designed cooling loop easily keeps module temperatures in the 20–30°C optimal band. It does this with low coolant flow rates and minimal pump parasitic load. Heat generation is steady. The electrochemical stress on the LFP cathode, graphite anode, and separator stays well within the cell design envelope. Consequently, cycle life aligns closely with manufacturer specification.

1C Operation: Where the Cooling Loop Is Tested

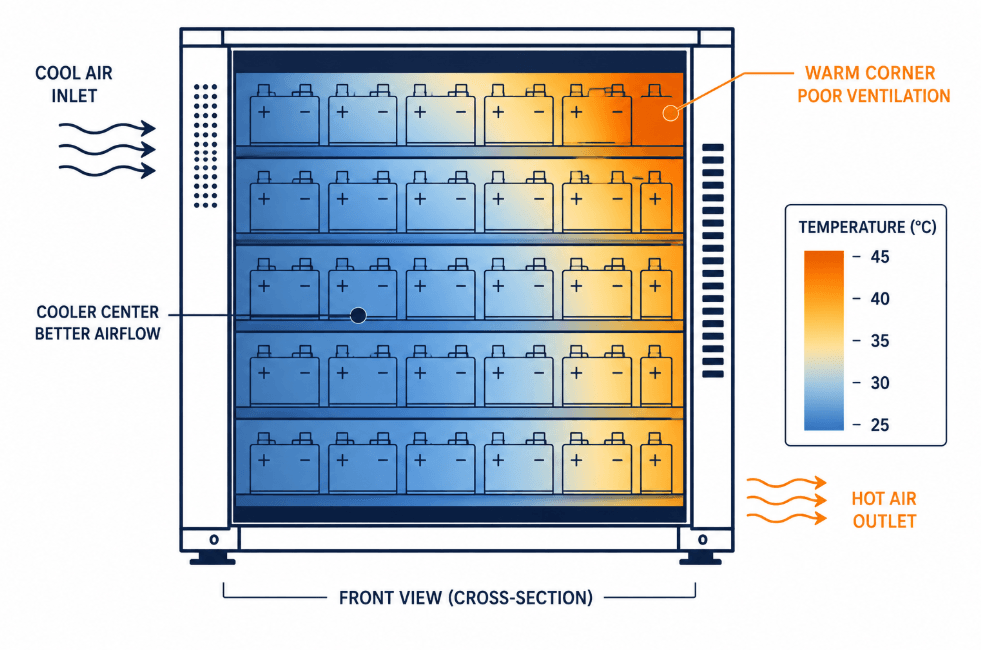
At 1C, heat generation rises substantially. Looking at liquid-cooled BESS 0.5C vs 1C dynamics, the formula shows that moving to a 1C rate increases thermal strain by more than a simple doubling. The coolant loop must run harder. Higher flow rates, lower coolant inlet temperature, and more frequent pump cycling are all necessary. Additionally, any partial blockage of a cold plate channel creates a localised hot spot. The BMS may not detect this fast enough to prevent accelerated cell ageing.

Key Engineering Specification for 1C Liquid-Cooled BESS
The cooling system must reject up to 50% more thermal energy per second than a 0.5C equivalent.
All cells must stay below 35°C. Module-level ΔT must remain ≤3°C at peak ambient temperature (typically 40–45°C for outdoor containerised systems).
A cooling loop sized only for 0.5C will deliver shorter cycle life when dispatched at 1C.

Liquid-Cooled BESS 0.5C vs 1C Cycle Life: The Data

The table below draws on manufacturer specifications for 280Ah and 314Ah LFP prismatic cells, including the EVReporter BESS cycle-life dataset. Values marked (*) are interpolated from published trend data. Note that 1C BESS-level specifications are less commonly published because most manufacturers rate their systems at 0.5C.

SunLith Energy Bar charts comparing liquid-cooled BESS 0.5C vs 1C cycle life at Cell level and BESS level
Parameter0.3C/0.3C0.5C/0.5C1C/1CNotes
Cell-level cycles to 80% SoH (100% DoD, 25°C)10,0008,000~4,000–5,000*Manufacturer datasheet
Cell-level cycles to 70% SoH (100% DoD, 25°C)15,00012,000~6,500*Cell level only
BESS-level cycles to 70% SoH (90% DoD, ≤35°C)8,0006,000~3,500–4,000*Includes calendar ageing
Calendar life at BESS levelUp to 20 yrsUp to 15 yrs~10–12 yrs*Liquid-cooled, ≤35°C
Heat generated per cycleLowModerateHighScales with I²R
DCIR rise rate (relative to 0.3C baseline)Baseline+15–25%+30–50%*SEI-driven resistance growth
Cell ΔT in liquid-cooled system<3°C<3°C3–6°C*Higher at 1C without adequate flow
Round-trip efficiency (liquid-cooled)~92–93%~91–92%~88–90%Lower at 1C due to I²R
Typical grid applicationArbitrage (4-hr)Frequency reg. / solarFast-response / C&I peak shaving

* 1C BESS-level figures are extrapolated from cell-level trend data and peer-reviewed fast-charging studies. DCIR rise values are relative to 0.3C baseline; absolute values vary by manufacturer and operating temperature.

Three findings stand out. First, moving from 0.5C to 1C cuts cell-level cycle life by roughly 37–50% at the 80% SoH threshold. Second, the BESS-level penalty is proportionally worse. Calendar ageing, thermal gradients, cell imbalance, and DCIR rise all compound the stress at system level. Third, DCIR grows 30–50% faster at 1C than at baseline. This matters because rising DCIR causes voltage sag — an effect that reduces usable capacity well before the cell reaches 80% SoH.

Consider a 10 MWh BESS cycled once per day. At 0.5C, it accumulates 7,300 equivalent full cycles over 20 years. The 6,000-cycle BESS warranty covers most of that period. However, at 1C, the ~3,500–4,000-cycle BESS warranty runs out after roughly 10–11 years. Mid-life augmentation then becomes unavoidable — and expensive.

Four Degradation Mechanisms in 0.5C vs 1C BESS Assets

Understanding why 1C cycling degrades LFP cells faster helps with both cell selection and BMS configuration. According to Energy-Storage.News, higher C-rates drive four distinct degradation pathways.

SunLith Energy Infographic cross-section of an LFP prismatic cell showing positive/negative terminals, SEI growth, lithium plating risk zone, heat pathways, and labeled components (anode, cathode, separator, copper/aluminum current collectors).

1. SEI Layer Growth

The solid electrolyte interphase (SEI) forms on the graphite anode during the first cycle. It keeps growing throughout cell life. SEI growth consumes lithium irreversibly, reducing usable capacity. Higher C-rates accelerate this in two ways. They raise cell temperature and increase local current density at the anode. Both effects thicken the SEI faster. As a result, liquid cooling’s primary role in 1C BESS is to suppress the temperature component of this growth.

2. DCIR Rise and Voltage Sag — the Hidden Cycle Life Cost

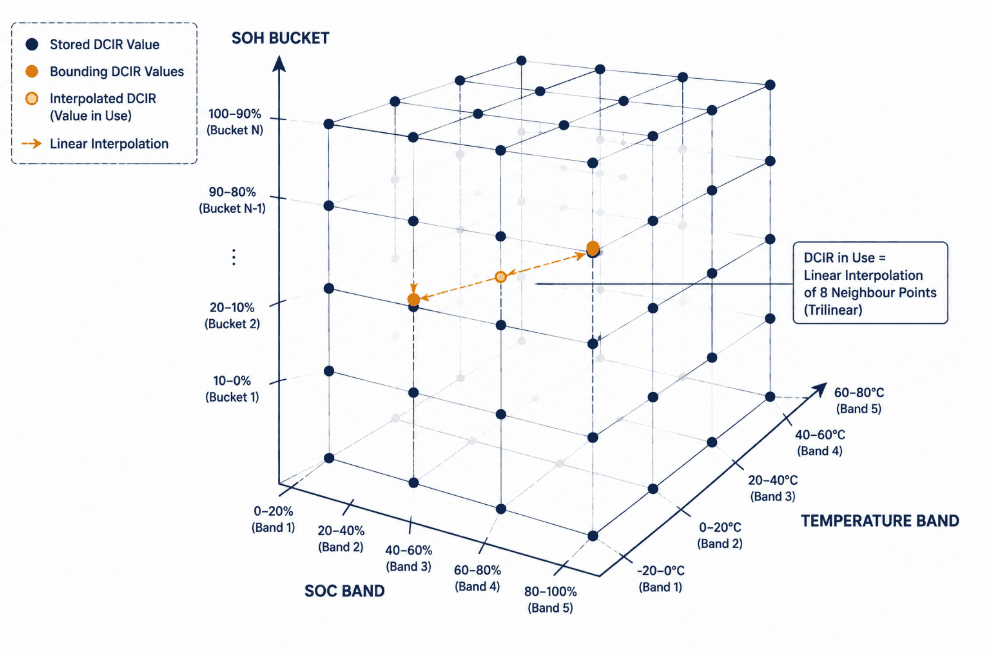
Direct Current Internal Resistance (DCIR) is the most operationally significant metric for a deployed BESS. It combines ohmic resistance, charge-transfer resistance at the electrode-electrolyte interface, and diffusion polarisation. In a new LFP prismatic cell, DCIR typically sits at 0.10–0.25 mΩ per Ah of rated capacity. The Sunlith DCIR technical article covers IEC 61960-standard measurement in detail.

At 1C, SEI growth accelerates — and each nanometre of additional SEI adds ionic transport resistance. DCIR rises faster as a result. Moreover, elevated temperature (harder to suppress at 1C even with liquid cooling) further accelerates this resistance drift.

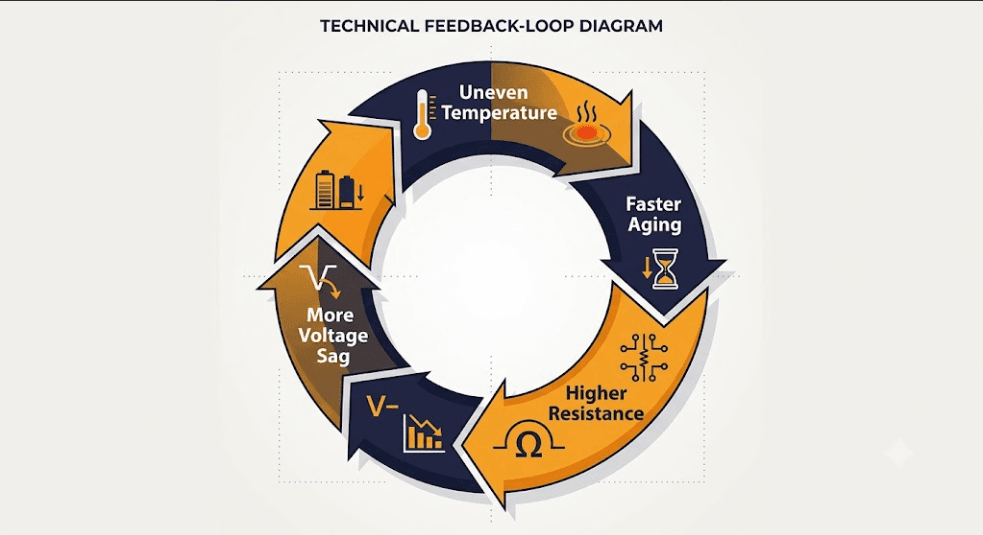
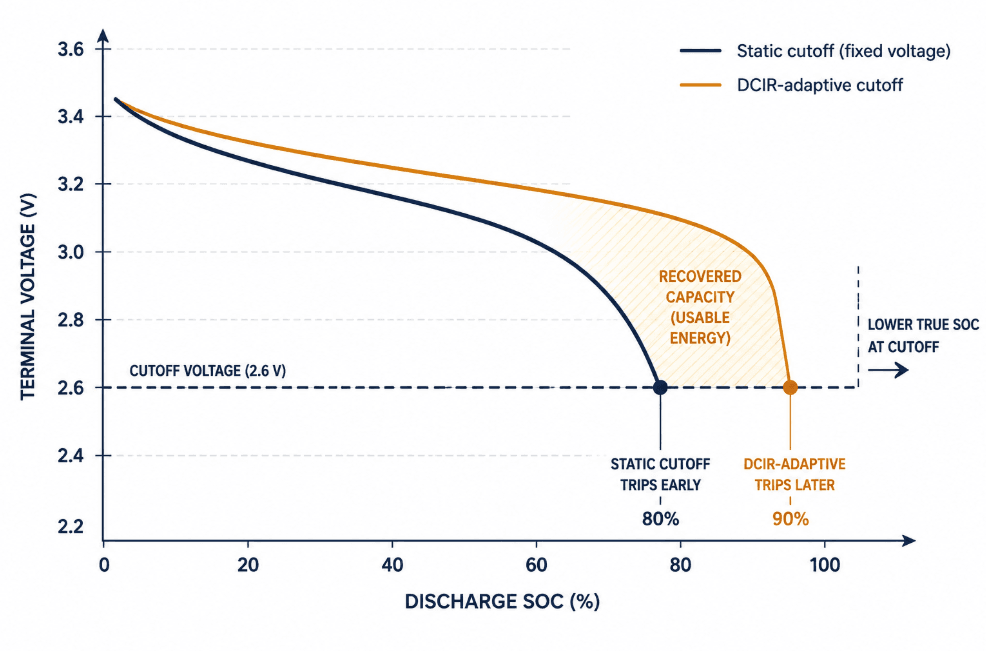
Rising DCIR causes voltage sag. The voltage drop under load equals V_sag = I × DCIR. At 1C, discharge current is double that of 0.5C. Therefore, the same DCIR increase produces twice the voltage drop. In practice, this triggers the inverter’s low-voltage cutoff — typically 2.5–2.8V per cell — at a higher residual SoC than intended. The discharge cycle ends early. Consequently, the usable SoC window shrinks from, say, 10–90% to roughly 15–85%. That lost throughput compounds over project life, reducing effective revenue by 10–15% before the cell even reaches 80% SoH.

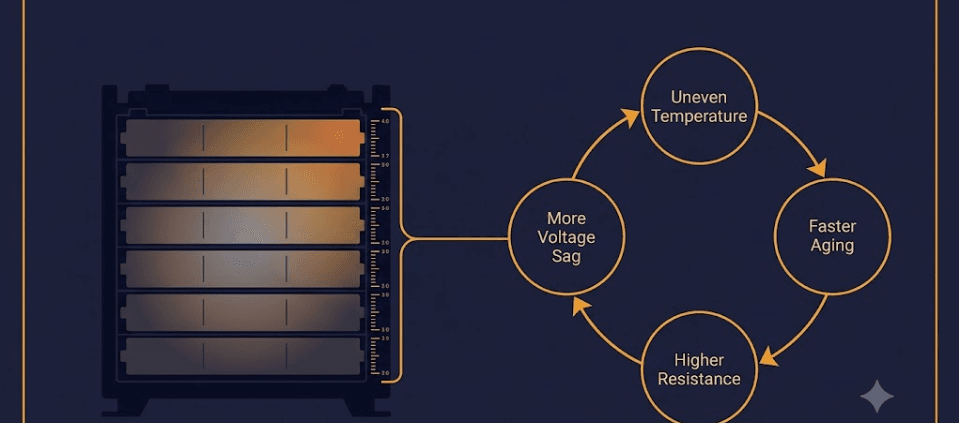
DCIR → Voltage Sag → Effective SoC Shrinkage
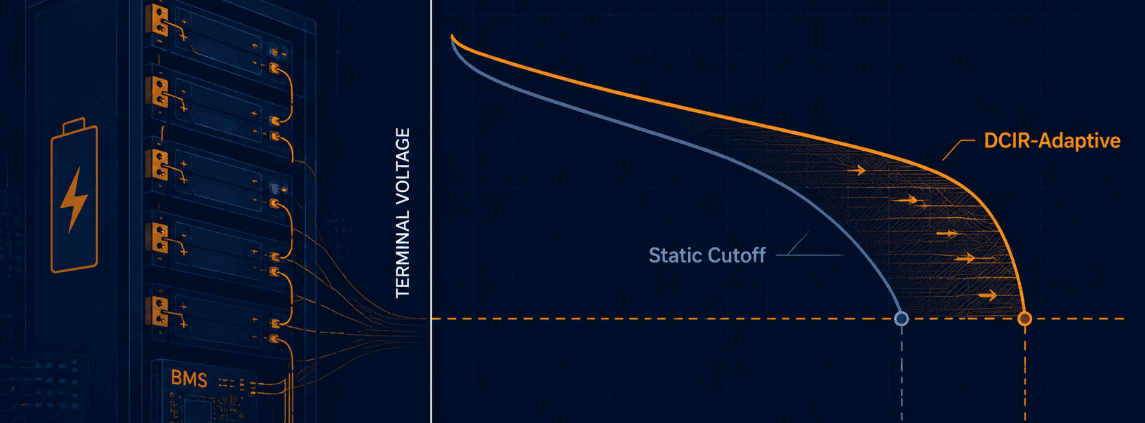
A BMS that tracks per-cell DCIR and adjusts the voltage cutoff dynamically can recover a significant portion of this lost SoC window.
This DCIR-adaptive cutoff is one of the highest-value firmware configurations for 1C liquid-cooled BESS assets.
SunLith Energy Thermal illustration and DCIR curve

3. Lithium Plating on the Anode

When charge current exceeds the anode’s intercalation rate, metallic lithium plates on the graphite surface instead of inserting into it. This is irreversible. It can also lead to dendritic growth that eventually penetrates the separator — the main path to internal short circuits. At 0.5C, LFP cells stay well within the safe intercalation envelope. At 1C, that margin narrows. Furthermore, if the cooling system is undersized, elevated temperature narrows the margin further, making thermal management the deciding factor in liquid-cooled BESS 0.5C vs 1C longevity.

4. Mechanical Stress and Electrode Cracking

LFP cathode particles expand and contract as lithium ions move in and out. Higher C-rates speed up this mechanical cycling. Cumulative electrode stress rises as a result. Research in ScienceDirect confirms that fast-charging produces macroscopic electrode detachment and microscopic particle cracking alongside SEI growth. LFP’s olivine structure resists this better than NMC. However, the effect is still measurable at sustained 1C operation.

Together, these four mechanisms explain why the cycle-life gap between 0.5C and 1C is not linear. Liquid cooling suppresses the thermal contribution. However, it cannot eliminate the electrochemical stress, DCIR accumulation, or mechanical fatigue that higher current imposes on the cell.

How Liquid Cooling Mitigates 1C BESS Cycle Life Degradation

What the TMS Controls

Liquid cooling does not eliminate the 1C cycle-life penalty, but it cuts it significantly compared to air-cooled 1C operation. Research shows that liquid cooling reduces peak cell temperature by approximately 3°C at moderate C-rates. Additionally, it nearly doubles attainable cycle life versus unmanaged thermal conditions. However, the margin shrinks at 1C, so correct TMS sizing becomes critical.

For a 1C liquid-cooled LFP BESS, four parameters determine how well the TMS performs: inlet coolant temperature (target 20–25°C), coolant flow rate sized to keep ΔT below 3°C, cold plate contact area and thermal resistance, and BMS curtailment of discharge above 38–40°C per cell.

Industry Benchmark — CATL EnerOne
CATL’s EnerOne liquid-cooled system limits cell-to-cell ΔT to 3°C across the module stack.
This enables a warranted 10,000-cycle life at 1C for the 280Ah cell.
Achieving comparable performance at 1C with a less capable TMS is not supported by published data.

Immersion vs Cold Plate at 1C

Immersion cooling — direct cell contact with a dielectric fluid — reduces degradation further than cold-plate systems at high C-rates. Data from EticaAG’s immersion cooling research shows a 22% battery life extension versus cold-plate cooling. Moreover, immersion eliminates localised hot spots entirely by surrounding every cell surface with fluid.

Nevertheless, immersion cooling carries higher capital cost. It is therefore used primarily in data centre UPS and research installations rather than grid-scale BESS. For most C&I projects, cold-plate liquid cooling is the appropriate balance of cost and performance. The C&I BESS thermal management guide covers sizing requirements in detail.

Which C-Rate Fits Your Application?

C-rate selection must match the application’s power-to-energy ratio — not simply the lowest purchase price. A system specified at 0.5C and dispatched at 1C will fail to meet its warranted cycle life. Conversely, a 1C system used only for overnight arbitrage at 0.25C wastes capital on oversized power electronics.

SunLith Energy Top 5 BESS Application C-rate Spectrum infographic.
ApplicationRecommended C-RateExpected BESS CyclesLiquid Cooling Tier
Grid arbitrage (4-hour)0.25C–0.5C8,000–10,000+ cell-levelCold plate, ΔT <3°C
Solar farm smoothing0.5C8,000 cell / 6,000 BESSCold plate, ΔT <3°C
Frequency regulation (2-hour)0.5C–1C5,000–8,000 BESSCold plate or enhanced liquid
C&I peak shaving (1-hour)1C4,000–5,000 BESSCold plate, higher coolant flow
EV fast-charge buffer2C–3C<3,000 BESSImmersion or high-flow cold plate

Frequency regulation sits at 0.5C–1C because market requirements vary. UK FFR and Australian FCAS markets need sub-second response, so 1C is justified. US CAISO and MISO markets are often serviceable at 0.5C. Always confirm the specific market’s power-to-energy ratio before finalising the C-rate specification. For a full breakdown, see the BESS C-rate guide.

LCOS and Project Finance: The Cost of Getting C-Rate Wrong

Augmentation Timing

LCOS depends on total energy throughput divided by lifetime cost. That lifetime cost includes capital, augmentation, and O&M. A system that exhausts its warranted cycle count in half the intended project life triggers mid-life augmentation — typically 20–35% of original capital cost. This single event can materially damage project returns.

Consider a 10 MWh system at $250/kWh installed ($2.5M total). At 0.5C with 6,000 BESS-level cycles, augmentation is deferred to roughly year 16–18. At 1C with ~3,500–4,000 BESS-level cycles, augmentation arrives at year 9–10. That earlier event costs approximately $600,000–$850,000. Furthermore, it must be modelled in the financial plan from day one.

RTE and DCIR Revenue Loss

Round-trip efficiency differences also compound over time. A liquid-cooled LFP BESS achieves roughly 91–92% RTE at 0.5C versus 88–90% at 1C. Over 20 years at one cycle per day, a 2-percentage-point gap represents approximately 1,460 MWh of lost throughput on a 10 MWh system.

Additionally, DCIR-driven voltage sag reduces the effective SoC window by 10–15% in mid-to-late project life at 1C. This compounds the revenue shortfall beyond what the RTE difference alone would predict. Consequently, LCOS models that account only for RTE — and not DCIR-driven capacity erosion — will consistently underestimate the true cost of 1C operation. For a project-level cost breakdown, see the C&I BESS thermal management article.

BMS and EMS Settings That Protect Cycle Life

The battery management system (BMS) is the first line of defence for cycle life at any C-rate. At or near 1C, these six settings directly affect degradation rate:

  • Temperature de-rating: Automatically derate current when any cell exceeds 35°C. Step down to 0.5C above 38°C. Halt discharge above 45°C. Without this, summer peak events push cells into the accelerated degradation zone.
  • DCIR-adaptive voltage cutoff: Adjust the discharge termination voltage in real time based on measured DCIR. As DCIR rises over thousands of cycles, this prevents the inverter from cutting off early due to resistive voltage sag — recovering up to 10% of effective throughput in mid-to-late project life.
  • SoC window management: Restrict operation to 10–90% SoC rather than 0–100%. The marginal capacity gained by widening the SoC window at 1C does not offset the electrode stress cost.
  • Cell-to-cell voltage balancing: Set balancing thresholds to ±5mV rather than ±10mV. At 1C, voltage polarisation amplifies cell divergence during high-rate events and can mask true SoC.
  • Coolant temperature monitoring: Log and alarm on coolant inlet temperature deviations. A 3°C rise in inlet temperature at 1C translates to a 5–7°C rise in peak cell temperature — enough to push the system outside the warranty envelope.
  • Cycle and throughput logging: Track both cycle count and energy throughput (MWh) alongside DCIR trend data. Use these to trigger augmentation planning before field performance diverges from the financial model.

For grid-scale projects, the EMS dispatch algorithm should include a C-rate override that blocks 1C dispatch when ambient conditions prevent the TMS from maintaining ΔT below 3°C. This is especially important during summer peaks, when grid dispatch urgency and ambient temperature peak together. For more on how BMS, EMS, and TMS integrate at the system level, see the microgrid BESS technical guide.

Frequently Asked Questions

Does liquid cooling eliminate the 0.5C vs 1C cycle life gap?

No. Liquid cooling reduces the thermal component of degradation at 1C. However, it cannot eliminate the electrochemical stress — SEI growth, DCIR rise, lithium plating risk, and electrode mechanical strain — that increases with current. Published LFP data consistently shows a 37–50% reduction in cell-level cycle count at 80% SoH when moving from 0.5C to 1C, even with best-in-class liquid cooling.

What cycle life does a liquid-cooled LFP BESS achieve at 0.5C?

Published data for 280Ah and 314Ah LFP prismatic cells shows approximately 6,000 BESS-level cycles to 70% SoH at 0.5C/0.5C, 90% DoD, and ambient temperatures up to 35°C — with calendar ageing included. At the 80% SoH threshold, cell-level data shows 8,000 cycles at 25°C.

How does DCIR rise affect a 1C liquid-cooled BESS over time?

As DCIR grows from SEI accumulation, the voltage drop under 1C discharge doubles versus 0.5C for the same resistance increase. The inverter’s low-voltage cutoff triggers at a higher residual SoC. This shrinks the usable SoC window by 10–15% in mid-to-late project life. A DCIR-adaptive voltage cutoff in the BMS firmware can recover a significant portion of this lost throughput.

How do I calculate the cooling load difference between 0.5C and 1C?

Use P_heat = P_discharge × (1 − √RTE). At 0.5C with 92% RTE, a 1 MWh system rejects roughly 20.5 kW. At 1C with 88% RTE, that rises to roughly 62 kW — a 3× increase, not 2×. Always size the cooling loop for the maximum continuous C-rate, not the average dispatch rate.

Which applications justify 1C despite the shorter cycle life?

Applications with revenue tied to peak power — frequency regulation in FFR or FCAS markets, C&I peak demand charge reduction, and high-power grid-stabilisation services — can justify 1C. The key test is whether the revenue uplift from 1C dispatch outweighs the higher LCOS from shorter cycle life, earlier augmentation, and DCIR-driven SoC shrinkage.

Conclusion

The comparison of liquid-cooled BESS 0.5C vs 1C cycle life reveals a clear and consequential difference. Moving from 0.5C to 1C cuts cell-level cycle count by 37–50% at the 80% SoH threshold. The BESS-level penalty is larger still because calendar ageing, thermal gradients, and DCIR accumulation all compound on top of the C-rate stress.

Liquid cooling is essential for any BESS operating above 0.5C. However, it mitigates the degradation penalty — it does not eliminate it. The thermal sizing formula in this guide gives procurement teams a concrete starting point. The DCIR-adaptive BMS setting gives asset managers a practical tool to recover lost throughput in mid-project life.

Sunlith Energy provides technical consultancy for BESS specification, thermal management design, and lifecycle modelling. Contact us to discuss the right C-rate design for your project.

SunLith Energy Iron-air battery LCOS cost breakdown diagram showing CapEx O&M and charging cost components

The Cost of 100-Hour Energy Storage: Breaking Down Iron-Air LCOS

Iron Air Battery LCOS: Why This Number Defines Grid Storage Economics

Iron air battery LCOS — the Levelised Cost of Storage — is the single most important number for evaluating 100-hour grid energy storage. Most analysts start with capital cost per kWh. However, capital cost alone tells only part of the story. LCOS captures everything: upfront cost, operating expenses, charging cost, efficiency losses, and project life. Together, these inputs produce one number: the minimum revenue per MWh a storage project must earn to break even.

Iron-air batteries target an LCOS of $20–40/MWh for 100-hour discharge. That figure would place iron-air below natural gas peaker plants, below pumped hydro in most regions, and at roughly one-fifth the LCOS of lithium-ion at equivalent duration. Furthermore, it would do this without relying on lithium, cobalt, or any scarce critical mineral.

This article breaks down the iron air battery LCOS from first principles. Specifically, it covers the formula, each cost component, how iron-air compares to competing technologies, and what real-world project data shows. For a foundation on how iron-air cells work, see our guide on what is an iron-air battery.

Why Iron Air Battery LCOS Matters More Than CapEx

Capital expenditure is easy to compare. Iron-air targets $20/kWh system cost. LFP lithium-ion costs $125–200/kWh fully installed. That gap is real. However, CapEx alone does not drive the right procurement decision.

Four Costs CapEx Misses in Iron-Air Battery LCOS

Consider what CapEx fails to capture:

  • Round-trip efficiency (RTE) penalty: Iron-air runs at 50–60% RTE. Consequently, developers must buy roughly twice the charging energy to deliver each MWh.
  • Charging cost: A gas generator pays for fuel only when it runs. A battery must purchase or generate the electricity it stores. Therefore, charging cost per MWh delivered rises as RTE falls.
  • Cycle count: Lithium-ion cycles 250–365 times per year. Iron-air cycles just 20–50 times. As a result, each dollar of iron-air CapEx spreads across far less energy throughput.
  • Project life: A 20-year asset life spreads CapEx further. Nevertheless, O&M costs accumulate and must be discounted. Net present value of all costs determines the true LCOS.

How LCOS Combines All Four Factors

LCOS captures every dynamic in one number. According to PNNL’s LCOS Estimates database, LCOS equals total lifetime costs divided by cumulative delivered energy — both discounted to present value. In other words, it shows the minimum revenue per MWh the system must earn to achieve a net present value of zero.

This makes LCOS the right basis for comparing iron-air to gas peakers. Developers compare the iron air battery LCOS against the LCOE of the asset the battery replaces. For more context on how long-duration energy storage (LDES) technologies compete with firm generation assets, see our full LDES guide.

The Iron Air Battery LCOS Formula: How Costs Break Down

The LCOS formula — as applied by Lazard, NREL, and PNNL — follows this structure:

LCOS ($/MWh) = [CapEx + NPV(O&M) + NPV(Charging Cost) + NPV(Augmentation)] ÷ NPV(Total Energy Discharged)

Each component carries a specific cost for battery energy storage systems (BESS). The table below maps each LCOS input to its iron-air battery value.

LCOS ComponentDescriptionIron-Air Battery Value / Note
CapEx — Cell StackCost of iron anode, bifunctional air cathode, aqueous KOH electrolyte, and cell housing~$7–10/kWh at commercial scale — iron’s material abundance is the primary cost driver
CapEx — Balance of System (BOS)Civil works, cabling, switchgear, structural enclosures, transformers~$5–8/kWh — land footprint is larger than lithium-ion, raising civil costs per kWh
CapEx — PCSPower Conversion System: inverters, controls, grid interconnection hardware~$3–5/kWh — standard utility PCS; chemistry places no special requirements
CapEx — EPC & Soft CostsEngineering, procurement, construction, permitting, grid studies~$2–4/kWh — currently elevated; limited LDES-experienced EPC firms exist in 2026
O&M — Fixed AnnualScheduled maintenance, airflow management, electrolyte monitoring, insurance~$3–6/kW-year — lower than lithium-ion; no thermal runaway risk or flammable electrolyte
O&M — VariableElectrolyte replenishment, electrode inspection, SCADA/EMS licensingEstimated $1–3/MWh discharged over a 20-year project life
Charging CostCost of electricity used to charge the system — critical because 50–60% RTE means 40–50% is lostIron-air targets curtailed renewable charging at near-zero marginal cost: $5–15/MWh
Cycle Life / UtilisationAnnual full discharge cycles × project life = total energy throughput denominator20–50 full cycles per year (event-based, not daily); 20+ year design life
Augmentation / ReplacementMid-life stack or electrode replacement to maintain rated capacityCurrently unvalidated at commercial scale — key uncertainty in early project finance models
Discount RateCost of capital applied to future cost streams in NPV calculation7–10% for US utility storage; 10–12% for early-commercial technology with limited track record

Why Charging Cost Dominates Iron-Air LCOS Calculations

💡 Key insight: Iron-air batteries target curtailed renewable energy for charging — solar and wind output that grids would otherwise waste. In high-renewable regions, curtailed energy costs $3–15/MWh. This near-zero charging cost is the assumption behind the $20–40/MWh LCOS target. If iron-air must charge from the wholesale grid at $40–60/MWh instead, LCOS rises to $80/MWh or above.

The BESS PCS functions that manage charge/discharge cycles also affect LCOS. Specifically, PCS efficiency losses add to the effective charging cost per MWh delivered. Modern utility PCS units achieve 97–98.5% efficiency at full load, contributing a small but measurable input to the total LCOS calculation.

Iron-Air Battery CapEx: Where the $20/kWh Target Comes From

Form Energy targets a system cost of approximately $20/kWh. This is a system-level figure — it includes not just cell hardware, but civil, interconnection, and soft costs. Below, the table shows how iron-air’s $20/kWh cost divides across components, and where it differs from lithium-ion.

CapEx ComponentEstimated ShareIron-Air vs LFP Difference
Cell Stack (iron anode + air cathode + electrolyte)35–45%Iron-air cells target ~$7–10/kWh vs LFP’s $55–110/kWh. This cell-level gap is the entire basis of iron-air’s cost case.
Balance of System (civil, cabling, enclosures)20–28%Higher for iron-air due to larger land footprint and more enclosures per kWh. This partially offsets the cell cost advantage.
Power Conversion System (PCS)12–18%Similar to LFP. Standard utility PCS equipment applies to both chemistries. No meaningful difference exists at this layer.
EPC & Engineering (permitting, studies, labour)10–15%Currently elevated for iron-air. The limited pool of LDES-experienced EPC firms drives up soft costs. Costs will normalise as deployments scale.
Grid Interconnection8–12%Identical to LFP. ISOs charge the same interconnection fees regardless of storage chemistry or duration.
Contingency & Financing Costs5–8%Higher for iron-air. Lenders apply a technology risk premium to early-commercial assets. This premium will fall as operating data accumulates.

The Cell Stack Is Where Iron-Air Wins

Iron-air’s cost advantage concentrates almost entirely at the cell level. For context, iron metal costs roughly $0.10–0.15/kg. The quantity of iron per kWh of capacity is modest. As a result, cell stack cost targets $7–10/kWh at commercial scale. By contrast, LFP cells alone cost $55–110/kWh — six to fifteen times more.

However, the BOS cost per kWh runs higher for iron-air than for lithium-ion. Lower energy density means more land, more enclosures, and more civil work per kWh of capacity. This partially offsets the cell-level advantage. According to NREL grid storage benchmarks, balance-of-system costs represent 20–28% of total installed cost for utility-scale storage. For iron-air, the larger footprint pushes this toward the upper end of that range.

The full BESS specifications guide covers how system-level specs — including C-rate, DoD, and RTE — shape total project cost at the procurement stage.

Iron Air Battery LCOS vs Lithium-Ion, Flow, and Gas Peakers

SunLith Energy iron air battery LCOS comparison chart with lithium-ion and gas peaker at 100-hour discharge

The table below compares iron-air battery LCOS against three competing technologies. Importantly, the comparison centres on the 100-hour discharge window — the duration iron-air specifically targets.

MetricIron-AirLFP Li-ion (4hr)Vanadium Flow (10hr)Gas Peaker
System CapEx ($/kWh)~$20 (target)$125–200$300–500$800–1,200/kW
Discharge Duration100+ hours4–8 hours8–12 hoursUnlimited (fuel-dependent)
Round-Trip Efficiency50–60%85–95%65–75%N/A (heat rate ~7–10 MMBtu/MWh)
Cycles per Year20–50250–365200–300As dispatched
Project Life (years)20+1520+30+
Annual O&MLow — no thermal management cost$6–10/kW-year$8–12/kW-year$15–25/kW-year + fuel
LCOS at 4hr / daily ($/MWh)Not applicable$78–150$110–190$120–200
LCOS at 100hr / event-based ($/MWh)$20–40 (target)Not viableNot viable$150–300+ incl. carbon
Carbon Cost RiskNoneNoneNoneHigh — stranded asset risk
Critical Mineral RiskNone — iron, air, water onlyModerate — lithium supplyModerate — vanadium supplyHigh — gas price exposure

Technology Selection Is Entirely Duration-Dependent

Importantly, no single technology dominates across all discharge durations. LFP lithium-ion, in particular, suits 2–8 hour daily cycling well. Its high RTE and mature supply chain produce an LCOS of $78–150/MWh for 4-hour discharge, according to BloombergNEF’s 2026 LCOE report. However, at 100-hour durations, lithium-ion CapEx is simply too high. The low cycle count of multi-day storage events cannot spread that cost across enough energy throughput.

Iron-air, by contrast, carries low enough CapEx that even 20–50 full cycles per year produce a competitive iron air battery LCOS. This is the same logic that makes pumped hydro economic: low capital cost per kWh and low-cost energy input outweigh moderate efficiency losses. For a broader view of how grid-scale BESS procurement decisions frame technology selection, see our grid-scale BESS guide.

⚖️ The gas peaker comparison: Gas peaker LCOE runs $120–200/MWh for short-duration peak events. Add fuel volatility, carbon pricing, and stranded asset risk over a 20-year horizon and the figure rises to $150–300/MWh. Iron-air’s $20–40/MWh target for 100-hour discharge represents an 80–90% cost reduction against that benchmark. This is the commercial case behind Xcel Energy and Georgia Power’s agreements with Form Energy.

Iron Air Battery LCOS Sensitivity: Bear, Base, and Bull Cases

The $20–40/MWh iron air battery LCOS target is not guaranteed. It depends on specific assumptions — some within developers’ control, others not. The table below shows the full range of outcomes.

VariableBear CaseBase CaseBull Case
Cell Stack CapEx$30/kWh$20/kWh$12/kWh
Round-Trip Efficiency45%55%65%
Charging Cost (curtailed renewables)$20/MWh$10/MWh$3/MWh
Discount Rate (cost of capital)12%9%7%
Full Cycles per Year153050
Project Life15 years20 years25 years
Resulting LCOS ($/MWh)$55–80$20–40$10–20

Cell Stack CapEx: The Biggest Lever

Cell stack CapEx and charging cost drive the widest LCOS range of any variable. Essentially, manufacturing scale determines cell cost. As Form Energy’s Weirton, WV facility ramps production, learning-curve effects push costs from $12–18/kWh toward the $7–10/kWh long-run target. LFP manufacturing achieved a 90% cost reduction over 15 years of scaled production. Iron-air follows a similar trajectory, though the timeline remains uncertain.

Charging Cost: A Market Design Question

Charging cost depends on grid design, not just battery technology. Iron-air generates its strongest economics when developers site projects near solar or wind assets that regularly produce curtailed energy. In California, ERCOT, and parts of the Midwest, curtailment already exceeds 10–15% of generation. The near-zero charging cost assumption holds in those regions. Where iron-air must charge from the wholesale market, LCOS rises toward the bear case.

Round-Trip Efficiency: The Medium-Term Opportunity

RTE improvement offers a clear LCOS reduction path. Research at Argonne National Laboratory and MIT targets bifunctional air cathode catalyst improvements. A 10 percentage point RTE gain — from 55% to 65% — reduces LCOS by roughly $5–8/MWh at the base charging cost. Furthermore, the DOE long-duration energy storage programme sets 70%+ RTE by 2030 as an explicit target under the Long Duration Storage Shot initiative.

Real-World Iron Air Battery LCOS: Projects and Commercial Data

As of mid-2026, iron air battery LCOS remains largely a projection. However, the first commercial deployments now generate real operating data. Specifically, these projects will either validate or revise the $20–40/MWh target.

ProjectCapacityPartnerLCOS Significance
Cambridge Energy Storage (MN)150 MWhGreat River EnergyFirst commercial iron-air system; commissioned late 2025. Multi-year performance study generates real cycle efficiency, degradation, and O&M cost data — the bankability foundation for all future projects.
Sherco Coal Plant Replacement (MN)10 MW / 1,000 MWhXcel EnergyFlagship 100-hour GWh-scale deployment replacing retiring coal. Sets the real-world LCOS benchmark for US utility procurement decisions.
Darbytown Station (VA)TBADominion Energy VirginiaPJM market test alongside Eos zinc-hybrid batteries. Generates direct comparative performance data vs alternative LDES technologies.
Crusoe AI Data Center Portfolio12,000 MWh (12 GWh)Crusoe Energy SystemsMarch 2026 — largest single iron-air deal globally. Demonstrates firm power for AI data centers as a new iron-air use case at undisclosed but commercially agreed LCOS.

Why the Cambridge Project Matters for LCOS Validation

The Cambridge Energy Storage Project with Great River Energy is the most important near-term data source. Great River Energy runs a multi-year performance study. Specifically, this study measures cycle efficiency, degradation rates, and O&M costs under real grid conditions. Additionally, lenders need this data to move from technology-risk financing (10–12% discount rate) to infrastructure-grade terms (7–8%). That shift alone reduces iron air battery LCOS by $4–8/MWh at the base case.

The Crusoe AI data center agreement signals a new application for iron-air. AI data centers need continuous, uninterrupted power — not just grid firming. Notably, iron-air’s 100-hour duration enables it to bridge multi-day grid contingencies for critical infrastructure. According to Form Energy’s battery technology overview, those grid studies show that hitting cost targets unlocks tens of GWh of multi-day storage demand in the US alone.

SunLith Energy Form Energy iron-air battery installation utility-scale Xcel Energy Minnesota project

IRA Incentives: How Tax Credits Reduce Iron Air Battery LCOS

Notably, the US Inflation Reduction Act (IRA) improves iron air battery LCOS through two direct mechanisms. Together, these credits can reduce effective project cost by 30–40%.

Investment Tax Credit (ITC) for Standalone Storage

The IRA provides a 30% ITC for standalone battery storage. Consequently, iron-air projects qualify without needing solar co-location. At $20/kWh system cost, the credit equals $6/kWh. Effective CapEx therefore falls to approximately $14/kWh. In turn, this reduces iron air battery LCOS by $5–8/MWh at the base case.

Advanced Manufacturing Production Credit (45X)

Additionally, the 45X credit provides per-component tax credits for domestically manufactured battery parts. Form Energy’s Weirton, WV facility qualifies for these credits on cell components, electrodes, and modules. As a result, the credit compresses the gap between early-commercial pricing and the long-run $7–10/kWh cell target. Furthermore, it supports factory ramp-up economics during the period when production volumes remain low.

📋 ITC note: The 30% ITC applies to the full installed system cost — including BOS, PCS, and interconnection, not just the battery cells. For a 100 MWh system at $20/kWh ($2M total), the ITC reduces net project cost to $1.4M. Most iron-air projects at this stage will use tax equity partnerships to monetise the credit fully.

Iron Air Battery LCOS: Frequently Asked Questions

What is the LCOS of an iron-air battery?

Iron-air batteries target an LCOS of $20–40/MWh for 100-hour discharge. This estimate comes from Form Energy’s commercial targets and NREL benchmarking. Specifically, it assumes $20/kWh system cost, 50–60% RTE, near-zero-cost curtailed renewable charging, and a 20-year project life with 20–50 full cycles per year.

How does iron-air LCOS compare to lithium-ion?

For 4-hour daily cycling, LFP lithium-ion achieves a lower LCOS of $78–150/MWh. However, at 100-hour discharge, lithium-ion CapEx is too high. Its cost cannot spread across the low cycle count of multi-day storage events. By contrast, iron-air’s low CapEx is specifically optimised for that window. Therefore, the two technologies do not compete — they serve different duration needs.

Why is iron air battery LCOS low despite poor round-trip efficiency?

Cell-level CapEx of $7–10/kWh is the answer. That is 6–15× lower than LFP. Furthermore, iron-air charges from near-zero-cost curtailed renewables. Consequently, the efficiency penalty costs relatively little. The same logic applies to pumped hydro: low capital cost and cheap energy input outweigh moderate efficiency losses.

What are the biggest risks to the $20/MWh LCOS target?

Three risks stand out. First, slower manufacturing scale-up could keep cell CapEx above $25/kWh longer than planned. Second, higher charging costs apply if projects must buy wholesale grid electricity rather than curtailed renewables. Third, lenders may maintain technology-risk discount rates of 10–12% until operating data accumulates — raising iron air battery LCOS by $5–10/MWh versus the base case.

Is iron-air LCOS competitive with gas peaker plants?

Yes, for multi-day firming applications. Gas peakers cost $120–200/MWh for short-duration events. Add fuel volatility, carbon pricing, and stranded asset risk and that figure rises to $150–300/MWh over a 20-year horizon. Iron-air’s $20–40/MWh target therefore represents an 80–90% cost reduction. As a result, Xcel Energy and Georgia Power have both signed commercial agreements with Form Energy.

Conclusion: What the Iron Air Battery LCOS Target Means for Grid Planning

The $20–40/MWh iron air battery LCOS target is the most compelling cost proposition in long-duration storage today. No other commercially advancing technology combines 100-hour discharge, Earth-abundant materials, and a cost structure that undercuts gas peakers. Moreover, iron-air achieves this without geographic constraints — unlike pumped hydro, which needs specific terrain.

However, the target remains a projection. The Cambridge and Sherco projects generate cycle efficiency, degradation, and O&M data. That data transforms iron-air from a technology-risk asset to a bankable one. A move from 10–12% to 7–8% discount rates alone reduces iron air battery LCOS by $6–10/MWh. It therefore determines whether the base case or the bear case prevails.

For grid planners, the right framework is not ‘can iron-air hit $20/MWh?’ Instead, ask: ‘What LCOS does our procurement model require, and does our site provide high-curtailment renewable charging?’ In regions with strong IRA access, high curtailment, and multi-day capacity market products, iron-air economics already work — even at current early-commercial pricing. As Form Energy scales production through 2026–2030, iron air battery LCOS will converge on the low end of the $20–40/MWh range. Consequently, the largest shift in grid storage economics since lithium-ion displaced pumped hydro for short-duration storage may be underway.

SunLith Energy BESS PCS power conversion system for four application types: C&I commercial building, utility scale solar farm, off-grid microgrid village, and mobile trailer-mounted battery storage

BESS PCS: Functions, Features, and Why the Power Conversion System Is the Heart of Every Energy Storage Project

The BESS PCS — Power Conversion System — converts DC battery power to AC for loads or the grid. However, what a PCS must do beyond that basic job changes completely depending on the application. Consequently, choosing the wrong PCS type is one of the most expensive mistakes a project team can make.

Consider four scenarios. A factory running peak shaving needs a PCS that switches to backup mode within 20 ms. By contrast, a 200 MW grid project needs sub-200 ms frequency response and reactive power control. An island microgrid, meanwhile, needs the PCS to synthesise the AC voltage reference — because no utility connection exists at all. Finally, a mobile BESS on a trailer needs ruggedness and fast site commissioning above all else.

Therefore, this guide covers each of the four application types in detail. Furthermore, it includes a master comparison table so you can see exactly which PCS functions are mandatory, optional, or not needed for each system type. By the end, you will have a clear framework for evaluating any BESS PCS proposal.

What Is a BESS PCS?

Inside every battery energy storage system, the Power Conversion System converts DC from the battery cells to AC for loads or the grid. During charging, it reverses direction and converts AC back to DC. Crucially, both functions share a single hardware platform — hence the term bidirectional.

As Sunlith’s PCS vs. Inverter guide explains, a PCS includes far more than just a bidirectional inverter. In addition, it handles reactive power control, protection functions, grid synchronisation, and communication with the BMS and EMS. According to NLR’s Power Electronics research, the PCS is one of the most critical components in grid-connected storage — because its control functions directly determine grid stability and service quality.

Moreover, the Bidirectional Inverter vs PCS comparison on this site highlights PCS-specific capabilities — including multi-port DC support, islanding, and black start. None of these are available in a stand-alone inverter. However, which of these capabilities you actually need depends entirely on your application type.

Four Application Types at a Glance

Before diving into each type, here is a quick overview showing how the four BESS application categories differ in their primary PCS priorities.

System TypeTypical PowerGrid ConnectionPrimary PCS Priority
C&I (Behind-the-Meter)30 kW – 2 MWGrid-connected, LV/MVPeak shaving, backup power, solar integration
Utility Scale (Front-of-Meter)2 MW – 500 MW+Grid-connected, MV/HVFFR, reactive power, grid code compliance
Microgrid / Off-Grid10 kW – 50 MWIslanded or weak gridGrid-forming, black start, load following
Mobile BESS50 kW – 5 MWTemporary grid or off-gridPortability, ruggedness, fast commissioning

Master Comparison Table: BESS PCS Functions by Application Type

Use this table to compare PCS requirements across all four system types. Functions marked ✔ Mandatory must be specified and tested. Those marked ◉ Optional are recommended in certain site conditions. Those marked ✘ Not Required are not applicable to that system type.

PCS Function / FeatureC&I BESSUtility ScaleMicrogrid / Off-GridMobile BESS
Bidirectional AC-DC Conversion✔ Mandatory✔ Mandatory✔ Mandatory✔ Mandatory
Peak Shaving / Load Shifting✔ Mandatory✘ Not Required✘ Not Required◉ Optional
Seamless Transfer / UPS Mode✔ Mandatory✘ Not Required✔ Mandatory✔ Mandatory
Solar PV Integration (AC/DC)✔ Mandatory◉ Optional✔ Mandatory◉ Optional
Fast Frequency Response (FFR)✘ Not Required✔ Mandatory✘ Not Required✘ Not Required
Primary Frequency Response (PFR)✘ Not Required✔ Mandatory◉ Optional✘ Not Required
Reactive Power (Q) Control◉ Optional✔ Mandatory◉ Optional✘ Not Required
LVRT / HVRT (Ride-Through)◉ Optional✔ Mandatory✘ Not Required◉ Optional
Grid-Following Mode (GFL)✔ Mandatory✔ Mandatory◉ Optional✔ Mandatory
Grid-Forming Mode (GFM)✘ Not Required◉ Recommended✔ Critical◉ Optional
Black Start Capability✘ Not Required◉ Optional✔ Critical◉ Optional
Droop Control✘ Not Required◉ Optional✔ Critical◉ Optional
Load Following✘ Not Required✘ Not Required✔ Critical◉ Optional
Genset Synchronisation✘ Not Required✘ Not Required✔ Critical✔ Mandatory
Time-of-Use (TOU) Scheduling✔ Mandatory✘ Not Required✘ Not Required◉ Optional
Multi-Port DC Input (PV + Battery)◉ Optional✘ Not Required✔ Mandatory◉ Optional
IEC 61850 / SCADA Integration✘ Not Required✔ Mandatory◉ Optional✘ Not Required
Modbus TCP / EMS Communication✔ Mandatory✔ Mandatory✔ Mandatory✔ Mandatory
Wide DC Input Voltage Range✘ Not Required✘ Not Required✔ Mandatory✔ Mandatory
Overload Capability (150–200%)✘ Not Required✘ Not Required✔ Critical✔ Mandatory
Compact / Trailer-Mount Design✘ Not Required✘ Not Required✘ Not Required✔ Critical
Rapid Commissioning (< 4 hrs)✘ Not Required✘ Not Required✘ Not Required✔ Critical
IP55+ Outdoor Enclosure◉ Optional✔ Mandatory✔ Mandatory✔ Critical
Noise Level < 65 dB(A)✔ Mandatory✘ Not Required◉ Optional◉ Optional
NERC CIP / Cybersecurity✘ Not Required✔ Mandatory✘ Not Required✘ Not Required

Legend: ✔ Mandatory = must be specified and verified at FAT  |  ◉ Optional = recommended for certain conditions  |  ✘ Not Required = not applicable

SunLith Energy BESS PCS function comparison table infographic showing mandatory, optional, and not required functions for C&I, utility scale, microgrid, and mobile battery energy storage systems
Which PCS functions are mandatory optional or not needed This comparison covers all four BESS application types in one quick reference chart

C&I BESS PCS Functions and Features

A C&I — Commercial and Industrial — BESS sits behind the utility meter, serving loads inside a building or factory. Unlike utility systems, its PCS does not need to meet grid operator mandates. Instead, it must respond to site-level conditions to deliver financial returns. Specifically, the financial case comes from cutting demand charges, shifting energy to cheap tariff windows, and providing backup power during outages.

SunLith Energy C&I BESS PCS single-line diagram showing bidirectional power flow between utility meter, solar PV inverter, BESS battery cabinet, and commercial building AC load panel for peak shaving and seamless backup transfer
In a CI system the PCS manages power flow between the utility meter solar array and site loads all simultaneously

Peak Shaving and Time-of-Use Scheduling

Peak shaving is the most financially important C&I BESS PCS function. Demand charges can account for 30–50% of a commercial electricity bill. Therefore, the PCS charges the battery during low-demand periods and then discharges during peak demand to reduce the demand reading at the meter. Furthermore, time-of-use (TOU) scheduling shifts energy consumption into cheaper tariff windows, reducing energy cost on top of the demand saving.

Both functions require the PCS to support scheduled cycles via the EMS. Additionally, the PCS must respond to dynamic tariff signals from the utility in real time. As the IEA’s Grid-Scale Storage report notes, demand-side flexibility is one of the fastest-growing commercial storage applications globally. Consequently, TOU scheduling is now a baseline requirement in most C&I BESS tenders.

Seamless Transfer and Backup Power

When the grid fails, the C&I BESS PCS must switch to island mode fast enough to protect sensitive equipment. This transfer — called a seamless transfer or UPS mode — must complete within 20 ms for most commercial sites, and within 10 ms for data centres or precision manufacturing. Critically, seamless transfer is not a standard feature on all PCS products, so buyers must list the maximum allowed transfer time explicitly in their specification.

Furthermore, the PCS must be able to supply the full site load in island mode — not just a fraction of it. Therefore, both the transfer time and the island-mode power rating must be tested during factory acceptance testing (FAT). Accepting a vendor declaration without live testing is a common and expensive commissioning mistake.

Solar PV Integration

Most C&I BESS projects include rooftop or carport solar PV, so the PCS must integrate with the solar inverter. Two integration methods are available. AC coupling connects the solar inverter and PCS on the same AC bus — straightforward to retrofit, though energy passes through two conversion stages, which adds losses. DC coupling, by contrast, connects solar panels directly to the BESS DC bus via a DC-DC converter inside the PCS. This cuts conversion losses significantly. However, DC coupling requires the PCS to support multi-port DC input, so buyers must specify this feature explicitly at procurement stage.

C&I PCS Key Specifications

  • Power Range: 30 kW – 2 MW continuous output
  • Seamless Transfer: < 20 ms to island mode (< 10 ms for critical loads)
  • TOU Scheduling: Via EMS with dynamic tariff integration
  • Solar Integration: AC-coupled or DC-coupled PV input support
  • Grid Code: IEEE 1547 / UL 1741-SA for LV interconnection
  • Noise: < 65 dB(A) at 1 m for indoor installations
  • Communications: Modbus TCP to site EMS or BMS

Utility Scale BESS PCS Functions and Features

A utility-scale BESS connects to the medium or high-voltage grid in front of the meter. Consequently, its PCS must comply with grid operator requirements — legal obligations rather than performance suggestions. These requirements are more precise, more rigorously enforced, and technically more demanding than anything a C&I project faces. Therefore, a utility-scale PCS is a genuinely different machine from a C&I unit, even if the basic conversion function is the same.

SunLith Energy Utility scale BESS PCS architecture diagram showing multiple parallel power conversion system units connected to MV switchgear, step-up transformer, grid point of common coupling, EMS server, and SCADA monitoring for fast frequency response and ancillary services
At utility scale multiple PCS units run in parallel feeding through a step up transformer to the grid with full IEC 61850 SCADA integration

Fast Frequency Response (FFR)

FFR is the most commercially valuable utility-scale PCS function. When grid frequency drops — for example, because a large generator trips — the PCS must detect the deviation and ramp power within milliseconds. Most grid operators set the response window at 200 ms. However, some markets require 150 ms, and AEMO in Australia now tenders for sub-100 ms response.

To achieve these targets, the PCS control loop must use a dedicated high-speed frequency measurement algorithm — standard power quality meters are far too slow. Furthermore, the EMS-to-PCS communication link must have a round-trip latency below 50 ms, otherwise the communication delay consumes the available response window before the PCS even starts ramping. According to the US Department of Energy Energy Storage Grand Challenge, fast-responding battery storage is central to grid stability as thermal generation retires. Consequently, FFR is now a baseline commercial requirement for most utility-scale BESS contracts.

Reactive Power Control

Utility-scale BESS must provide reactive power — VAR — support to the grid. Under IEEE 1547-2018 in North America and EN 50549 in Europe, this function is mandatory. Specifically, the PCS must inject or absorb reactive power across all four quadrants of the PQ operating plane.

One critical detail: the PCS must deliver Q control even when the battery is at minimum state of charge — a requirement known as Q-at-night capability. Notably, some PCS products restrict reactive power output when the battery is in standby. Therefore, buyers must test Q-at-zero-kW operation during commissioning rather than rely on a datasheet claim alone.

Voltage Ride-Through: LVRT and HVRT

Grid codes require BESS to stay connected during voltage disturbances. LVRT — Low Voltage Ride-Through — means the PCS holds its grid connection during faults and injects reactive current to support the network voltage. According to ENTSO-E’s Network Code on Requirements for Generators, LVRT capability must extend down to 15% of nominal voltage for up to 625 ms. HVRT works in reverse — the PCS stays connected and absorbs reactive power during grid over-voltages.

Together, LVRT and HVRT define the voltage operating envelope of the PCS. Buyers must obtain the full voltage-time profile from the vendor and then verify it against the grid code at their specific point of interconnection. Requirements vary by country and operator, so this step cannot be skipped.

Grid-Following vs Grid-Forming at Utility Scale

Most utility-scale PCS units operate in grid-following (GFL) mode — synchronising to the grid via a Phase-Locked Loop and injecting current according to EMS setpoints. GFL works well on strong grids. However, as renewable penetration increases, grids are weakening and GFM capability is becoming more important.

Grid-forming (GFM) mode provides better fault current support and voltage stability on weak grids. As Sunlith’s Microgrid BESS technical guide notes, Australia already had over 1,070 MW of grid-forming BESS deployed by mid-2025. Therefore, GFM is mainstream technology, and buyers of utility-scale systems in high-renewable regions should evaluate it seriously.

Utility Scale PCS Key Specifications

  • FFR Latency: < 150–200 ms from event to ramp start
  • Q Control: Four-quadrant reactive power at all SOC levels including zero kW
  • LVRT / HVRT: Must match grid code voltage-time profile at PCC
  • DC Voltage: 1,000 V or 1,500 V DC to reduce cabling losses at scale
  • Communications: IEC 61850 GOOSE for deterministic low-latency dispatch
  • Cybersecurity: NERC CIP (North America) or IEC 62351 encryption
  • Certifications: IEEE 1547, EN 50549, AS/NZS 4777, UL 1741-SA — market-dependent

Microgrid and Off-Grid BESS PCS Functions and Features

Among all four application types, an off-grid or islanded microgrid BESS places the most demanding requirements on the PCS. No utility grid exists to act as a voltage and frequency reference. Consequently, the PCS must create that reference entirely from battery power. This changes nearly everything about how the system operates — from the control architecture down to the protection coordination.

SunLith Energy Microgrid BESS PCS diagram showing grid-forming mode operation with solar PV, diesel genset, battery storage, and AC load bus in an isolated off-grid system with no utility grid connection, showing black start and droop control functions
In an off grid microgrid the BESS PCS synthesises the local AC voltage and frequency from scratch with no utility connection to lean on

Grid-Forming Mode: The Non-Negotiable Requirement

Grid-forming (GFM) mode is the single most important requirement for any off-grid BESS PCS. Without it, the system simply cannot operate in an islanded environment. In GFM mode, the PCS synthesises the local AC voltage and frequency directly from battery DC power. All other devices in the microgrid — solar inverters, gensets, loads — then lock onto the PCS output as their grid reference.

This role is fundamentally different from a grid-connected system, where the PCS follows an existing grid reference. Consequently, GFM requires a completely different control architecture — it is not simply a software switch added to a grid-following PCS. Therefore, buyers must verify GFM certification through independent testing, not just through a vendor’s datasheet claim.

Black Start

Black start is the ability to energise a completely dead AC network from battery power alone, starting from zero volts. This function is essential for off-grid sites and increasingly mandatory for grid-scale microgrid contracts. However, it is also one of the most commonly missing features in PCS datasheets.

Specifically, black start requires the PCS to ramp up the AC bus voltage gradually — from zero — then connect loads in sequence as the voltage stabilises. Furthermore, close coordination with the protection scheme is needed to prevent fault currents during energisation. Therefore, black start must be tested and verified during commissioning. Listing it in a specification without on-site validation is not sufficient.

Droop Control and Load Following

In an islanded system, loads shift constantly and there is no external grid to absorb imbalances. Therefore, the PCS must continuously match its output to the instantaneous load demand — a function called load following. Droop control is closely related: it allows the PCS to share load automatically with a genset or another BESS unit by adjusting output in proportion to frequency or voltage deviations, without waiting for a central EMS command.

Consequently, droop control improves microgrid stability and allows multi-source systems to operate reliably even when the EMS communication link is temporarily lost. For these reasons, droop control and load following are both marked as critical requirements in the master comparison table above.

Genset Synchronisation

Many microgrids include a diesel or gas genset as a backup source. Before the interconnecting breaker closes, the BESS PCS must synchronise its output voltage with the genset — matching frequency, phase, and amplitude. Without proper synchronisation, inrush currents and voltage transients can damage both the PCS and the genset. Moreover, the PCS must manage transitions smoothly in both directions: when the genset starts up and when it shuts down.

Microgrid PCS Key Specifications

  • Grid-Forming Mode: Mandatory — PCS must synthesise local AC voltage and frequency
  • Black Start: Must be tested and certified on-site, not just listed in a datasheet
  • Droop Control: Autonomous load sharing without relying on EMS command
  • Load Following: Fast response to sudden load steps — no external grid buffer
  • Genset Sync: Smooth breaker closure with diesel or gas generators
  • Seamless Transfer: < 10 ms for critical load protection in island mode
  • Overload: 150–200% of rated current for 10 s to handle motor start loads
  • DC Voltage Range: Wide window to handle SOC swings without derating in island mode

Mobile BESS PCS Functions and Features

Mobile BESS units are trailer-mounted or containerised storage systems that travel between sites. Common applications include event venues, construction sites, disaster relief operations, emergency grid backup, and temporary peak demand support. Unlike fixed installations, however, mobile BESS PCS units must prioritise three things above all else: portability, ruggedness, and speed of deployment.

SunLith Energy Mobile BESS PCS trailer-mounted battery energy storage system at a temporary construction site showing compact power conversion system unit, diesel genset integration, and rapid site commissioning setup
Mobile BESS units must reach full power output within hours of arriving on site which demands a compact rugged PCS with fast commissioning and multi source compatibility

Compact Design and High Power Density

Above all, a mobile BESS PCS must fit inside a trailer or small container. For this reason, power density is the primary design constraint — and liquid-cooled PCS units are preferred above 200 kW because they deliver more power per cubic metre and generate significantly less noise than air-cooled equivalents. Additionally, the PCS must tolerate vibration and shock loads during road transport, which standard stationary units are simply not designed to handle.

Rapid Site Commissioning

Speed of deployment is what sets mobile BESS apart from every other application type. A mobile BESS must reach full power output within a few hours of arriving on site — not the multi-week integration process typical of a permanent installation. Therefore, the PCS must support plug-and-play commissioning: pre-configured protection settings, automatic detection of local grid frequency (50 Hz or 60 Hz), and simple plug-in connections for power and communications.

Furthermore, the PCS must support multiple connection scenarios out of the box — temporary grid connection, islanded operation with a genset, or fully standalone off-grid mode. Consequently, mobile PCS units must include both grid-following and grid-forming capabilities as standard. Waiting for a firmware upgrade or specialist configuration on-site defeats the purpose of a mobile system.

Genset Integration and Overload Capability

Mobile BESS units frequently operate alongside diesel generators. Therefore, the PCS must synchronise with the genset smoothly and manage load transfers in both directions — when the engine starts and when it shuts down. Additionally, overload capability is a hard requirement for mobile deployments. Motor start loads on construction sites or industrial events can draw 150–200% of steady-state current for several seconds. A PCS that trips under this load makes itself useless.

Rugged Enclosure and Wide Temperature Range

Mobile BESS units deploy in unpredictable environments — muddy construction sites, outdoor festivals, flood-affected areas, and extreme climates. Consequently, the PCS must carry an IP55 or higher enclosure rating to resist dust and water ingress. Furthermore, the operating temperature window must extend well beyond typical stationary limits — many mobile PCS products are rated for operation between -25°C and +55°C and storage down to -40°C.

Mobile BESS PCS Key Specifications

  • Design: Compact, high power density; liquid cooling preferred above 200 kW
  • Transport Tolerance: Rated for road vibration and shock per IEC 60068-2
  • Commissioning Time: < 4 hours from arrival to full power output
  • Grid Frequency Auto-Detect: 50 Hz / 60 Hz without manual reconfiguration
  • Operating Modes: Grid-following and grid-forming built in as standard
  • Genset Sync: Smooth synchronisation and load transfer in both directions
  • Overload: 150–200% rated current for 10 s minimum
  • Enclosure: IP55 minimum; IP65 for harsh environments
  • Temperature Range: -25°C to +55°C operating; -40°C storage

PCS Functions Common to All Four Application Types

While each application type has unique demands, several PCS functions are universal. These baseline capabilities define what a PCS is — regardless of where it is installed or what grid code applies.

Bidirectional DC-AC Power Conversion

Every BESS PCS converts DC to AC during discharge and AC to DC during charging. Modern units reach peak conversion efficiency of 96% to 98.5%. However, round-trip efficiency matters more than peak figures. As Sunlith’s energy storage losses guide explains, power conversion is one of the four main loss categories in any BESS. Even a 1% PCS efficiency improvement compounds significantly across a 15-year project life — so it is worth specifying carefully.

BMS and EMS Communication

Two control layers interface with the PCS. Working from the bottom up: the Battery Management System (BMS) sends real-time charge and discharge limits — maximum current, minimum cell voltage, and thermal boundaries. These limits must always be respected by the PCS, including during high-priority grid response events. Above the BMS sits the Energy Management System (EMS), which sends power setpoints and operating mode commands to the PCS.

As Sunlith’s BESS communication protocols guide explains, the BMS transmits SOC, SOH, cell voltages, temperatures, current, and fault codes to enable safe and optimised dispatch. Consequently, the PCS-BMS-EMS communication stack is not merely a data link — it is a safety-critical control interface that must be validated end-to-end before commissioning.

DC-Side Battery Protection

Regardless of application type, all BESS PCS units must protect the DC bus from electrical faults. Key protection functions include over-current limiting, overvoltage protection and DC bus voltage regulation, pre-charge control to prevent capacitor inrush, earth fault detection, and short-circuit protection. Together, these functions protect the battery cells and reduce the risk of thermal runaway events. Therefore, buyers should always request the full DC protection relay specification — not just the AC circuit breaker ratings.

Key Technical Features to Specify in Any BESS PCS

Regardless of application type, the parameters below form a baseline specification checklist for any BESS PCS request for proposal (RFP).

FeatureTypical RangeNotes
Rated Power30 kW – 10 MW per unitConfirm continuous rating — not peak or 30-second duty
DC Voltage Range600 V – 1,500 V DCMust cover full battery SOC range without derating
AC Output Voltage400 V / 690 V / 11 kVMV output reduces transformer count at utility scale
Peak Efficiency97% – 98.5%Also request weighted average at your load profile
Power Factor Range0.8 lead – 0.8 lagConfirm Q capability at zero kW active output
FFR Response Time< 100 – 200 msVerify against grid code at interconnection point
Grid-Forming ModeMandatory (microgrid)Optional at utility scale; essential for off-grid
Seamless Transfer< 20 ms C&I; < 10 ms off-gridTest at FAT — do not accept a datasheet figure only
CommunicationsModbus TCP / IEC 61850IEC 61850 GOOSE for FFR; Modbus TCP for C&I dispatch
CertificationsIEEE 1547, UL 1741-SA, EN 50549Request current certificates with expiry dates
CoolingForced air / Liquid-cooledLiquid cooling preferred above 500 kW
Enclosure RatingIP54 indoor; IP55+ outdoorIP65 for mobile or harsh-environment sites
Warranty5 – 10 yearsAlign with BESS project life of 15–20 years minimum

Relevant Standards for BESS PCS

Standards differ by region and application type. Always verify that certifications are current, geographically valid, and cover the specific grid code version in force at your interconnection point. Furthermore, check expiry dates — expired certifications are a common and avoidable cause of project delays.

StandardScopeApplies To
IEC 62477-1/-2Power electronic converter safetyAll types — global baseline
IEEE 1547-2018DER interconnection requirementsC&I and utility — North America
UL 1741-SASmart inverter functionsC&I — USA (California Rule 21, Hawaii Rule 14H)
EN 50549-1/-2Grid connection for generatorsC&I and utility — European Union
IEC 61850Substation communication networksUtility scale — global
AS/NZS 4777.2Grid connection of inverter energy systemsAll types — Australia and New Zealand
IEC 62933-4-1Electrical energy storage — environmentalAll types — global
NERC CIP-002–013Bulk electric system cybersecurityUtility scale — North America
IEC 60068-2Environmental testing — vibration and shockMobile BESS — transport durability

For full regional certification details by country and market, see Sunlith’s Worldwide PCS Certification Guide. In addition, IRENA’s Utility-Scale Battery Storage report provides a useful global overview of how energy storage standards are evolving. Furthermore, Sunlith’s Bidirectional Inverter PCS Applications guide covers application-specific certification pathways in more detail.

BESS PCS Specification Checklist

Use this checklist when writing a BESS PCS request for proposal (RFP). Start with the application type — it determines which items below are mandatory.

  1. Define application type: C&I, utility, microgrid, or mobile. This single decision shapes every other requirement.
  2. Rated Power: Specify continuous AC output (kW) and DC input separately — not peak ratings.
  3. DC Voltage Window: Confirm the PCS operates across the full battery SOC range without derating at either end.
  4. Efficiency Curve: Request weighted average efficiency at your typical daily load profile, not only the nameplate peak value.
  5. Grid-Forming Mode: Mandatory for microgrid. Specify if needed for weak-grid or mobile deployments.
  6. Seamless Transfer Time: < 20 ms for C&I; < 10 ms for off-grid critical loads. Test at FAT without exception.
  7. FFR Response Time: Define maximum latency from EMS setpoint to output ramp start — applicable to utility scale only.
  8. Reactive Power: Specify power factor range. Confirm Q control works at zero kW active power output.
  9. Black Start: Specify explicitly if required — not included in all PCS products. Test on-site.
  10. Overload Capability: 150–200% rated current for 10 s — mandatory for microgrid and mobile types.
  11. Commissioning Time: < 4 hours from arrival to full output — applicable to mobile BESS deployments.
  12. Communications: Specify Modbus TCP, IEC 61850 GOOSE, or CAN Bus as required for your application.
  13. Certifications: List required standards by jurisdiction. Request current certificates with expiry dates.
  14. Enclosure Rating: IP54 for indoor; IP55+ for outdoor; IP65 for mobile or harsh-environment sites.
  15. Warranty: Specify minimum period, firmware update policy, and remote diagnostics capability.

Frequently Asked Questions About BESS PCS

What is a PCS in BESS?

Inside a battery energy storage system, the Power Conversion System converts DC electricity from the battery to AC for loads or the grid. During charging, it reverses and converts AC to DC. Beyond this basic function, it also controls reactive power, responds to grid frequency and voltage events, and protects the battery. In off-grid systems, furthermore, it synthesises the local AC voltage and frequency reference from battery power alone.

Are C&I and utility scale BESS PCS units the same product?

No — they are significantly different. A C&I PCS focuses on peak shaving, load shifting, solar integration, and fast backup transfer. A utility-scale PCS, by contrast, must meet strict grid code requirements for FFR, reactive power control, and voltage ride-through. Consequently, you cannot simply scale up a C&I PCS for a utility project — the control architecture, communications, and certification requirements are fundamentally different.

Does an off-grid microgrid need a different PCS?

Yes, absolutely. A microgrid BESS PCS must operate in grid-forming mode — synthesising the local AC voltage and frequency without any external grid connection. In addition, it must support black start, droop control, load following, and genset synchronisation. None of these are required in most grid-connected applications. Therefore, always specify off-grid requirements explicitly in procurement documents — do not assume they are included.

What makes a mobile BESS PCS different from a fixed installation?

A mobile BESS PCS must be compact, transport-rated, and fast to commission on arrival. It must auto-detect local grid frequency and support both grid-following and grid-forming modes as standard. Furthermore, it must tolerate road vibration, wide temperature ranges, and variable site conditions that a stationary unit would never encounter. Consequently, mobile PCS units are a distinct product category — not simply a stationary PCS mounted on a trailer.

What efficiency should I expect from a BESS PCS?

Modern BESS PCS units reach peak efficiency of 97% to 98.5%. However, weighted average efficiency across a typical daily profile runs 1–2% lower than the peak figure. Therefore, always request the weighted average efficiency for your specific load profile — the nameplate peak value alone is not a reliable basis for energy yield calculations.

Which standards does a BESS PCS need?

Certification requirements depend on your project location and application type. In the US, IEEE 1547-2018 and UL 1741-SA are typically required. Meanwhile, Europe relies on the EN 50549 standard. For projects in Australia, AS/NZS 4777 is mandatory. Additionally, utility-scale projects in North America must meet NERC CIP cybersecurity requirements. See Sunlith’s Worldwide PCS Certification Guide for full details by country.

How Sunlith Energy Approaches BESS PCS Selection

At Sunlith Energy, we treat the PCS as one of the most important decisions in any energy storage project. Every engagement begins with an application analysis that defines the required operating modes, protection settings, and grid code obligations for that specific site. Furthermore, we verify certifications independently — rather than accepting vendor declarations without review.

Our team has evaluated PCS products across C&I, utility, microgrid, and mobile deployments. Importantly, we carry out PCS-EMS-BMS integration testing before any system leaves the factory. This ensures that communication protocols, protection coordination, and control modes are all validated end-to-end. Consequently, our clients avoid the costly commissioning surprises that arise when integration is left to the site team.

Contact the Sunlith Energy team if your project needs a BESS PCS specification review, vendor proposal evaluation, or commissioning support.

Related Sunlith Energy Resources:

Conclusion

Selecting the right BESS PCS comes down to knowing your application. A C&I system needs peak shaving, backup transfer, and solar integration. A utility-scale project demands FFR, reactive power control, and full grid code compliance. An off-grid microgrid requires grid-forming mode, black start, and droop control. A mobile BESS, moreover, needs ruggedness, fast commissioning, and multi-mode operation out of the box. Therefore, there is no single PCS specification that fits all four scenarios — and trying to use one is a recipe for expensive rework.

Consequently, the first and most important step is to define your application type precisely. From there, use the master comparison table and specification checklists in this guide to build your PCS requirements. Furthermore, involve your PCS vendor early, verify certifications independently, and test all critical functions — especially seamless transfer, black start, and FFR — during factory acceptance testing before the system ships.

Sunlith Energy works with EPCs, project developers, and asset owners across all four BESS application types. Contact our team to discuss PCS requirements for your next project.

Other References

SunLith Energy Microgrid BESS system with solar panels and containerized battery energy storage units at a remote industrial facility.

Microgrid BESS: The Complete Guide to Battery-Powered Microgrids

Power outages cost businesses billions every year. Aging grid infrastructure, extreme weather, and the variable nature of solar and wind energy make centralized power systems less reliable. As a result, energy-forward organizations are turning to microgrid BESS — a combination of distributed energy resources and battery storage that can supply power independently of the utility grid.

A microgrid BESS is not simply a backup generator. Instead, it is an intelligent energy platform that stores renewable energy, dispatches it on demand, and switches smoothly between grid-connected and islanded operation. To understand the foundation of this technology, read our ultimate guide to battery energy storage systems before diving into the microgrid-specific details covered here.

This guide covers everything EPCs, project developers, and commercial energy buyers need to know. Topics include: how these systems work, core components, sizing methodology, use cases, grid-forming technology, relevant standards, and financial considerations.

What Is a Microgrid BESS?

A microgrid is a local energy network. It integrates distributed energy resources — solar PV, wind turbines, diesel generators, and battery storage — into one controllable system. Crucially, it can run in two modes: grid-connected (exchanging power with the utility) or islanded (supplying loads on its own).

Battery storage is the technology that makes islanded operation practical. Without BESS, a microgrid relying on solar cannot guarantee stable voltage and frequency when it disconnects from the grid. With BESS, however, the system buffers generation gaps, sustains loads overnight, and holds the frequency reference that other devices need. For a broader look at how BESS works across sectors, see our guide on top applications of commercial and industrial BESS.

In short: BESS is the backbone of a modern microgrid. It turns a set of distributed generators into a self-sufficient power system.

Grid-Connected vs. Islanded Microgrid BESS

SunLith Energy Diagram showing microgrid BESS in grid-connected mode (left) and islanded mode (right) with solar PV and battery storage
Microgrid BESS Operating Modes Grid Connected vs Islanded

Microgrid BESS operates in two fundamental modes. Understanding both is essential before sizing or specifying a system.

  • Grid-connected mode: The microgrid stays synchronized with the utility. BESS handles peak shaving, load shifting, and frequency regulation. Excess solar generation is stored or exported.
  • Islanded (off-grid) mode: The microgrid disconnects at the point of common coupling. BESS then acts as the voltage reference, sustaining all local loads entirely on its own.

Seamless transition between these modes is a critical performance target. Research published in Energies (2026) showed loss-of-mains detection in under 3 milliseconds — well within the 10-millisecond threshold needed for sensitive equipment to ride through without disruption.

Core Components of a Microgrid BESS System

A complete microgrid BESS integrates several interdependent subsystems. Knowing each one helps EPCs design reliable systems and helps project developers evaluate vendor proposals accurately.

1. Battery Modules and Racks — LFP Chemistry

Lithium Iron Phosphate (LFP) chemistry dominates microgrid deployments today. LFP delivers over 6,000 cycles at 80% depth of discharge. It also operates safely across wide temperature ranges and avoids the thermal runaway risk seen in NMC chemistry. Battery modules are assembled into racks and housed in containerized enclosures for rapid site deployment.

2. Battery Management System (BMS)

The BMS monitors cell-level voltage, temperature, and current. It enforces SoC limits (typically 20–80% under the 20/80 cycling rule), calculates State of Health (SoH), and tracks DC Internal Resistance (DCIR). Additionally, the BMS communicates with the EMS via CAN bus or Modbus. For a deeper look at how the EMS works inside a BESS, we have a dedicated technical article on the subject.

3. Power Conversion System (PCS)

The PCS — also called the bidirectional inverter — converts DC energy from batteries into AC power for loads. It also converts AC to DC during charging. In a microgrid, the PCS can operate in grid-following or grid-forming mode. Grid-forming units synthesize voltage and frequency from scratch, which makes islanded operation possible even without a utility reference.

4. Energy Management System (EMS)

The EMS is the intelligence layer. It receives data from the BMS, PCS, solar inverters, load meters, and weather forecasts. Then it dispatches charge/discharge commands to optimize across multiple objectives simultaneously — peak shaving, renewable self-consumption, SoC management, and grid services. Moreover, it governs mode transitions and coordinates load shedding during generation shortfalls. Read our full breakdown of how EMS enables advanced grid services through BESS to see exactly how this works in practice.

5. Solar PV Array

Solar PV is the primary generation source in most microgrid BESS deployments. The PV array charges the BESS during daylight hours. As a result, the BESS can supply loads through the night or during cloud cover. Oversizing the PV-to-BESS ratio — typically 1.2× to 1.5× — ensures adequate charging under real-world irradiance conditions.

6. Point of Common Coupling (PCC) Switch / STS

The PCC switch or Static Transfer Switch (STS) is the electrical boundary between the microgrid and the utility grid. During a grid disturbance, the STS opens within milliseconds to island the microgrid. When grid power returns and stabilizes, the STS synchronizes and re-closes. Consequently, the speed and reliability of this device directly determines the quality of power continuity during transitions.

Microgrid BESS Component Summary Table

ComponentPrimary FunctionKey StandardTypical Technology
Battery ModuleStore DC energyIEC 62619, UL 1973LFP, NMC
BMSCell monitoring, protection, SoH trackingIEC 62133-2Rack-level + pack-level
PCS / InverterDC↔AC conversion, grid forming/followingIEEE 1547, UL 1741Grid-forming (VSM/droop)
EMSDispatch, optimization, mode transitionsIEC 62933-5-2SCADA + AI forecasting
STS / PCC SwitchGrid isolation, mode transitionIEEE 1547.4<20 ms transfer
Solar PV ArrayPrimary renewable generationIEC 61215, IEC 61730Monocrystalline TOPCon
Thermal ManagementTemperature control, fire suppressionNFPA 855, UL 9540AHVAC + liquid cooling
SunLith Energy Technical architecture diagram of a microgrid BESS showing solar PV, BMS, PCS, EMS, and battery modules connected to AC loads
Microgrid BESS Components Architecture Diagram

Grid-Forming BESS: The Key to True Islanding

The most important technology choice in any microgrid BESS project is the inverter control mode. Specifically, you must decide between grid-following and grid-forming. This single decision determines whether the system can operate independently of the utility at all. Our detailed grid-forming vs. grid-following BESS guide covers the full technical comparison, but the key points are summarized below.

Grid-Following BESS: Its Core Limitation

A grid-following inverter acts as a current source. It detects the voltage and frequency of an active grid and synchronizes its output to that reference. Therefore, if the grid disappears — during a blackout — a grid-following inverter cannot sustain islanded operation. It must shut down immediately per IEEE 1547 anti-islanding requirements to protect utility workers.

This means a grid-following BESS cannot black-start a dead network. Nor can it sustain an islanded microgrid on its own. As a result, it is not a viable standalone solution for resilience-critical sites.

Grid-Forming BESS: How It Creates the Grid

SunLith Energy Side-by-side comparison of grid-forming BESS as voltage source versus grid-following BESS as current source for microgrid operation
Grid Forming vs Grid Following BESS Inverter Comparison

A grid-forming inverter operates as a voltage source instead. Rather than following an external signal, it synthesizes its own voltage waveform and frequency using algorithms such as Virtual Synchronous Machine (VSM) or droop control. Consequently, all devices on the microgrid — other inverters, loads, generators — synchronize to the grid-forming BESS.

This fundamental shift in control architecture unlocks four critical capabilities:

  • Black start: The grid-forming BESS energizes a completely dead network from zero.
  • Sustained islanding: The microgrid runs indefinitely without any utility connection.
  • Synthetic inertia: The inverter emulates the rotational inertia of a synchronous generator, stabilizing frequency during rapid load changes.
  • Fault current contribution: The system provides enough fault current to trip protection relays, enabling conventional protection coordination.

As of mid-2025, Australia had deployed 1,070 MW of grid-forming BESS across ten sites, according to AEMO. Furthermore, a 2025 Nature Scientific Reports study confirmed that integrated grid-forming inverter strategies significantly improve microgrid resilience under fault conditions. This real-world track record proves that grid-forming technology is no longer experimental.

How to Size a Microgrid BESS System

Getting the size right is critical. An undersized system fails to cover loads overnight or during weather events. An oversized system wastes capital. Fortunately, the sizing methodology follows four clear, sequential steps.

Step 1 — Establish the Load Profile

Start with a complete energy audit. Measure peak demand (kW) and daily energy consumption (kWh). Identify critical loads that must run during islanding and non-critical loads that can be shed. Also account for motor start-up inrush currents, which can reach 6× running current and must be covered by the PCS peak power rating.

Step 2 — Define Autonomy Duration

Autonomy duration is the number of hours the microgrid must sustain critical loads without solar generation or grid support. For most commercial microgrids, 4–8 hours covers overnight periods. For resilience-critical facilities such as hospitals or data centers, however, 24–72 hours of autonomy is the standard design target.

Step 3 — Apply the Sizing Formula

Use this baseline formula to calculate required battery capacity:

Required BESS Capacity (kWh) = [Critical Load (kW) × Autonomy (h)] ÷ (DoD × RTE)

Here: DoD = usable depth of discharge (0.80 for LFP); RTE = round-trip efficiency (0.92 for modern LFP BESS). Always add a 10–15% spinning reserve margin on top for frequency stability headroom.

Step 4 — Size the Solar PV Array

The solar PV array must fully recharge the BESS within the available daylight window. For a system that recharges overnight-depleted batteries within 6–8 hours of sunlight, a PV-to-BESS ratio of 1.3× to 1.5× is typically required. NREL’s battery storage FAQs provide reliable guidance on irradiance-based sizing methodology that you can apply directly to project scoping.

Microgrid BESS Sizing Reference Table

The table below assumes LFP chemistry, 80% DoD, 92% RTE, 10% spinning reserve, and 12-hour overnight autonomy:

ApplicationCritical Load (kW)Autonomy (h)BESS Size (kWh)Solar PV (kWp)
Remote Village50128171,060
Commercial Campus25082,7173,500
Hospital / Critical Site5002416,30421,000
Mining / Industrial1,0001216,30421,000
Island Community2,0001232,60942,000

Note: These are scoping figures only. Final sizing must account for site-specific irradiance, load diversity factor, planned expansion, and local grid code requirements.

Microgrid BESS Use Cases: Six Key Applications

SunLith Energy Infographic showing six microgrid BESS use cases: remote communities, hospitals, mining, campuses, data centers, and island nations
Six Leading Microgrid BESS Use Cases Infographic

Microgrid BESS is no longer a niche solution for remote communities. It is now essential infrastructure across a wide range of sectors. Here are the six leading applications driving global deployment today.

1. Remote and Off-Grid Communities

Approximately 770 million people still lack reliable electricity access. Many live in locations where grid extension is economically unviable. Solar-plus-BESS microgrids offer a proven alternative to diesel generation. According to IRENA’s renewable energy statistics, the levelized cost of energy from a solar-battery islanded microgrid has fallen below $0.18/kWh in high-solar-resource locations — competitive with or cheaper than diesel, even before accounting for fuel logistics costs.

2. Hospitals and Healthcare Facilities

Power interruptions in healthcare settings can have life-threatening consequences. Research published in Energy and Buildings (2025) modelled a solar-BESS microgrid for a hospital on Lombok Island. A correctly sized system supplying 7 MWh per day maintained 100% reliability across a simulated 3-day grid outage with zero diesel required. Therefore, microgrid BESS in healthcare is not just an economic choice — it is a life-safety infrastructure decision.

3. Mining and Industrial Sites

Mining operations in remote locations have historically relied on diesel generators. Diesel logistics add cost and operational risk. A documented case study from our island grid BESS resource collection shows a mining site that replaced three diesel gensets with a solar-plus-BESS microgrid using VSG grid-forming control. In year one, diesel fell by 78%. By year two, after a solar expansion, diesel was phased out entirely.

4. Commercial Campuses and Universities

Large campuses with significant on-site renewable generation are strong microgrid BESS candidates. These systems reduce utility demand charges through peak shaving. They also enable grid services revenue through frequency regulation markets. Moreover, they provide resilience against utility outages. Our overview of grid-scale BESS deployments covers how campus-scale and utility-scale systems create stacked value from a single BESS asset.

5. Data Centers and Digital Infrastructure

AI infrastructure expansion is driving unprecedented data center power demand. Many operators are deploying microgrid BESS as a dual-purpose solution: resilience insurance against grid outages and a cost-optimization tool to reduce peak demand charges. Systems rated 1 MW to 5 MW captured 42.7% of microgrid project activity in 2025, aligning closely with hospital campus, university, and data center scale requirements.

6. Island Nations and Coastal Communities

Island nations face unique energy challenges. They depend entirely on expensive imported diesel, which is vulnerable to supply chain disruption. Pacific Island countries including Fiji, Vanuatu, and Samoa are targeting 100% renewable electricity by 2030. Solar-storage microgrids are the primary technology vehicle for reaching that goal. As a result, microgrid BESS has become a sovereign energy security tool for these nations, not just a technical option.

Microgrid BESS Standards and Certifications

Compliance with the right standards is mandatory for grid interconnection, insurance approval, and project financing. The DOE BESSIE supply chain report (2024) provides a comprehensive overview of applicable standards across all BESS system layers. The core standards governing microgrid BESS are listed below.

  • IEEE 1547 / IEEE 1547.4: Interconnection requirements, islanding protection, and re-synchronization for DERs.
  • IEEE 2030.2: Interoperability guide for energy storage systems with electric power infrastructure.
  • IEC 62933-5-2: Safety requirements for grid-integrated energy storage systems.
  • IEC 62619: Safety requirements for lithium cells and batteries in stationary applications.
  • UL 1973: Batteries for stationary and light electric rail applications.
  • UL 9540: Energy storage systems and equipment.
  • UL 9540A: Test method for thermal runaway fire propagation in BESS.
  • NFPA 855: Installation standard for stationary energy storage systems (fire safety).

For grid-connected microgrid BESS in North America, IEEE 1547 is the foundational requirement. It governs voltage ride-through, frequency response, anti-islanding, and re-closing behavior. Projects exporting to utility grids also require interconnection studies including short-circuit analysis and protection coordination.

Microgrid BESS Market: Growth and Outlook

The global microgrid market is growing rapidly. According to MarketsandMarkets, the market will reach USD 95.16 billion by 2030, up from USD 43.47 billion in 2025 — a CAGR of 17.0%. This growth reflects a decisive shift toward localized, resilient, and low-carbon energy systems worldwide.

Several structural forces are driving this expansion:

  • Falling battery costs: LFP battery pack prices have fallen more than 80% over the past decade. As a result, solar-plus-BESS microgrids now compete economically with grid power in many markets.
  • Grid resilience mandates: California’s SGIP program catalyzed more than 1,200 MW of community microgrids by early 2026. Furthermore, the U.S. Department of Defense has mandated microgrid deployments at all major domestic installations by 2030.
  • AI and data center demand: The proliferation of AI infrastructure is driving record data center power consumption, which in turn accelerates microgrid BESS adoption in this sector.
  • Island and remote electrification: National governments in Pacific Island countries and Sub-Saharan Africa are deploying solar-BESS microgrids as the primary path to 100% renewable electricity targets.

Asia-Pacific is the fastest-growing region, with a projected CAGR of 23.7% — driven by rural electrification programs and industrial decarbonization across Southeast Asia. North America, meanwhile, retains the largest market share at approximately 38.6%.

Financial Considerations: LCOS, CAPEX, and Revenue

Levelized Cost of Storage (LCOS)

LCOS is the primary metric for evaluating a microgrid BESS investment. It represents total ownership cost — capital, installation, operations, and financing — divided by total energy dispatched over the system’s lifetime. For LFP BESS with 6,000+ cycle life, LCOS has fallen dramatically in recent years. In high-solar-resource locations with favorable financing, solar-plus-BESS microgrid LCOS is now below $0.18/kWh, which is competitive with retail grid tariffs in many markets.

Indicative CAPEX Range

All-in CAPEX for a fully commissioned microgrid BESS — including solar PV, BESS, PCS, EMS, STS, civil works, and grid interconnection — typically ranges from $400–$700/kWh for systems above 1 MWh. Smaller systems carry higher per-kWh costs due to fixed engineering and interconnection expenses. Battery storage costs alone have fallen to $120–$180/kWh at the pack level for utility-scale LFP procurement in 2025.

Multiple Revenue Streams

A well-designed microgrid BESS earns value from several streams at once. This stacking of revenue is one of the key reasons project economics have improved so significantly.

  • Demand charge reduction: Peak shaving cuts utility demand charges, which can represent 30–50% of commercial electricity bills.
  • Energy arbitrage: Charge during low-tariff periods and discharge during high-tariff periods.
  • Grid services: Frequency regulation, fast frequency response (FFR), and spinning reserve markets add additional revenue for grid-connected systems.
  • Diesel displacement: For off-grid sites, BESS value is measured in fuel savings. At $1.00–$1.50/liter, diesel displacement provides rapid payback on BESS capital.
  • Microgrid-as-a-Service (MaaS): Developers bear upfront capital in exchange for long-term PPAs, eliminating CAPEX for end-users. According to Grand View Research, the global MaaS market was valued at USD 2.87 billion in 2024 and is projected to reach USD 6.56 billion by 2030.

EPC and Developer Project Checklist

For EPCs and project developers evaluating a microgrid BESS deployment, the following checklist covers the critical design and procurement decisions in the correct sequence:

  1. Conduct a full energy audit — peak demand (kW), daily energy (kWh), and critical vs. non-critical load segregation.
  2. Define autonomy requirements — hours of backup for critical loads, accounting for expected solar generation gaps.
  3. Select battery chemistry — LFP for longevity, safety, and cycle life; NMC for applications where energy density is the priority.
  4. Choose inverter control mode — grid-forming PCS is required for islanding, black start, and renewable penetration above 60–70%.
  5. Design the PCC switch or STS — specify less than 20 ms transfer time and determine protection coordination.
  6. Size the solar PV array — target 1.3–1.5× PV-to-BESS ratio and use NREL PVWatts for site-specific yield estimation.
  7. Specify the EMS — ensure multi-objective optimization across peak shaving, SoC management, renewable self-consumption, and grid services.
  8. Confirm applicable standards — IEEE 1547, UL 9540, UL 1973, NFPA 855, and any local grid codes.
  9. Conduct an interconnection study — short-circuit analysis, protection coordination, and harmonic assessment.
  10. Evaluate financing structures — direct CAPEX, green bonds, development finance institutions, or a MaaS PPA arrangement.

Conclusion

Microgrid BESS has crossed from specialized niche technology into mainstream energy infrastructure. Falling battery costs, proven grid-forming inverter technology, mature EMS platforms, and well-established compliance standards have collectively removed the barriers that once limited microgrid deployment.

Today, a microgrid BESS can simultaneously reduce energy costs, generate grid services revenue, provide life-safety resilience, displace diesel, and deliver a platform for 100% renewable operation. Moreover, the market is growing at 17% CAGR globally — with Asia-Pacific exceeding 23%. For EPCs and developers, the question is no longer whether microgrid BESS works. The questions are: what size, what chemistry, what inverter architecture, and what financing model best fits your specific project. Read our broader grid-scale BESS guide to see how microgrid BESS fits into larger utility-scale energy storage strategies.

SunLith Energy Microgrid BESS project by Sunlith Energy — containerized battery storage and solar panels at a commercial facility at dusk

Sunlith Energy provides technical guidance, BESS system supply, and project development support for microgrid BESS projects at commercial and utility scale. Contact our team to discuss your project requirements.

kWp vs kWh in Solar Energy: What’s the Difference and Why It Matters

kWp vs kWh — these two units appear on every solar quote and datasheet. Yet they are often confused. Confusing them leads to undersized systems, missed savings, and wrong payback estimates.

This guide explains exactly what kWp and kWh mean in solar. You will learn how they differ, how to convert one to the other, and how both affect your system design.

If you need a quick refresher on kW vs kWh first, see our guide on kWh vs kW explained. Otherwise, read on for the full kWp vs kWh breakdown.

What You Will Learn
Core definitions: Understand what kWp (kilowatt-peak) means and how STC conditions are defined.
Energy metrics: Discover what kWh (kilowatt-hour) measures in a solar context.
Conversion formula: Learn the mathematical calculation for converting kWp to annual kWh output.
Environmental impacts: See how peak sun hours, NOCT, and system losses affect real-world yield.
Practical scenarios: Review real kWp vs kWh sizing examples for residential, C&I, and utility solar.
Battery storage dynamics: Explore how kWp and kWh relate when solar is paired with a BESS.
Buying protection: Avoid common mistakes buyers make when comparing solar quotes.

kWp vs kWh: What Does kWp (Kilowatt-Peak) Mean?

kWp stands for kilowatt-peak. It is the rated maximum power output of a solar panel or array. This rating is measured under controlled laboratory conditions called Standard Test Conditions (STC). Therefore, kWp tells you the best-case output — not real-world output.

STC are used by every solar module manufacturer. They create a level playing field so buyers can compare panels from different brands on equal terms.

kWp STC Conditions — What the Rating Is Based On

  • Solar irradiance: 1,000 W/m² — equivalent to full midday sun at sea level
  • Cell temperature: 25 °C — cooler than most real rooftop conditions
  • Air mass: AM 1.5 — a standard mid-latitude atmospheric path

Under these conditions, a 400 Wp panel produces exactly 400 W. Ten such panels form a 4 kWp array. However, these conditions rarely exist on a real rooftop.

Why kWp Overstates Real-World Output
On a hot summer day, rooftop cell temperatures reach 45–65 °C. This is well above the 25 °C STC benchmark.
As a result, real output drops 10–25% below the kWp rating. This is why kWp alone does not tell you how much electricity you will actually generate.
That is where kWh comes in.

kWp vs kWh: NOCT Gives a More Realistic kWp Figure

NOCT (Normal Operating Cell Temperature) tests panels at 800 W/m² irradiance, 45 °C cell temperature, and 1 m/s wind — conditions much closer to a real rooftop. Consequently, NOCT power ratings run 10–15% lower than STC kWp figures. When comparing panels, always check both ratings on the datasheet.

The IEC 61215 standard governs how manufacturers measure both STC and NOCT performance, making these ratings internationally comparable.

SunLith Energy Two-column comparison table showing STC versus NOCT solar panel test conditions with irradiance temperature and wind speed values
STC vs NOCT Test Conditions Comparison

What is the difference between specific yield (kWh/kWp) and panel efficiency?

While both terms appear frequently on datasheets, they measure entirely different variables. Panel efficiency represents how effectively a solar cell converts sunlight into electricity within a fixed square meter of physical space—essentially telling you how compact the technology is.

On the other hand, specific yield (kWh/kWp) measures how much total energy (kWh) your entire system delivers over a year for every kilowatt of capacity (kWp) installed. While panel efficiency is fixed by the manufacturer, specific yield is heavily dependent on your geographic location, tilt angle, and climate.

kWp vs kWh: What Does kWh (Kilowatt-Hour) Mean in Solar?

kWh stands for kilowatt-hour. It measures the actual energy your solar system generates over time. While kWp is the rated capacity, kWh is the real-world output.

Think of it this way: kWp is the engine size of a car. kWh is the distance it actually travels. A powerful engine is useless if it only runs for one hour a day.

How to Calculate kWh Output from a kWp Solar System

The formula below converts kWp into expected annual kWh generation:

Annual kWh = kWp × Peak Sun Hours/day × 365 × System Efficiency

How do I calculate how many solar panels I need based on my kWh usage?

If you are trying to size an array to match your electricity bill, you can reverse-engineer our calculation formula. First, look at your annual energy bill to find your total consumption in kWh. Next, divide that number by your local annual specific yield (for instance, 1,500 kWh/kWp).

The resulting number gives you your required system size in kWp. To find the physical number of panels needed, simply divide that total kWp by the individual wattage of your preferred panel (e.g., dividing a 5 kWp requirement by a 400 Wp or 0.4 kWp panel yields exactly 13 panels).

Peak Sun Hours (PSH) measure how many hours per day a location receives the equivalent of 1,000 W/m² irradiance. For example, Dubai averages 6.1 PSH/day. London averages 2.8 PSH/day. Therefore, the same kWp system produces far more kWh in Dubai than in London.

You can look up PSH for any location using NREL’s PVWatts Calculator, which is a free and reliable tool from the US Department of Energy.

System Efficiency accounts for inverter losses, wiring resistance, soiling, and temperature derating. A well-designed system typically runs at 78–85% overall efficiency. However, shading or poor installation can push this below 70%.

kWp vs kWh Worked Example: Same System, Two Locations

ParameterPhoenix, ArizonaLondon, UK
System Size10 kWp10 kWp
Peak Sun Hours / Day5.8 hours2.8 hours
System Efficiency80%80%
Annual Output (kWh)10 × 5.8 × 365 × 0.80 = 16,936 kWh10 × 2.8 × 365 × 0.80 = 8,176 kWh
Specific Yield (kWh/kWp)1,694 kWh/kWp818 kWh/kWp

The result is striking: the same 10 kWp system generates over twice as many kWh in Phoenix as in London. As a result, quoting kWp without specifying location is meaningless for project economics.

SunLith Energy Flow diagram showing how a 10 kWp solar system rating converts to annual kWh output using peak sun hours and efficiency factor
kWp to kWh Annual Yield Calculation Flow

kWp vs kWh: A Direct Side-by-Side Comparison

The table below shows the core differences between kWp and kWh in solar:

kWp (Kilowatt-Peak)kWh (Kilowatt-Hour)
What it measuresPower capacity (rate)Energy output (total)
What it tells youMaximum potential output at STCActual electricity generated over time
ConditionsLaboratory (STC: 1,000 W/m², 25 °C)Real-world (varies by location, season, losses)
Appears onSolar panel datasheet, system quoteEnergy bill, yield model, project audit
AnalogyEngine horsepowerKilometres driven
Location-dependent?No — fixed at STCYes — higher kWh in sunnier locations
Used forComparing panels, sizing the arrayCalculating savings, ROI, payback period

5 Factors That Affect How Much kWh Your kWp System Delivers

Several real-world factors determine how many kWh a given kWp system produces. Understanding these is essential for accurate yield forecasting.

1. Location and Solar Irradiance Affect kWh Output Most

Solar irradiance varies enormously by region. The Middle East, Australia, and the US Southwest receive 1,800–2,500 kWh/m² annually. Northern Europe receives 900–1,200 kWh/m². Consequently, a solar project in Dubai generates two to three times more kWh per kWp than the same system in Scotland.

For detailed peak sun hours data by country, see our guide on peak sun hours by location. Furthermore, the Global Solar Atlas provides free, downloadable irradiance maps for any location worldwide.

2. Panel Orientation and Tilt Angle Change kWh Yield

South-facing panels at a tilt angle matching the site latitude produce the highest annual kWh. East or west-facing installations lose 15–20% of yield compared to south-facing. In addition, north-facing installations at high latitudes can lose 30–40% of potential kWh output.

3. Shading and Soiling Reduce kWh Production

Partial shading cuts kWh output significantly. In conventional string-wired systems, one shaded panel reduces output across the whole string.

Soiling — dust, pollen, bird droppings — causes a further 2–6% loss in temperate climates. However, in dry desert regions, soiling losses can reach 15–25% without regular panel cleaning.

4. Temperature Coefficient Lowers kWh in Hot Climates

Solar panels lose power as cell temperature rises above 25 °C. A typical monocrystalline silicon panel loses approximately 0.35% of its kWp output for every degree above 25 °C.

At 60 °C cell temperature — common on hot rooftops — that is a 12% reduction from the STC kWp rating. As a result, hot climates produce fewer kWh per kWp than cool climates, despite having more sunlight.

5. Inverter and System Losses Reduce Final kWh

The inverter converts DC solar power to AC. It operates at 94–98% efficiency. Additional losses come from wiring resistance, transformer losses, and module mismatch.

Combined, these losses typically reduce kWh output by 15–25% from the theoretical kWp-based maximum. Therefore, always factor in a realistic loss value — not the best-case figure — when modelling project yield.

kWp vs kWh Specific Yield by Region (kWh/kWp/year)

MENA Region: Expect roughly 1,600–2,000 kWh/kWp/year across the Middle East and North Africa.
Asia Territories: Systems in South and Southeast Asia average 1,300–1,700 kWh/kWp/year.
Southern Europe & Australia: These sunny climates deliver 1,200–1,600 kWh/kWp/year.
USA Sun Belt: Expect an average yield of 1,400–1,800 kWh/kWp/year.
Northern Europe & UK: Lower irradiance limits yield to 700–1,100 kWh/kWp/year.

These figures assume south-facing, optimally tilted panels with no shading and standard system losses of 15–20%.
SunLith Energy World map showing solar specific yield in kWh per kWp per year colour-coded from high yield regions in MENA and Australia to lower yield in Northern Europe
Global kWhkWp Specific Yield Map

kWp vs kWh in Solar System Sizing: Three Real Examples

These examples show how kWp and kWh interact in real projects at different scales.

Residential kWp vs kWh Example: 5 kWp System in New Delhi

  • Location: New Delhi (5.4 peak sun hours/day)
  • System size: 5 kWp — approximately 12–13 panels at 400 Wp each
  • System efficiency: 80%
  • Annual output: 5 × 5.4 × 365 × 0.80 = 7,884 kWh/year
  • Monthly average: approximately 657 kWh/month
  • Typical household consumption: 300–500 kWh/month — system covers 130–220% of demand

Result: The 5 kWp system comfortably covers an average household’s electricity needs. Furthermore, it generates surplus kWh for export or battery storage on most days.

Why doesn’t my 5 kWp system show 5 kW on my inverter app?

A common point of confusion for homeowners post-installation is opening their monitoring app on a sunny day and seeing an instantaneous output of only 3.5 kW to 4 kW. This is completely normal.

Remember that your 5 kWp rating is calculated under perfect laboratory conditions ($25^\circ\text{C}$). In the real world, rooftop heat (which degrades panel efficiency), inverter conversion losses, and slight angle misalignments naturally reduce your real-time performance. This is precisely why we design systems based on cumulative kWh energy yield over time rather than looking solely at the peak kW capacity.

Commercial kWp vs kWh Example: 200 kWp System in Dubai

  • Location: Dubai (6.1 peak sun hours/day)
  • System size: 200 kWp
  • System efficiency: 78% — lower due to desert soiling losses
  • Annual output: 200 × 6.1 × 365 × 0.78 = 347,334 kWh/year (347 MWh/year)
  • Specific yield: 1,737 kWh/kWp/year
  • Estimated saving: At AED 0.30/kWh — approximately AED 104,200/year (USD 28,300)

Result: The 200 kWp system delivers strong kWh yield. However, soiling management is essential to maintain this specific yield over time.

Utility-Scale kWp vs kWh Example: 50 MWp Farm in Spain

  • Location: Spain (5.2 peak sun hours/day)
  • System size: 50,000 kWp (50 MWp)
  • System efficiency: 82% — bifacial panels with single-axis trackers
  • Annual output: 50,000 × 5.2 × 365 × 0.82 = 77.7 GWh/year
  • Specific yield: 1,555 kWh/kWp/year — enhanced by tracking
  • Equivalent households: approximately 22,000 Spanish homes at 3,500 kWh/year each

Result: Single-axis trackers boost kWh yield by 20–30% over fixed-tilt systems. As a result, they significantly improve the kWh economics of large solar farms.

SunLith Energy Bar chart comparing annual kWh output for a 5 kWp residential system a 200 kWp commercial system and a 50 MWp utility solar farm
kWp vs kWh Sizing Comparison Chart

kWp vs kWh When Solar Is Paired with Battery Storage

When solar is paired with a Battery Energy Storage System (BESS), both kWp and kWh take on new roles. Correctly matching them is the foundation of a good solar-plus-storage design.

kWp Controls How Fast the Battery Charges

The kWp rating sets the maximum power available to charge the battery at any moment. For example, a 100 kWp array with 80% system efficiency delivers roughly 80 kW to the battery in peak conditions.

Consequently, a 200 kWh battery paired with this array takes a minimum of 2.5 hours to charge from empty. This determines whether the battery completes a full cycle before sunset.

kWh Controls How Long the Battery Can Supply Load

The battery’s kWh capacity sets dispatch duration — how many hours it can supply load after solar drops. A 200 kWh BESS at 50 kW discharge sustains load for four hours after sunset. Therefore, matching solar kWp with the right battery kWh is critical. See our guide on BESS C-Rate Explained for more on this relationship.

kWp vs kWh Mismatch: What Happens When Solar Is Oversized

In systems with limited grid export, too much solar kWp relative to battery kWh causes curtailment — wasted solar energy.

For example, a 50 kWp array at 80% efficiency producing 40 kW fills a 50 kWh battery in just 1.25 hours. After that, excess kWh is wasted. Our guide on choosing solar panels and batteries for a 100 kWh load shows how to avoid this in a full worked example.

For a broader view of how storage losses affect kWh throughput, see our article on energy storage losses in BESS.

kWp vs kWh Solar + Storage Design Rule of Thumb
Target battery kWh = 1–2 × average daily solar kWh generation

Example: A 10 kWp system in Delhi generating 27 kWh/day pairs well with a 25–50 kWh BESS.
This covers one overnight discharge cycle with buffer for low-sun days.
Off-grid systems or multi-day low-sun locations need a higher storage ratio.

4 Common kWp vs kWh Mistakes in Solar Quotes

These are the most frequent errors buyers make when reading and comparing solar proposals.

Mistake 1: Comparing kWp Without Factoring in Location

Two quotes showing ’10 kWp’ are not equal if the systems are in different locations. Always request an annual kWh yield estimate alongside the kWp figure.

Reputable suppliers use tools such as PVWatts or PVGIS from the EU Joint Research Centre to produce site-specific yield reports. Insist on seeing these before signing.

Mistake 2: Accepting kWh Estimates With Unrealistic Losses

Some suppliers inflate kWh projections by assuming only 5–10% system losses instead of the more realistic 15–25%.

Always ask which loss factors are included: temperature derating, soiling, inverter efficiency, wiring resistance, shading, and module mismatch. A credible yield report lists each factor explicitly.

Mistake 3: Sizing Battery Storage from kWp Instead of kWh

Sizing a battery based on peak kWp — rather than actual daily kWh generation — leads to oversized and overpriced storage. The battery must match the actual kWh generated each day, not the theoretical maximum.

Furthermore, use hourly generation profiles rather than peak values when sizing storage. This avoids undersizing the battery for mornings and evenings when kWp output is low.

Mistake 4: Ignoring kWp Degradation and Its Effect on kWh

Solar panels degrade annually — typically 0.5–0.8% per year for monocrystalline silicon. Consequently, a panel with 0.7%/year degradation retains about 82.5% of its kWp rating after 25 years.

This means fewer kWh per year as the system ages. Financial models must incorporate this degradation into their annual kWh projections. Ignoring it overstates long-term savings.

SunLith Energy Checklist infographic listing four verification steps for reviewing kWp and kWh accuracy when comparing solar quotes
kWp vs kWh Solar Quote Checklist

kWp vs kWh Quick Reference Summary

QuestionkWp AnswerkWh Answer
What does it measure?Peak power capacity under STCActual energy generated over time
Is it location-dependent?No — STC conditions are fixedYes — varies with irradiance, temp, losses
Typical residential value3–10 kWp rooftop system3,000–14,000 kWh/year (location-dependent)
How is it calculated?Number of panels × panel Wp ratingkWp × PSH/day × 365 × system efficiency
Does it appear on your bill?No — it is a system specificationYes — as kWh consumed or exported per month
Why does it matter?Comparing panels, sizing the arrayCalculating savings, ROI, and payback period

Frequently Asked Questions (FAQs)

Can a solar panel produce more than its kWp rating?

Yes, but only temporarily. This usually happens due to the “edge-of-cloud effect,” where passing clouds magnify sunlight, or in extremely cold, high-altitude environments where cold temperatures boost solar cell efficiency above standard test conditions.

Why doesn’t my solar system ever show its full kWp rating on my inverter app

This is completely normal. Your 5 kWp rating is measured in a perfect laboratory. In the real world, rooftop heat, inverter conversion losses, minor shading, and dirty panels typically reduce your real-time instantaneous output (kW) by 20% to 30% compared to the peak capacity.

Does a higher kWp rating mean better performance in cloudy weather?

Not necessarily. A higher kWp just means a larger system or higher-efficiency panels. For strong performance in overcast conditions, you should look at a panel’s NOCT rating and low-irradiance specs rather than its standard kWp rating.

Conclusion: kWp vs kWh — Use Both for Better Solar Decisions

kWp and kWh answer two completely different questions. kWp tells you what the system is rated to produce under ideal lab conditions. kWh tells you what it actually delivers at your location, accounting for losses, temperature, and seasonal irradiance.

For any solar investment, both metrics are essential. kWp helps you compare panels and size the system. kWh helps you calculate real energy savings and payback period. Therefore, never evaluate a solar quote on kWp alone.

At Sunlith Energy, every solar proposal includes a site-specific kWh yield model using validated irradiance data — so you see what the system will actually deliver. Contact our team to request a free yield assessment for your project.