⚡ Quick Answer: What Is a Safe Temperature Gradient in a BESS Pack? A temperature gradient is the difference in temperature between the hottest and coolest cells in a pack at the same moment, often written as ΔT. Many BESS specifications target a maximum gradient of around 5°C across a rack, with premium liquid-cooled systems aiming closer to 2-3°C. A larger temperature gradient does not just mean one hot spot. It means cells are aging at different rates within the same pack, which widens the performance gap that cell matching worked to close in the first place.
1. Why Temperature Uniformity Is a Different Problem Than Cooling Capacity
Choosing between air and liquid cooling answers one question: how much heat can the system remove overall. It does not answer a second, separate question, however: does that heat leave every cell at the same rate? A BESS can have more than enough total cooling capacity. Even so, it can still run a large temperature gradient, if heat leaves some cells faster than others.
This distinction matters because gradient problems do not always show up as an overheating alarm. A pack can sit comfortably within its overall safe temperature range. Meanwhile, one corner of the rack quietly runs several degrees hotter than another, cycle after cycle. Nothing trips. Nothing alarms. The pack simply ages unevenly, and nobody notices until the SOH numbers start to diverge.
2. What Counts as a Safe Temperature Gradient
Exact gradient limits vary by manufacturer, cell chemistry, and system design. As a result, treat any single number as a target to verify, not a universal rule. That said, a few reference points are commonly cited in BESS specifications.
Around 5°C maximum cell-to-cell gradient is a commonly specified ceiling for air-cooled and moderately cooled BESS racks.
2-3°C is a tighter target that premium liquid-cooled systems often aim for, particularly at utility scale, where thousands of cells raise the stakes of even small mismatches.
Gradient limits typically apply within a single rack or module first. They then get checked again at the full-system level, since gradients between racks can run larger than gradients within one rack.
Ask your supplier for their specific gradient target, not just their overall operating temperature range. A wide operating range, such as -20°C to 55°C, says nothing about how tightly matched cell temperatures stay relative to each other inside that range.
3. Three Root Causes of Uneven Cell Heating
Temperature gradients rarely come from one single cause. Instead, three factors typically combine to create them.
Coolant Path Position
In a liquid-cooled rack, coolant usually enters at one point and exits at another, picking up heat along the way. Cells nearest the coolant inlet sit in cooler fluid. Cells nearest the outlet, by contrast, sit in fluid that has already absorbed heat from cells earlier in the path. As a result, outlet-side cells often run measurably warmer than inlet-side cells. This happens purely because of their position in the flow path, not because of anything different about the cells themselves.
Cell Position Within the Pack
Cells near the edge of a rack or enclosure sit closer to the outside walls, where some heat escapes to the surrounding air. Cells buried in the center of a dense pack, on the other hand, have neighbors on every side, so that heat has fewer places to go. Center cells, therefore, often run hotter than edge cells, even under identical cooling and identical current.
Current Path and Busbar Resistance
Current does not always split perfectly evenly across parallel cell groups. Small differences in busbar length, connection quality, or contact resistance mean some current paths carry slightly more current than others. Since heating from resistance follows I²R, even a small current imbalance produces a disproportionate heating difference. This connects directly to internal resistance variation covered in our cell matching guide: cells or groups with higher resistance generate more heat at the same current. As a result, a resistance mismatch and a temperature gradient often reinforce each other.
4. How a Temperature Gradient Accelerates Divergent Aging
Battery aging reactions speed up with heat. Researchers publishing in PMC (National Center for Biotechnology Information) found that inhomogeneous cell temperature inside a pack is a real, measurable driver of uneven degradation, not just a theoretical concern. Applied to a pack with a real gradient, this means the hottest cells are not just uncomfortable. They are quietly aging faster than their cooler neighbors, cycle after cycle.
This is where uneven heating and cell matching intersect. A pack that started out well matched, as covered in our cell matching guide, can still drift apart over time. A persistent hot zone can push those cells toward faster capacity fade. Meanwhile, cooler cells barely age at all. The BMS then has to work harder to compensate for a gap that thermal design, not manufacturing variance, actually created.
Cold cells create a different problem. Below their optimal range, cells deliver less power. They also accept slower charge rates. In practice, this means the coolest cells in a pack can become the limiting factor for dispatch power. This happens even though they are aging the slowest of anyone in the rack.
5. How the BMS Responds to What It Can Actually See
A BMS cannot manage a gradient it cannot measure. Sensor placement, therefore, matters as much as sensor accuracy. A design with one temperature sensor per module, placed at a single convenient point, will miss gradients happening between that sensor’s location and the rest of the module.
More thorough designs, instead, place multiple sensors per module. These sit at known high-risk points — near coolant outlets, at pack centers, and at busbar connections. This ties directly into the safety diagnostic algorithms covered in our BMS algorithms guide, since a BMS can only flag a developing hot spot if a sensor actually sits close enough to detect it before the gradient becomes a real problem.
6. Questions to Ask Your Supplier
What is your specified maximum cell-to-cell temperature gradient, not just the overall operating temperature range?
How many temperature sensors does each module have, and where are they physically placed?
For liquid-cooled systems, what is the coolant flow path? What gradient exists between inlet-side and outlet-side cells?
Do you have field or test data showing SOH divergence between hot-zone and cool-zone cells over time?
How does the BMS respond if a persistent gradient develops? Does it just log the data, or does it adjust balancing or dispatch limits?
Conclusion: A Temperature Gradient Is a Slow Problem That Looks Like No Problem at All
Overheating alarms are easy to notice. Temperature gradients, however, are not. A pack can run entirely within its safe range. It can still age unevenly, cell by cell. Nobody measured the gradient closely enough to see it. Ask suppliers for their specific gradient limit, not just their operating range. Then ask how many sensors actually watch for it.
For the manufacturing-stage half of this problem — how mismatched cells enter a pack in the first place — see our cell matching guide. Matching and thermal design solve two different sources of the same underlying issue: cells in one pack quietly drifting apart from each other over time.
☀️ Need a Thermal Design Review for Your BESS Project? Sunlith Energy reviews cooling architecture, sensor placement, and gradient specifications for BESS projects from 50 kWh upward. Contact us before you finalize a thermal design.
Frequently Asked Questions About Cell Temperature Gradients
What is a temperature gradient in a battery pack?
A temperature gradient is the difference between the hottest and coolest cell temperatures in a pack at the same moment, usually written as ΔT. It is a separate measurement from the pack’s overall operating temperature range. That is because a pack can sit within a safe range overall while still having a large gap between its warmest and coolest cells.
What causes temperature gradients inside a BESS pack?
Three factors typically combine to cause gradients. Coolant path position matters, since cells near a coolant outlet run warmer than cells near the inlet. Cell position within the pack matters too, since center cells trap more heat than edge cells. Finally, uneven current distribution from busbar resistance differences creates uneven I²R heating across parallel cell groups.
How does uneven heating affect cell aging?
Hotter cells within a gradient age faster than cooler cells in the same pack, since battery degradation reactions speed up with heat. Over time, this can widen the performance gap between cells, even in a pack that started out well matched. As a result, the BMS ends up compensating for a gap that thermal design created, rather than manufacturing variance.
What is a safe temperature gradient for a BESS pack?
Exact limits vary by manufacturer and system design. However, a maximum gradient of around 5°C is commonly specified for air-cooled and moderately cooled systems, while premium liquid-cooled systems often target 2-3°C. Always confirm the specific figure with your supplier rather than assuming a standard number applies.
How many temperature sensors does a BESS module need?
There is no single universal number. Still, a module with only one sensor at a single convenient location cannot detect a gradient occurring elsewhere in that module. More thorough designs, therefore, place multiple sensors at known high-risk points, such as near coolant outlets, pack centers, and busbar connections.
⚡ Quick Answer: What Is Cell Matching? Cell matching is the process of sorting battery cells by voltage, capacity, and internal resistance before they go into a pack, so cells with similar characteristics end up grouped together. It happens on the factory floor, before assembly. This is not the same thing as BMS balancing, which corrects drift after the pack is already built and in use. Skipping cell matching does not make a pack unsafe by itself, since the BMS still protects it. However, it does mean the BMS has to work much harder from day one. As a result, the pack’s real-world capacity and cycle life will likely fall short of what the cell datasheet promises.
1. Why Cell Matching Happens Before the BMS Gets Involved
Cell matching is a manufacturing step that happens before a single cell ever reaches a pack. Even cells from the same production batch are not identical. Small differences in electrode coating thickness, electrolyte fill, and formation cycling leave every cell slightly different. Capacity, voltage, and internal resistance all vary a little, even when the datasheet lists one number for all of them. In a single cell, this variation does not matter. Once dozens or hundreds of cells connect into a pack, though, it matters a great deal.
The BMS will eventually correct some of this drift through balancing, as covered in our complete battery management system guide. Cell matching, however, happens earlier. It is a manufacturing step, not a BMS function, and it exists to reduce how much correction the BMS has to do later.
2. Three Criteria Used to Sort Cells: Voltage, Capacity, and Resistance
Cell matching typically screens for three characteristics. Each one affects the pack differently. As a result, a thorough process checks all three rather than relying on just one.
Voltage (or SOC) matching — technicians group cells by their resting voltage after a defined charge or discharge point. This is the simplest check to run. It also catches the most obvious mismatches quickly.
Capacity matching — technicians charge and discharge test each cell to measure actual usable Ah, then group cells with similar capacity together. This matters most for series strings, since the lowest-capacity cell sets the ceiling for the whole string.
Internal resistance matching — technicians measure resistance using one of two methods, DCIR or ACIR, then group similar-resistance cells into the same parallel group. This matters most for parallel groups, since a lower-resistance cell otherwise takes more than its fair share of current.
High-volume manufacturers often combine all three, and internal resistance testing itself splits into two distinct methods worth understanding.
DCIR vs ACIR: Two Ways to Measure Internal Resistance
DCIR (DC internal resistance) testing applies a current pulse to the cell and measures the resulting voltage drop. Technicians then calculate resistance directly from Ohm’s law. This method closely reflects how the cell behaves under a real load, since it uses an actual current step rather than a small signal. The tradeoff is speed: each pulse needs time to apply and settle, which slows down high-volume sorting.
ACIR (AC internal resistance) testing instead applies a small alternating current signal, commonly at 1 kHz, and reads the resulting impedance directly. This method runs much faster than DCIR, which is why many production sorting lines use it as a first-pass screen. However, ACIR mostly captures the cell’s high-frequency ohmic resistance. It does not fully capture the slower electrochemical charge-transfer resistance that DCIR testing reveals.
In practice, many manufacturers use ACIR for fast first-pass screening across an entire incoming batch, then apply DCIR pulse testing to verify cells before they go into the same series string or parallel group. A supplier who only mentions one of these two methods is likely doing the faster, less thorough version alone.
3. Series Strings vs Parallel Groups: Different Priorities
Series and parallel connections fail differently when cells are mismatched. For this reason, they need different matching priorities.
In a series string, cells share the same current, but their voltages differ based on individual state. The weakest cell — the one with the lowest capacity — reaches its low-voltage cutoff first during discharge. Likewise, it hits its high-voltage cutoff first during charge. As a result, that one weak cell limits the usable capacity of the entire string. This happens even though the other cells still have energy left. This is why capacity matching matters most for series strings.
In a parallel group, cells share the same voltage, but current splits between them based on internal resistance. A cell with lower resistance pulls more current than its neighbors. In turn, it works harder and ages faster. Over time, that uneven current sharing can widen the resistance gap further, creating a feedback loop. Left unchecked, this loop drives localized accelerated aging in the same cells, cycle after cycle. That localized wear is what leads to premature pack failure, well before the rest of the pack reaches end of life. For a buyer, that translates directly into a shorter calendar life and a worse return than the datasheet cycle life implied. This is why resistance matching matters most for parallel groups.
☀️ Resistance matching matters most for parallel groups. 💡 The Thermal Feedback Loop: Internal resistance mismatch and localized heating reinforce one another. For a deeper look at how temperature imbalances accelerate this degradation, read our guide on Cell Temperature Gradients in BESS
4. What Happens If You Skip Cell Matching
Skipping cell matching does not make a pack dangerous on its own. A properly designed BMS still enforces voltage and temperature limits, regardless of how well matched the cells are. What changes, instead, is how hard the BMS has to work, and how much capacity the pack actually delivers.
If cells arrive at noticeably different SOC and go into a pack without matching, the BMS must run a large initial balancing pass. This happens the first time the pack charges. Passive balancing currents are typically small — often just tens to a few hundred milliamps — compared to the pack’s full Ah rating. Correcting a large initial mismatch this way can take many hours. In some cases, it takes several charge cycles before the pack reaches a properly balanced state.
Beyond the slow start, an unmatched pack often never fully closes the gap. If capacity variation between cells is large enough, ongoing balancing keeps the weakest cell from falling further behind. Still, balancing cannot manufacture capacity that a weak cell simply does not have. The pack’s usable capacity, therefore, ends up set by its weakest link, cycle after cycle.
5. Top-Balance vs Bottom-Balance: Which Comes First
When manufacturers match cells by connecting them in parallel before final assembly, the SOC point at which this happens changes the outcome.
Bottom-balance matching connects cells in parallel at a low SOC, often close to how they arrive from the manufacturer. This approach is simple and fast. However, it only aligns the cells at the bottom of the charge curve. The pack will likely still need a top-of-charge balancing pass once assembled and charged for the first time.
Top-balance matching, instead, charges the parallel-connected cells to a high SOC before final assembly, typically near the top of the charge curve. This produces a better-aligned pack from the first charge. That is because the region where mismatch matters most for safety and full capacity gets addressed early. The tradeoff is time: bringing a large batch of cells to a matched high-SOC state takes more equipment and more hours before assembly can begin.
6. Cell Matching at Scale: How Manufacturers Grade Cells for Utility BESS
At utility scale, matching thousands of cells by hand is not practical. Instead, high-volume manufacturers run automated sorting lines. These measure voltage, capacity, and resistance for every incoming cell. Grading software then groups cells into matched sets before they ever reach the assembly line.
For a BESS buyer, this raises a practical question worth asking directly: does the supplier grade and match cells before assembly, or does the pack rely entirely on the BMS to fix mismatch after the fact? Independent testing resources such as Battery University document just how differently DCIR and ACIR readings can diverge on the same cell, which is exactly why asking a supplier which method they use, and at which stage, is worth doing directly.
A supplier who can show incoming cell test data is doing meaningfully more quality control than one who simply points to their BMS’s balancing feature. Look, in particular, for a specific matching tolerance — for example, a defined percentage spread in capacity, or a defined milliohm band in resistance.
7. Questions to Ask Your Cell or Pack Supplier
Do you test and match cells by voltage, capacity, and internal resistance before assembly, or only one of these?
For internal resistance, do you use DCIR, ACIR, or both — and at which stage does each method apply?
What matching tolerance do you use? For example, what percentage spread in capacity, or what milliohm band in resistance?
Do you keep incoming cell test data on file? Can you provide it for the specific batch used in our order?
For series strings, how do you decide which cells go together — capacity, resistance, or both? Our BMS algorithms guide covers how the BMS itself later measures DCIR for SOH estimation, which is a useful comparison point when you ask this question.
Is matching done at a low SOC, a high SOC, or both, before final assembly?
Conclusion: Matching Sets the Ceiling the BMS Can’t Raise
A BMS is very good at correcting small, ongoing drift between cells. It is not designed, however, to compensate for a pack that started out badly mismatched. Cell matching before pack assembly sets the baseline the BMS then has to maintain for the life of the system. A well-matched pack lets the BMS do its normal job: fine-tuning small differences over time. A poorly matched pack, by contrast, forces the BMS into a losing battle against a gap it cannot close, cycle after cycle.
When evaluating a cell or pack supplier, ask specifically how they match cells before assembly, including whether they use DCIR, ACIR, or both. Do not just ask how the BMS balances them afterward. For supplier evaluation more broadly, see our BESS supplier BMS evaluation guide. The cell matching answer says a lot about how much real capacity and cycle life you can expect to see in practice.
☀️ Need Help Evaluating a Cell Matching Process? Sunlith Energy reviews incoming cell test data, matching tolerances, and pack assembly quality control for BESS projects from 50 kWh upward. Contact us before you finalize a cell or pack supplier.
Frequently Asked Questions About Cell Matching
Is cell matching the same as BMS balancing?
No. Cell matching happens before assembly. It is a manufacturing step that sorts cells by voltage, capacity, and internal resistance, so similar cells end up grouped together. BMS balancing, on the other hand, happens after assembly, correcting the small drift that develops during normal use. Matching reduces how much balancing the BMS has to do; it does not replace it.
What is the difference between DCIR and ACIR matching?
DCIR testing applies a current pulse and calculates resistance from the voltage drop using Ohm’s law, closely reflecting real load behavior. ACIR testing applies a small AC signal, commonly at 1 kHz, and reads impedance directly, which runs much faster but mostly captures high-frequency ohmic resistance rather than the full picture. Many manufacturers use ACIR for fast first-pass screening, then confirm with DCIR before final grouping.
What is the difference between capacity-based and resistance-based sorting?
Capacity-based sorting groups cells with similar usable Ah, and matters most for series strings, since the lowest-capacity cell sets the ceiling for the whole string. Resistance-based sorting, by contrast, groups cells with similar internal resistance, and matters most for parallel groups, since a lower-resistance cell will otherwise pull more than its fair share of current.
Does skipping this step make a battery pack unsafe?
Not directly. A properly designed BMS still enforces voltage and temperature limits, no matter how well the cells were matched. That said, skipping this step does mean the BMS must run a larger initial balancing pass. In turn, the pack’s real-world capacity may fall short of the datasheet value, since the weakest cell limits the whole pack.
Should I ask my BESS supplier for this test data?
Yes. Ask whether the supplier tests and matches cells by voltage, capacity, and internal resistance before assembly, and which resistance method they use. A supplier who can provide incoming cell test data for your specific batch is demonstrating a real quality control process, not just relying on the BMS to compensate after the fact.
Is top-balance or bottom-balance better?
Top-balance, which aligns cells at a high SOC before assembly, generally produces a better-aligned pack from the first charge. That is because it addresses the top-of-charge region where mismatch matters most. Bottom-balance is faster, but the pack will likely still need a top-of-charge balancing pass once assembled.
⚡ Quick Answer: What Is BMS Functional Safety? BMS functional safety is the structured process used to find and control failure risks before a battery management system reaches the field. It centers on two core methods: HARA (Hazard Analysis and Risk Assessment), which identifies hazards and ranks their risk, and FMEA (Failure Modes and Effects Analysis), which traces specific failure modes to their effects. In automotive BMS design under ISO 26262, this risk ranking is called ASIL. For stationary BESS, the equivalent rating is SIL under IEC 61508, since ASIL itself is an automotive-only term. A supplier who can show you their HARA and FMEA documentation, not just a certificate, has done the real engineering work.
1. Why the Process Matters More Than the Certificate
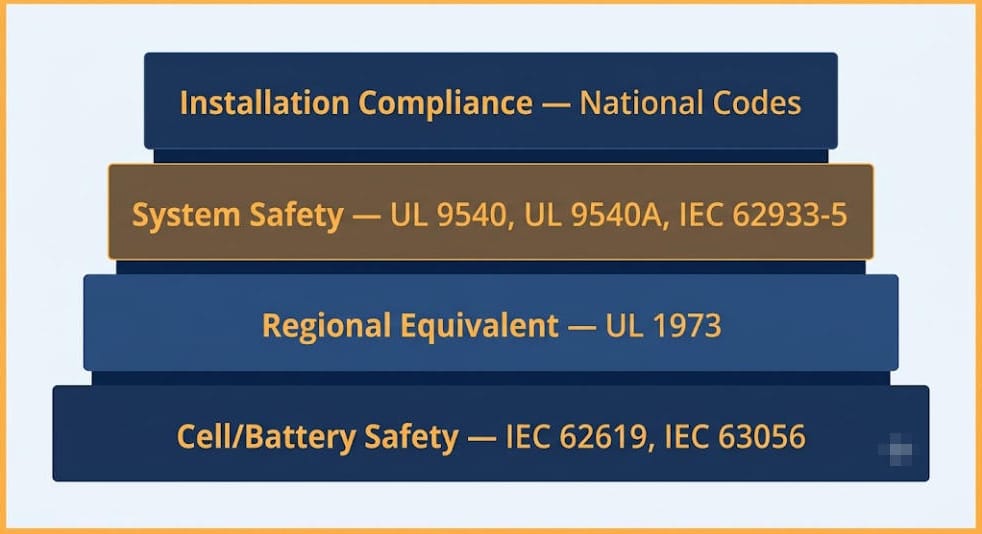
Most BMS buyers ask suppliers for certifications: UL 1973, IEC 62619, sometimes UL 9540A. Those certificates matter. However, they mostly confirm the outcome, not the process behind it. BMS functional safety is that process. It is the structured method engineers use to find failure risks early. In other words, it catches problems before they become field failures or safety incidents.
For the certifications a BMS itself typically carries, see our complete battery management system guide. This article goes behind those certificates, into the HARA and FMEA process that safety engineers use to earn them in the first place.
2. HARA: How Hazards Get Identified and Ranked
HARA stands for Hazard Analysis and Risk Assessment. It is the starting point of any BMS functional safety process. First, engineers define the “item” under review — for example, the high-voltage battery pack and its BMS. Then they ask a simple question: what could go wrong, and how bad would it be?
A typical HARA example for a BMS looks at overvoltage detection during charging. If that detection fails, the battery can overcharge. In the worst case, this leads to thermal runaway. As a result, HARA ranks this kind of hazard using three factors: how severe the harm could be, how often the situation is likely to occur, and how controllable it is once it starts. Together, these three factors produce a risk classification for that specific hazard.
3. From HARA to ASIL or SIL: Why the Terms Differ Between EV and BESS
Here is where a lot of BMS content gets confusing. In automotive functional safety, ISO 26262 assigns each hazard an ASIL rating. ASIL stands for Automotive Safety Integrity Level, and it ranges from ASIL A at the low end to ASIL D at the high end. Notably, ASIL is an automotive-only term. It only applies under ISO 26262.
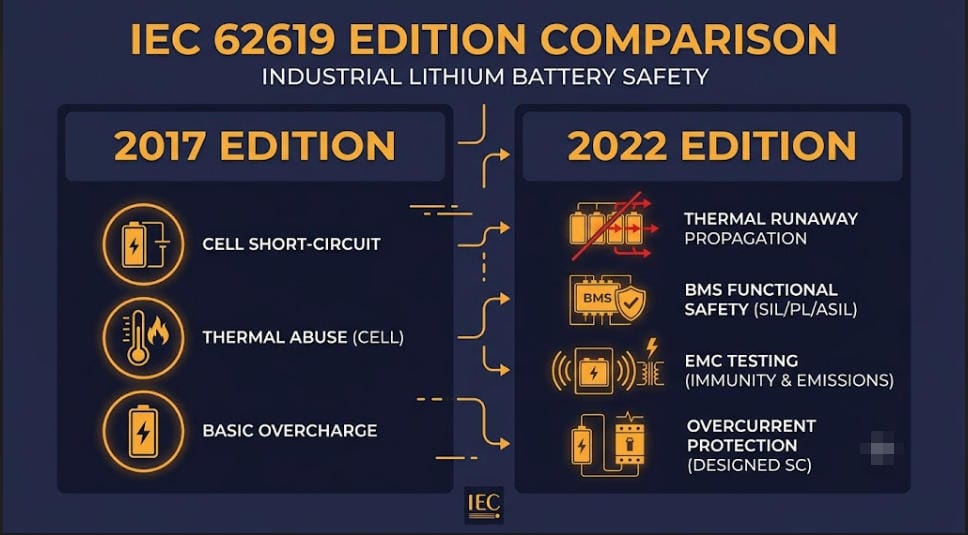
Stationary BESS does not use ISO 26262 or ASIL at all. Instead, industrial and stationary battery systems typically reference IEC 61508, the foundational functional safety standard for industrial equipment. Under this standard, the equivalent risk rating is called SIL, or Safety Integrity Level. It ranges from SIL 1 at the low end to SIL 4 at the high end. IEC 62619, the safety standard most directly relevant to stationary lithium battery systems, builds on this same risk-based approach.
In short: if a supplier quotes an ASIL rating for a stationary BESS product, ask why. That term belongs to automotive design. For BESS, the correct reference point is SIL under IEC 61508, or the specific requirements in IEC 62619.
4. FMEA: Finding Failure Modes Before They Find You
Once HARA has ranked the hazards, FMEA takes over next. FMEA stands for Failure Modes and Effects Analysis. It works from the bottom up. First, engineers list every plausible way a component can fail. Then, they trace each failure forward to its effect on the system.
For a BMS, a typical FMEA entry might look like this: a voltage sensing connector goes loose. That failure causes a false voltage reading. In turn, the false reading could let the BMS miss a real overvoltage condition. For each entry, engineers also note a detection or mitigation mechanism. For example, this might be a redundant voltage check, or a plausibility test that catches an implausible reading before it reaches a safety-critical decision.
A properly documented FMEA does not just list failures. It also proves how each one gets prevented or caught. That proof is what an auditor or a certification body actually reviews.
5. FMEDA: When Hardware Diagnostics Get Quantified
FMEDA extends FMEA with numbers. It stands for Failure Modes, Effects, and Diagnostics Analysis. Rather than only describing failure modes in words, FMEDA calculates a diagnostic coverage percentage for each one. In other words, it shows what fraction of that failure mode’s occurrences the system’s safety mechanisms will actually catch.
This matters for BMS functional safety because a hardware design is only as safe as its worst-covered failure mode. A BMS might claim excellent overall diagnostic coverage. Even so, it could still leave one connector or one sensor path poorly monitored. FMEDA is what surfaces that gap before a customer, not an incident, does.
6. What a Real BMS Functional Safety Process Actually Produces
A supplier who has genuinely run this process should, therefore, be able to produce specific documents, not just a summary slide. Look for these deliverables:
A HARA report, listing each identified hazard with its severity, exposure, and controllability ratings, plus the resulting SIL (for BESS) or ASIL (for automotive) classification.
Safety goals derived from the HARA. These are stated as top-level requirements, for instance: “prevent cell overvoltage during charging under single-point failure conditions.”
A functional safety concept. This translates each safety goal into requirements — first functional, then technical, down to the hardware and software level.
An FMEA or FMEDA report, listing failure modes, their effects, and the safety mechanism that detects or prevents each one.
A safety case or validation report. This shows how testing confirmed the safety mechanisms actually work as designed.
These safety mechanisms must map seamlessly across the entire battery topology. For a closer look at how these safety-critical diagnostic lines and communication protocols are distributed across physical hardware layers, see our guide to centralised, modular, and wireless BMS architecture.
For the specific BMS algorithms — SOH, SoP, isolation monitoring, safety diagnostics — that these safety mechanisms often rely on, see our BMS algorithms guide. In short, functional safety analysis is the process that justifies why those algorithms exist and how thoroughly they were tested.
7. Questions to Ask Your Supplier About BMS Functional Safety
Before finalizing your procurement, it helps to have a structured framework for vetting a vendor’s safety claims. For a comprehensive breakdown of what to look for beyond documentation, review our BMS supplier evaluation checklist.
Can you show me the HARA report for this BMS, including the hazards identified and their risk ratings?
Is your safety rating expressed as SIL under IEC 61508, or ASIL under ISO 26262? Does that match whether this is a stationary or automotive product?
Can you provide the FMEA or FMEDA report showing diagnostic coverage for each major failure mode, not just one overall percentage?
What safety goals came out of your HARA? How do they map to the BMS features you actually ship?
Has an independent third party reviewed this functional safety process, or is it entirely self-assessed?
Conclusion: Ask for the Process, Not Just the Certificate
A certification number tells you a BMS passed a test. BMS functional safety documentation tells you why it should pass. It also shows what specific hazards the engineering team found and controlled along the way. For BESS projects, insist on SIL ratings under IEC 61508 or IEC 62619 evidence. Do not accept an automotive ASIL number instead, since it simply does not apply. Ask to see the HARA and FMEA reports directly. After all, a supplier with nothing to show beyond a certificate has likely skipped the part of the work that actually keeps a battery pack safe.
☀️ Need a BMS Functional Safety Review for Your BESS Project? Sunlith Energy reviews BMS functional safety documentation — HARA reports, FMEA coverage, and SIL classification — for BESS projects from 50 kWh upward. Contact us before you finalize a supplier.
Frequently Asked Questions About BMS Functional Safety
What is the difference between HARA and FMEA in BMS functional safety?
HARA identifies hazards at the system level and ranks their risk using severity, exposure, and controllability. FMEA, on the other hand, works at the component level. It traces specific failure modes up to their effects on the system. Typically, HARA comes first and sets the risk target. FMEA then verifies the design meets that target.
Why doesn’t ASIL apply to stationary BESS?
ASIL, or Automotive Safety Integrity Level, is defined specifically within ISO 26262, an automotive functional safety standard. Stationary BESS does not fall under that standard. Instead, it typically references IEC 61508, whose equivalent risk rating is called SIL, or Safety Integrity Level.
What is FMEDA and how is it different from FMEA?
FMEDA, or Failure Modes, Effects, and Diagnostics Analysis, extends FMEA by adding a quantified diagnostic coverage percentage for each failure mode. Standard FMEA describes failure modes and their effects in words. FMEDA, by contrast, calculates how much of each failure mode the system’s diagnostics will actually catch.
What documents should a BMS supplier provide as proof of functional safety work?
At minimum, ask for the HARA report and the safety goals derived from it. Also request the FMEA or FMEDA report, plus a safety validation document showing that testing confirmed the safety mechanisms work as intended. If a supplier can only provide a certificate, with none of these underlying documents, they have likely not completed a full functional safety process.
Does IEC 62619 replace the need for a HARA and FMEA process?
No. IEC 62619 sets safety requirements specifically for stationary lithium battery cells and systems. However, it does not replace the underlying HARA and FMEA process used to design and verify BMS safety mechanisms. Instead, the two work together: IEC 62619 sets the target, and the functional safety process is how a supplier gets there and proves it.
⚡ Quick Answer: Which BMS Architecture Is Right for a BESS? BMS architecture comes in three main types: centralised (one controller handles all cells directly), modular master-slave (each module has its own slave BMS reporting to a master), and wireless BMS (modules communicate without a physical data harness). Centralised suits small residential systems. Modular master-slave is the standard for commercial and utility-scale BESS. Wireless BMS is maturing fast in EVs but remains early-stage for grid-scale BESS, mainly due to EMI risk in high-power environments and a 25-40% cost premium.
1. Why BMS Architecture Matters Beyond Just System Size
Most guides treat BMS architecture as a simple size question: small systems get one BMS, big systems get many. That is true as a starting point. But the choice also decides how a fault in one module affects the rest of the pack, how much wiring a technician has to run and maintain, and how easily the system scales later without a redesign.
For the basics of what a BMS does — monitoring, protection, balancing, and communication — see our complete battery management system guide. This article goes one level deeper: the wiring topology inside modular designs, and the wireless BMS option now entering the market.
2. Centralised BMS: How a Single Controller Works
In a centralised design, one controller connects directly to every cell in the pack. It handles voltage monitoring, balancing, and protection for all cells from a single board. There is no master-slave hierarchy here, simply because there is only one controller.
This setup keeps cost and complexity low. As a result, it works well for residential systems under roughly 100 kWh. Cell counts here typically stay in the range of a few dozen to a few hundred. Beyond that range, though, the wiring harness needed to connect every single cell to one board becomes heavy, expensive, and hard to service.
A centralised design also has a single point of failure built in. If the central controller fails, the entire pack loses monitoring and protection at once. For small systems, this risk is usually acceptable, given the lower stakes and lower cost. For larger systems, however, it is not.
3. Modular (Master-Slave) BMS Architecture: How It Works
A modular design, often called master-slave, splits the job across many controllers instead of one. Each battery module gets its own slave BMS board. That slave handles local cell monitoring and balancing for its own module only. In turn, all slave boards report up to a central master BMS, which coordinates the full pack and talks to the inverter and EMS.
This setup scales far better than a centralised design. For instance, adding another module usually means adding another slave board to the daisy chain, not redesigning the whole harness. As a result, it is the standard choice for commercial and utility-scale BESS today.
The real engineering decision here, though, is not whether to use master-slave. Most large systems already do. Instead, it comes down to which wiring protocol connects the slaves to the master. It also depends on how much independence each slave keeps if it loses contact with the master.
4. Wiring Protocols in Modular Designs: isoSPI vs CAN vs LIN
Three communication protocols dominate the physical link between slave boards and the master. Each one makes a different tradeoff between speed, noise immunity, and cost. For a deeper look at how these networks manage data across the entire system, read our guide on BESS communication protocols.
isoSPI — an isolated version of SPI (Serial Peripheral Interface), built specifically for daisy-chaining BMS slave boards. It runs over a simple twisted pair. It tolerates the electrical noise inside a battery pack well, and it supports fast data rates. As a result, many premium BMS platforms use isoSPI for the slave-to-slave and slave-to-master link inside one rack.
CAN bus — the same protocol widely used in automotive and industrial systems. CAN is robust, well standardized, and easy to integrate with third-party inverters and EMS platforms. Because of this, it is common for the master-to-inverter and master-to-EMS link, and sometimes for slave-to-master links in simpler designs.
LIN bus — a lower-cost, lower-speed protocol used for less time-critical links, such as temperature sensor networks within a module. In short, it trades speed for lower wiring and component cost.
In practice, many BESS platforms combine protocols. isoSPI handles fast, noise-resistant slave communication within a rack. CAN bus then takes over at the master level for system-wide integration. Ask your supplier which protocol handles which link. Otherwise, a design built entirely on one lower-speed protocol may struggle to keep up with fast balancing or protection response at scale.
5. Wireless BMS Architecture: How It Works and Where It Stands Today
Wireless BMS removes the physical data harness between modules entirely. Instead of isoSPI or CAN wiring, slave boards communicate with the master using Bluetooth Low Energy, Zigbee, or a proprietary 2.4GHz radio protocol. Cell voltage, temperature, and balancing commands all travel wirelessly instead of over copper.
Why Wireless BMS Is Appealing
The appeal is real. Going wireless removes the weight, cost, and failure points of a physical wiring harness. It also simplifies manufacturing, since there are fewer connectors to install and fewer wiring faults to test for. This matters most where running a wired harness is expensive or awkward. Second-life BESS built from repurposed EV modules, for example, often have mismatched connector layouts that make wiring harder than usual.
Why Utility-Scale BESS Isn’t There Yet
That said, wireless BMS is not yet the default choice for grid-scale BESS, and current research explains why. A peer-reviewed review of wireless BMS technology, published in MDPI Energies, notes that wireless systems remain at an early stage of maturity. This is especially true for high-power settings, where electromagnetic interference from PCS switching can disrupt the link.
Three practical concerns keep wireless BMS out of most utility-scale BESS today. First, EMI susceptibility: high-power switching from inverters and PCS equipment can interfere with the wireless signal. That kind of interference in a safety-critical monitoring link is a serious risk, not a minor inconvenience. Second, cost: wireless hardware currently runs 25-40% more than equivalent wired systems, which matters a great deal at grid scale. Third, standardization: there is no universal wireless protocol yet. As a result, mixing components from different makers is harder than it is with wired isoSPI or CAN systems.
For now, wireless BMS is furthest along in electric vehicles, where weight savings translate directly into range. It is also gaining ground in residential solar-plus-storage products, where simple assembly and remote installation flexibility matter more than they do at utility scale. For grid-scale BESS specifically, expect wired modular designs to stay the standard for the next several years. Wireless will likely enter first through pilot projects and second-life storage deployments.
6. Comparing Centralised, Modular, and Wireless BMS Architecture Options
Factor
Centralised
Modular (Master-Slave)
Wireless
Typical system size
Under 100 kWh
100 kWh to multi-MWh
EVs, residential ESS today; utility-scale still early
Wiring complexity
High at scale — every cell wired to one board
Moderate — daisy-chained per module
Minimal — no data harness
Failure isolation
Poor — single point of failure
Good — slave boards can protect locally
Depends on link redundancy design
Cost
Low
Moderate, scales predictably
25-40% premium over wired today
Maturity for BESS
Proven, residential standard
Proven, commercial/utility standard
Early-stage for grid-scale
7. Failure Isolation: The Real Safety Question Behind the Design
The most important question about any BMS design is not which protocol it uses. Instead, it is what happens when one part of the system fails. In a well-designed modular setup, each slave board keeps protecting its own module even if it loses contact with the master. This relies heavily on the local execution of core BMS algorithms to calculate state-of-charge (SOC) and state-of-health (SOH) independently. In a poorly designed system, however, the whole pack’s protection depends entirely on the master controller.
Evaluating these single points of failure is a core part of rigorous risk assessment. For a deeper look at how engineers map out these risks and establish safety goals, see our guide on BMS functional safety, HARA, and FMEA.
So ask your supplier directly: if the master BMS fails or loses communication, does each module still enforce its own voltage and temperature limits? If the answer is no, that design has a hidden single point of failure, no matter how many slave boards it has.
8. Choosing the Right BMS Architecture for Your BESS Project
For residential and small commercial systems under 100 kWh, a centralised design is usually the right call, since it is simpler, cheaper, and proven. For commercial and utility-scale BESS, on the other hand, modular master-slave is the standard. Here, the real decision is choosing a supplier whose wiring protocol and failure-isolation design hold up under real-world conditions. Wireless BMS, meanwhile, is worth watching, and worth specifying for second-life or hard-to-wire retrofit projects today. Still, it is not yet the safe default for new utility-scale BESS.
9. Questions to Ask Your Supplier About BMS Architecture
Is the design centralised or modular master-slave, and does that match our system size?
What wiring protocol connects slave boards to the master — isoSPI, CAN, or a mix?
If the master fails or loses communication, does each slave module still enforce its own protection limits independently?
If any wireless components are proposed, what EMI testing has been done in a real high-power switching environment, not just a lab bench test?
How does the system scale if we add modules later — does it require a wiring redesign, or just an extension of the existing daisy chain?
Conclusion: BMS Architecture Shapes Reliability as Much as Chemistry Does
Cell chemistry gets most of the attention in a BESS purchase decision. However, the design behind the cells deserves the same scrutiny. A centralised setup suits small systems. Modular master-slave is the proven standard for commercial and utility-scale BESS. Wireless BMS is real, growing, and worth watching, but for grid-scale projects today, it remains an early-stage option, not a default choice.
Whatever design a supplier proposes, ask the failure-isolation question directly. After all, a pack with excellent cells and a poorly isolated BMS is still a fragile system.
☀️ Need a BMS Architecture Review for Your BESS Project? Sunlith Energy reviews BMS architecture proposals — wiring topology, failure isolation, and protocol choice — for BESS projects from 50 kWh upward. Contact us before you finalize a supplier.
Frequently Asked Questions About BMS Architecture
What is the difference between centralised and modular BMS architecture?
A centralised design uses one controller connected directly to every cell in the pack. A modular design, also called master-slave, works differently. It splits monitoring across multiple slave boards — one per module — that report to a central master controller. As a result, modular designs scale better for larger systems.
Is wireless BMS ready for utility-scale BESS?
Not yet, as a default choice. Wireless BMS works well in electric vehicles and is gaining ground in residential storage. However, electromagnetic interference from high-power switching, a 25-40% cost premium, and a lack of standard protocols keep it early-stage for grid-scale BESS today.
What is isoSPI and why does it matter for battery pack wiring?
isoSPI is an isolated communication protocol built for daisy-chaining BMS slave boards. It runs over a simple twisted pair, resists the electrical noise inside a battery pack, and supports fast data rates. For this reason, it is common in modular designs for grid-scale BESS.
Why does failure isolation matter more than the design type?
A modular design only delivers its safety benefit under one condition: slave boards must keep protecting their own modules when they lose contact with the master. Otherwise, that modular design still depends entirely on the master controller. In that case, it has the same single point of failure as a centralised system, just with extra hardware.
Can I mix wired and wireless BMS in one BESS?
In principle, yes, and this is already happening in some second-life storage projects that use repurposed EV modules with mismatched wiring. In practice, though, mixing protocols adds integration complexity. So confirm with your supplier how a hybrid design handles failure isolation and data sync between the wired and wireless segments.
⚡ Quick Answer: What Is BMS Cycle Counting? BMS cycle counting turns raw current and SOC data into a wear metric. First, most systems track Ah/kWh throughput and convert it into Equivalent Full Cycles (EFC). Next, advanced platforms run a rainflow algorithm that splits a messy SOC trace into discrete, depth-weighted cycles. Finally, premium BMS platforms add a stress-weighted layer for C-rate and temperature. As a result, BMS cycle counting feeds SOH and RUL models, not just a simple warranty odometer.
BMS cycle counting sounds simple. In reality, it is one of the least understood functions inside a Battery Management System. Every BESS datasheet shows a number like “6,000 cycles to 80% SOH.” Few buyers ask the obvious follow-up question: how does the BMS actually reach that count in the field? A grid-connected battery rarely swings cleanly from 100% to 0% and back. Instead, it moves up 12%, down 4%, up 20%, down 7%, dozens of times a day. Dispatch signals, solar variability, and frequency-regulation events all drive this pattern. Because of this, converting a noisy trace into one clean cycle number is a genuinely hard firmware problem.
This guide explains exactly how BMS cycle counting works today. First, we cover why simple threshold counting fails for BESS. Next, we break down the rainflow algorithm, borrowed from mechanical fatigue analysis. Then, we show how it solves the partial-cycle problem. Finally, we explain why the datasheet number rarely matches what your BMS reports in the field. For the state-estimation layer this article builds on, see our guides to BMS SOC estimation methods and BMS algorithms explained.
1. Why BMS Cycle Counting Is Harder Than It Sounds
A cycle sounds easy to count: full charge, full discharge, done. However, “one cycle” has no single agreed definition outside the lab. A cell tested for its datasheet rating runs controlled, repeatable 100%–0% swings at a fixed C-rate and temperature. However, a cell inside a grid-connected BESS does nothing of the sort.
In practice, real-world SOC traces look like a jagged mountain range. Hundreds of small reversals happen every day. A dispatch instruction, a passing cloud, or a short frequency-regulation event can each trigger one. If BMS cycle counting logged every reversal as a cycle, one day of frequency regulation could register thousands of cycles. That would badly overstate wear. On the other hand, a threshold-only method misses just as much. A peak-shaving BESS that stays within the 20–80% band could show almost zero full cycles. Yet it may still have years of hard use behind it.
Neither outcome helps warranty tracking or SOH modelling. For this reason, BMS and EMS firmware rely on purpose-built cycle-counting algorithms instead of simple threshold logic. According to Energy-Storage.News, the industry still lacks one universal definition of a cycle. That gap is exactly why several competing counting methods exist side by side today.
The most basic form of BMS cycle counting sets two SOC thresholds, typically near 95% and 5%. Firmware then adds one to a counter each time the pack completes a full traverse between them. This approach is cheap to build and easy to explain. As a result, it shows up often in low-cost consumer BMS platforms.
For stationary BESS, though, this method falls short. Most BESS installations rarely complete a true top-to-bottom swing. Dispatch strategies deliberately avoid the SOC extremes to protect cycle life (see our guide on the 20/80 rule for batteries). Consequently, a system cycling between 20% and 80% SOC may never trigger a single “full cycle” under this method. That can happen even after years of heavy use. This undercount is precisely why the industry moved toward throughput-based BMS cycle counting instead.
3. Method 2: BMS Cycle Counting With Ah-Throughput (EFC)
This method sits behind almost every commercial BESS warranty. Rather than watching for full swings, the BMS integrates current over time. It uses the same Coulomb-counting math built for SOC estimation. In other words, it adds up every amp-hour that flows in or out of the pack, in either direction. The BMS then divides that cumulative throughput by the pack’s rated capacity. The result is Equivalent Full Cycles, or EFC.
For example, a 500 kWh BESS that has processed 1,000 kWh of cumulative throughput has logged 2 EFC. This version of BMS cycle counting is simple. In addition, it is cheap to run continuously. And it works no matter how the pack is actually cycled, since it never requires a full 100–0% swing.
The Core Blind Spot of EFC Tracking
EFC has one well-known limitation: it treats every amp-hour the same, no matter how deep the swing was. As Energy-Storage.News notes, EFC alone cannot tell one cycle at 100% depth of discharge apart from two cycles at 50% DoD, or ten cycles at 10% DoD. Yet these three patterns stress the cell chemistry quite differently. So, shallow frequent cycling and deep infrequent cycling can log an identical EFC number. Even so, they age the pack at very different rates.
Many BMS platforms partly correct for this. They re-base the EFC denominator against current estimated capacity instead of nameplate capacity. That keeps the figure accurate as the pack fades. Even so, the core blind spot remains. This gap is exactly what rainflow-based BMS cycle counting was built to close.
4. Method 3: Rainflow-Based BMS Cycle Counting for Partial Cycles
Rainflow counting began as a tool for mechanical fatigue analysis. Engineers used it to turn a noisy load history into a clean set of discrete stress cycles. Battery researchers later adapted the same logic for SOC traces. A peer-reviewed ScienceDirect study on grid-integrated BESS cycle counting confirms it as the most widely used cycle-counting algorithm in the field today. Rainflow-based BMS cycle counting solves what EFC cannot: it identifies the depth of every individual swing, not just the running total.
How the Rainflow Algorithm Works Step-by-Step
The BMS records every local extremum in the SOC trace. In other words, it logs every point where the pack switches from charging to discharging, or back again.
It then calculates the SOC delta between each set of three consecutive extrema.
Consequently, If the middle delta is smaller than or equal to both neighbours, that segment counts as one closed, complete cycle at that specific depth.
The BMS removes those two points. Then it repeats the comparison on the remaining trace — much like water draining off a stepped rooftop, which is where the algorithm gets its name.
The output is a list of discrete cycles, each tagged with its own depth of discharge. For example: “47 cycles at ~80% DoD, 1,200 cycles at ~15% DoD,” instead of one flattened EFC figure.
One detail matters here: rainflow-based BMS cycle counting applies to depth of discharge, not absolute SOC. A swing from 80% down to 70% and a swing from 20% down to 10% both register as the same 10%-DoD event. Both count as equivalent stress. This lines up with how degradation models actually work, since most treat wear as a function of cycle depth, not the absolute SOC band it happens in.
Because rainflow output preserves depth data, it feeds straight into the DoD-weighted models used by SOH and RUL algorithms. That is the same layer we cover in our guide to BMS algorithms explained.
5. Method 4: Stress-Weighted BMS Cycle Counting
The most advanced BMS and EMS platforms push rainflow-based BMS cycle counting one step further. Instead of tallying cycles by depth alone, each identified cycle passes through a stress function. That function also factors in the C-rate and cell temperature present during that specific cycle. For instance, a 60%-DoD cycle at 0.2C and 25°C is far gentler than the same 60%-DoD cycle at 1.5C and 40°C. A stress-weighted counter reflects that difference clearly.
Rather than reporting a raw cycle count, this method builds a running “degradation” or “aging” score. That score, not the raw EFC number, feeds the most accurate RUL models. This is also why two BESS units with an identical EFC count can end up with very different projected remaining life.
6. How Firmware Filters Noise Before BMS Cycle Counting Begins
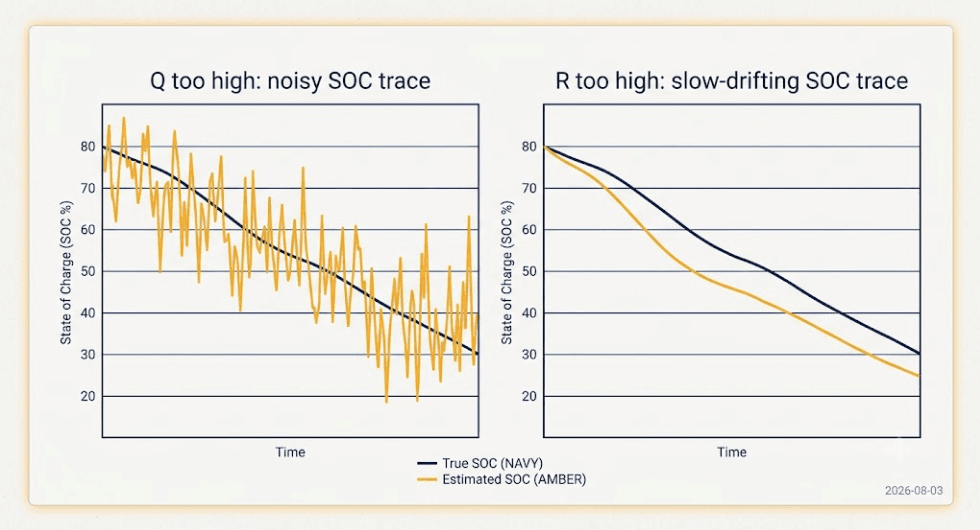
Raw current-sensor data is noisy. Grid-frequency jitter, brief EMS corrections, and normal sensor tolerance all create tiny, meaningless direction reversals in the SOC trace. Sometimes there are hundreds per hour. Feed that data straight into a rainflow algorithm, and the result is an explosion of trivial micro-cycles. Those micro-cycles overstate wear.
To prevent this, production BMS cycle counting firmware applies a minimum-delta, or hysteresis, threshold. A direction reversal only counts as a genuine local extremum once SOC has moved by some minimum amount, commonly 1–2%. Only then does it enter the counting algorithm. Firmware treats smaller reversals as noise and ignores them.
This single design choice separates a BMS that produces warranty-defensible cycle data from one that does not. Set the threshold too low, and cycle counts inflate from sensor noise. Set it too high, and the BMS misses genuine shallow cycling that still adds to ageing. Therefore, always ask your BMS supplier what hysteresis threshold their firmware applies. Datasheets rarely publish this figure. Yet it directly shapes every downstream SOH and warranty number.
7. Comparing the Four Cycle-Tracking Methods
Method
What It Captures
DoD-Aware?
Best For
Main Limitation
Threshold counting
Full 95%–5% traverses only
No
Simple consumer packs
Badly undercounts partial-cycling BESS
Ah-throughput (EFC)
Cumulative current throughput
No
Warranty reporting, simple dispatch
Cannot distinguish deep vs. shallow cycling
Rainflow counting
Each discrete swing, by depth
Yes
SOH modelling, mixed dispatch profiles
More compute-intensive; needs clean extrema
Stress-weighted counting
Depth + C-rate + temperature
Yes
RUL prediction, warranty defensibility
Requires a validated stress model per cell type
Most premium BMS platforms do not rely on just one method. Instead, they report EFC for simple dashboards and warranty tracking. Meanwhile, they run rainflow and stress-weighted BMS cycle counting in the background to feed SOH and RUL models. If a supplier says their BMS “counts cycles” without naming a method, ask directly. The gap between threshold counting and stress-weighted rainflow counting can differ by an order of magnitude in reported wear.
8. Why Datasheet Numbers Rarely Match Real-World Wear
A supplier’s “6,000 cycles to 80% SOH” claim is almost always a lab-derived EFC figure. Labs measure it under fixed, controlled conditions. That means a specific depth of discharge, often 80–90%, a specific C-rate, often 0.5C–1C, and a specific ambient temperature, often 25°C. Change any one of these variables in the field, and the real cycle-life outcome shifts. Sometimes it shifts substantially. We cover this relationship in detail in our guide to how temperature affects LFP battery cycle life. You can also model your own scenario with our battery cycle life calculator. For a broader reference on stationary lithium battery testing conditions, see IEC’s battery safety and performance standards.
In practice, your BMS’s in-field EFC or rainflow-weighted count measures a different operating profile than the datasheet number. A BESS running frequent shallow cycles at moderate temperature may outlive its rated cycle count in calendar terms. Meanwhile, one running deep cycles at high ambient temperature may fall short of it. Neither outcome means the datasheet number was wrong. It simply means BMS cycle counting and lab-rated cycle life measure two related, but distinct, things.
9. Questions to Ask About Your Supplier’s BMS Cycle Counting Method
Which cycle-counting method does the firmware run: threshold, raw EFC, rainflow, or stress-weighted? A BMS that only reports raw EFC cannot show how deep-cycling patterns affect real degradation.
What minimum-delta, or hysteresis, threshold filters noise before a reversal counts as a cycle? An unpublished or unreasonably low threshold can quietly inflate cycle counts.
Is the EFC denominator based on nameplate capacity or current estimated capacity? Using nameplate capacity for the pack’s whole life understates EFC as the cell ages.
Does the cycle-counting output feed the SOH and RUL algorithms directly, or are they calculated separately? Disconnected pipelines often cause inconsistent SOH and warranty reporting.
What DoD, C-rate, and temperature conditions does the warranty’s rated cycle-life figure assume? This baseline is what your field cycle count should be compared against, not treated as a universal number.
Consider a 100 kWh BESS module running a frequency-regulation profile for one day. It discharges 8 kWh, charges 5 kWh, discharges 12 kWh, charges 10 kWh, discharges 6 kWh, and charges 9 kWh. That adds up to 50 kWh of cumulative throughput.
Decomposed into 3 discrete cycles at ~8%, ~12%, ~9% DoD
3 shallow cycles logged, none flattened into one number
While both numbers are technically correct, they answer different questions. The 0.50 EFC figure shows up on a simple throughput dashboard and feeds warranty-cycle tracking. The rainflow breakdown, however, is what a SOH model actually needs. Three shallow 8–12% DoD cycles age a cell differently than one 50%-DoD cycle would. That holds true even though both scenarios can produce the same EFC total.
Conclusion: BMS Cycle Counting Is a Modelling Choice, Not a Simple Tally
A BMS does not count cycles the way a person counts laps around a track. Instead, it reconstructs a cycle metric from a continuous current and SOC trace. Each method trades simplicity for accuracy differently. Threshold counting is too crude for real BESS dispatch. EFC is the industry-standard warranty metric, yet it stays blind to depth of discharge. Rainflow-based BMS cycle counting recovers that missing depth information. It breaks messy, real-world SOC traces into discrete, weighted cycles. Stress-weighted counting goes further still. It folds in C-rate and temperature to build the aging score that actually drives accurate RUL prediction.
For BESS buyers and operators, the lesson is simple. Do not take “the BMS tracks cycle count” at face value. Instead, ask which method it uses. Ask how it filters sensor noise. And ask how that number connects to the SOH and RUL figures you will eventually rely on for warranty claims and second-life valuation.
☀️ Need a BMS Cycle Counting and SOH Methodology Review? SunLith Energy reviews BMS cycle counting implementation, EFC and rainflow methodology, and SOH-RUL linkage for BESS projects from 50 kWh upward. Contact us before you commit to a supplier.
Frequently Asked Questions
How does BMS cycle counting work?
BMS cycle counting converts raw current and SOC data into a wear metric. Most systems first calculate cumulative Ah or kWh throughput. They then convert it into Equivalent Full Cycles. More advanced platforms add a rainflow algorithm on top. It breaks the SOC trace into discrete cycles at their true depth of discharge, filtering out small reversals below a set noise threshold.
What is an Equivalent Full Cycle (EFC) in BMS cycle counting?
An EFC is the standard unit behind most BMS cycle counting for warranty purposes. The BMS sums all Ah or kWh throughput — every unit of charge or discharge, in either direction. It then divides that total by the pack’s rated or current estimated capacity. Two cycles at 50% depth of discharge, and one cycle at 100% depth of discharge, both produce 1 EFC.
Why does depth of discharge matter if EFC already tracks total throughput?
Because EFC only tracks the total charge moved, not how it was distributed. A cell that goes through one deep 100%-DoD cycle experiences different stress than one that goes through ten shallow 10%-DoD cycles. Yet both can produce the same EFC total. Rainflow-based BMS cycle counting exists specifically to preserve this depth information for accurate SOH and RUL modelling.
What is rainflow counting, and why does BMS cycle counting use it?
Rainflow counting is an algorithm first built for mechanical fatigue analysis. Applied to a battery’s SOC trace, it identifies local turning points. It then pairs them into discrete, complete cycles at their true depth of discharge, instead of one flattened throughput number. This makes it the preferred method for BMS cycle counting on BESS platforms with irregular, partial-cycling dispatch profiles.
Why doesn’t my BESS ever seem to reach the cycle count on its datasheet?
The datasheet figure is almost always measured under fixed lab conditions: a specific depth of discharge, C-rate, and temperature. If your system cycles more shallowly, at a gentler C-rate, or at cooler temperatures, its real-world BMS cycle counting output accumulates more slowly than the lab figure implies. The reverse is true under harsher conditions.
Can two BESS units show the same cycle count but have different remaining life?
Yes. Raw EFC, and even simple cycle counts, do not capture the temperature and C-rate conditions each cycle occurred under. This is why advanced BMS cycle counting adds a stress-weighted layer. It produces a degradation score rather than a plain cycle number, which feeds more accurate Remaining Useful Life predictions than cycle count alone.
⚡ Quick Answer: What Are BMS Algorithms? BMS algorithms go far beyond SOC estimation. A production BMS runs several algorithms at once: SOH estimation, SoP, SoE, cell balancing logic, contactor sequencing, isolation monitoring, safety diagnostics, and RUL prediction. For BESS, the quality of these BMS algorithms decides dispatch reliability, warranty defensibility, and second-life value — not just SOC accuracy.
1. Beyond SOC: The Full BMS Algorithm Stack
Most talk about BMS algorithms stops at State of Charge. SOC matters. But it is only one output from a stack of six or more BMS algorithms running at once.
For a deeper dive into OCV lookup, Coulomb counting, and Extended Kalman Filter SOC methods, see our dedicated guide: BMS SOC Estimation Methods Explained. This article picks up where those leave off, covering the advanced firmware algorithms that drive aging, dispatch limits, safety, and long-term asset value.
A BESS operator or EPC should understand what each BMS algorithm actually calculates. Marketing language often overstates what firmware really runs. The sections below walk through each algorithm layer in build order: health first, then power and energy limits, then balancing, then safety, then long-term prediction.
2. SOH Algorithms: How BMS Algorithms Track Battery Aging
State of Health (SOH) is the second most important number a BMS produces after SOC. It is also far harder to calculate correctly. SOH shows how much usable capacity and performance remain compared to a new cell. A cell rated at 100 Ah that now delivers 92 Ah has an SOH of roughly 92%.
Unlike SOC, SOH cannot reset with one charge cycle. The BMS must infer it from long-term trends. This makes SOH-focused BMS algorithms fundamentally different from SOC algorithms.
Capacity Fade Tracking Algorithm
The simplest SOH algorithm compares measured full-charge capacity against rated nameplate capacity. The BMS records the Ah delivered between two known SOC points, typically 100% to 0%. It then compares that figure against the original rated capacity.
This method is accurate but slow. It produces one new SOH data point per full cycle. Many BESS installations rarely complete a true 100–0% cycle. Partial-cycle capacity fade algorithms estimate the fade rate from partial cycles instead, using coulomb-counted throughput and known depth-of-discharge. These partial-cycle BMS algorithms carry more uncertainty than full-cycle measurements.
Incremental Capacity Analysis (ICA) Algorithm
Incremental capacity analysis is a more advanced SOH algorithm. It examines the shape of the voltage curve, not just its endpoints. As a cell ages, specific peaks in its incremental capacity curve (dQ/dV) shift and shrink. Each shift pattern correlates with a specific degradation mechanism: lithium plating, active material loss, or electrolyte decomposition. ICA-based BMS algorithms can tell different aging causes apart, not just report one percentage. For the electrochemistry behind why lithium plating happens in the first place — and how it interacts with the slower SEI layer growth every LFP cell experiences — see our guide on SEI layer growth and lithium plating in LFP cells.
ICA-based BMS algorithms can tell different aging causes apart, not just report one percentage. This matters for warranty claims and second-life valuation. A cell degrading from normal calendar aging is a very different asset than one degrading from a manufacturing defect or thermal abuse event.
The tradeoff is cost. ICA needs high-resolution voltage sampling during specific charge segments. Not every BMS platform captures this data by default.
DCIR-Based SOH Algorithm
DC internal resistance (DCIR) rises as a cell ages, mostly independent of capacity fade. A DCIR-based SOH algorithm applies a known current pulse and measures the resulting voltage drop. It then calculates internal resistance using Ohm’s law, and compares that value against a baseline resistance-versus-age curve for the specific cell model.
DCIR-based SOH algorithms run faster than capacity-fade methods, since a short current pulse is enough — no full cycle required. This makes them useful for spotting outlier cells early, often before capacity fade becomes visible.
The limitation is temperature sensitivity. DCIR shifts a lot with cell temperature. An accurate DCIR-based BMS algorithm must correct every reading against a resistance-versus-temperature-versus-age model calibrated for the exact cell in use.
SOH Algorithm Comparison
Method
What It Measures
Update Frequency
Best For
Capacity fade tracking
Ah delivered vs. rated capacity
Once per full cycle
Systems with regular full cycles
Incremental capacity analysis (ICA)
dQ/dV curve shape and peak shift
Per qualifying charge segment
Distinguishing aging mechanisms, warranty claims
DCIR-based SOH
Internal resistance rise vs. baseline
Per current pulse (fast)
Early outlier-cell detection, partial-cycle systems
Most premium BMS platforms combine all three algorithms: DCIR for fast, frequent checks; capacity fade tracking as the long-term anchor; and ICA for diagnostic deep-dives when a cell shows early warning signs.
3. SoP Algorithm: What BMS Algorithms Tell the Inverter
State of Power answers a different question than SOC or SOH. It asks not “how much energy is stored,” but “how much power can this pack safely deliver or accept right now.” The SoP algorithm calculates the maximum charge and discharge power available for a set time window, typically 1, 10, or 30 seconds. It weighs current SOC, temperature, cell voltage limits, and internal resistance.
This number goes straight to the inverter or PCS and to the energy management system (EMS). Without an accurate SoP algorithm, the EMS either under-dispatches or over-dispatches. Under-dispatching leaves revenue on the table during a frequency regulation or peak-shaving event. Over-dispatching triggers a protection cutoff mid-event, which is worse for grid-service contract compliance.
SoP gets harder to calculate at temperature and SOC extremes. A pack at 10% SOC or −5°C has much lower discharge SoP than the same pack at 50% SOC and 25°C, even with similar energy content. A well-designed SoP algorithm accounts for voltage sag under load. It does not rely on static cell voltage limits alone, and it uses the same internal resistance data the SOH algorithm tracks.
4. SoE Algorithm: Usable kWh, Not Just Percentage
SOC gives you a percentage. The SoE algorithm gives you the actual usable kilowatt-hours remaining. It factors in current SOH, temperature derating, and the depth-of-discharge limits set for the system. Two BESS units showing 60% SOC can have very different SoE if one has degraded to 85% SOH and the other sits near 98% SOH.
For asset owners running dispatch contracts or virtual power plant participation, SoE is the number that actually sets revenue capacity. A BMS that only reports SOC forces the EMS to apply a separate correction factor for aging, and that workaround adds error. A BMS with a proper SoE algorithm reports usable energy directly, already corrected for real-world capacity.
5. SoR and SoF Algorithms: Diagnostic and Dispatch-Readiness Checks
Two less-discussed BMS algorithms round out the state-estimation stack.
State of Resistance (SoR) tracks internal resistance as its own diagnostic metric, separate from its role as a SOH input. Rising resistance in a single string or module is often the earliest sign of an emerging fault. It can flag a loose busbar connection or accelerated local aging before it shows up in the pack-level SOH number.
State of Function (SoF) is a composite go/no-go algorithm. It combines SOC, SOH, SoP, temperature, and active fault flags into one dispatch-readiness signal. The EMS checks this signal before committing the BESS to a grid-service event. A pack can have fine SOC and SOH individually and still fail SoF — for example, if a temperature sensor reads near its fault threshold. SoF exists to stop the EMS from dispatching a unit that has energy on paper but should not be trusted for that event.
6. Cell Balancing Algorithms: Passive vs Active Control Logic
Cell balancing keeps every cell in a series string at a matched voltage and SOC. The control logic behind it is itself a BMS algorithm worth understanding, not just a hardware feature.
This balancing logic is especially vital—and complex—when dealing with the flat voltage plateaus of LFP chemistry; for a deeper look at hardware and balancing nuances there, read our specific guide on BMS for LiFePO4 batteries.
Passive Balancing Algorithm Logic
A passive balancing algorithm finds the highest-voltage cell in a string during charge. It then switches a bleed resistor across that cell, burning off excess energy as heat until the cell matches the pack average. The control logic usually triggers balancing only above a voltage or SOC threshold, commonly near the top of charge, where cell mismatch matters most for safety and full-charge capacity.
Design choices matter more than the hardware here. A poorly tuned threshold balances too aggressively, wasting energy and building unnecessary heat. Too conservative a threshold lets mismatch build up for many cycles.
Active Balancing Algorithm Logic
An active balancing algorithm moves charge from higher-voltage cells to lower-voltage cells, using inductors, capacitors, or switched-capacitor networks. It does not just burn off the difference as heat. The control logic is more complex: it must sequence several transfer paths at once, avoid oscillation between cells close in voltage, and decide when further balancing no longer justifies the switching losses.
For grid-scale BESS with thousands of series-parallel cells, the balancing algorithm’s efficiency affects round-trip efficiency and effective cycle life directly. A well-balanced pack ages its weakest cells more slowly, since those cells spend less time at voltage extremes.
7. Contactor and Isolation BMS Algorithms
Two safety-critical BMS algorithms operate below the level most BMS content ever discusses. They matter a great deal for BESS commissioning and daily operation.
Pre-Charge Sequencing Algorithm
When a BESS connects to its inverter or DC bus, a large voltage gap between the battery and a discharged bus can spike current high enough to weld contactor contacts or blow fuses. The pre-charge sequencing algorithm closes a smaller pre-charge contactor through a current-limiting resistor first. It watches the bus voltage rise toward battery voltage, and only closes the main contactor once the gap falls within a safe threshold, typically a few percent.
The algorithm must also set a timeout and a fault response. If bus voltage fails to rise as expected in time, that signals a downstream fault. A well-designed sequence aborts the connection instead of forcing the main contactor closed anyway.
Isolation Monitoring Algorithm
High-voltage BESS strings must stay electrically isolated from chassis ground. The isolation monitoring algorithm injects a small test signal, or measures leakage current, between the HV bus and chassis ground. It then calculates an isolation resistance value. A common safety threshold is 500 ohms per volt of system voltage — a 750V BESS string needs at least 375,000 ohms of isolation resistance under this rule.
A slowly degrading isolation reading, even one still above the fault threshold, is an early warning worth flagging. It usually points to moisture ingress, insulation wear, or a developing ground fault well before it trips a hard fault.
8. Safety Diagnostic Algorithms: MAVD, RdV, and Early Fault Detection
Beyond voltage, current, and temperature thresholds, advanced BMS platforms run pattern-based diagnostic algorithms. These catch failure modes before they reach a hard safety limit.
Maximum Allowable Voltage Deviation (MAVD) algorithms compare each cell’s voltage against the pack average in real time. A cell drifting outside its expected deviation band can signal an internal short, a connection fault, or local degradation — even while it stays within absolute safe voltage limits. Because MAVD looks at relative deviation, not absolute thresholds, it often catches faults earlier than simple over-voltage or under-voltage protection.
Resistance-derivative or rate-of-change (RdV) algorithms track how fast a cell’s voltage or resistance is changing, not just its current value. A cell with rapidly climbing resistance is a different risk than one with stable but elevated resistance, even if both report the same SOH today. RdV algorithms flag the rate of change itself as its own alarm condition.
These diagnostic layers matter most for large-format BESS, where a single degrading cell among thousands can go unnoticed until it causes a string-level fault. Standards bodies such as the IEC publish safety requirements for stationary lithium battery systems that reference exactly this kind of deviation monitoring.
Furthermore, if you are deploying assets in the European market, these algorithmic diagnostics are critical for compliance; see our EU batteries regulation EU 2023 1542 complete guide for a full breakdown of the data and safety mandates.
Ask suppliers whether their BMS runs deviation and rate-of-change diagnostics on top of standard threshold protections — this is a real differentiator between a basic BMS and a genuinely safety-engineered one.
9. RUL Prediction Algorithms and Second-Life Value
Remaining Useful Life algorithms take SOH trend data and project forward. They estimate how many more cycles or years remain before the pack falls below an end-of-life threshold, commonly 70–80% of original capacity.
Three RUL Algorithm Approaches
Empirical RUL algorithms fit a degradation curve — often exponential, or a two-stage linear-then-accelerating shape — to historical SOH data for the specific chemistry and use profile. They then extrapolate forward. These are cheap to run and reasonably accurate for well-studied LiFePO4 chemistries with large datasets for a quick way to model these degradation curves yourself based on cycle depth and temperature, you can check out our interactive battery cycle life calculator. But they assume future use resembles the past.
Physics-based (electrochemical) RUL algorithms simulate the degradation mechanisms directly: lithium plating, SEI growth, active material loss. They predict RUL from first principles. These are more accurate under changing use conditions, but they need detailed cell-level parameters that cell suppliers do not always share.
Machine-learning RUL algorithms train on large fleets of historical degradation data. They predict RUL from current sensor patterns without an explicit physical or empirical formula. These can beat both other approaches when trained on a large enough fleet of the same cell type and use case. But they need a lot of historical data, and they can behave unpredictably outside the conditions they trained on.
Why RUL Algorithm Accuracy Matters for BESS Economics
RUL accuracy affects two commercial decisions directly: warranty reserve calculations for suppliers, and second-life asset valuation for owners. A BESS pack projected to hold 80% capacity for ten more years is worth much more on the second-life market than one with an uncertain or steeply declining RUL curve. Lower-demand second-life uses, like residential backup or slow-cycling grid support, depend on that projection being credible.
For utility-scale BESS operators planning eventual asset disposition, ask your BMS or EMS supplier which RUL modeling approach they use, and what fleet data backs it. Battery aging research from national labs such as NLR (National Laboratory of the Rockies) increasingly informs these models. Ask whether RUL confidence intervals are reported alongside the point estimate — a single RUL number with no range is hard to use for financial planning.
10. Questions to Ask Your BMS Supplier About Algorithms
Marketing language often claims “advanced algorithms” without saying which ones actually run in firmware. For a structured framework on auditing these capabilities during procurement, see our guide on BESS supplier BMS evaluation.
The following targeted questions will help you separate real algorithmic depth from a basic protection-only BMS with technical-sounding labels:
Which SOH algorithm does the BMS use — capacity fade tracking, ICA, DCIR-based, or a combination? A BMS that only runs capacity fade tracking will be slow to catch outlier cells in systems that rarely complete full cycles.
Does the BMS calculate SoP and SoE algorithms, or only SOC and SOH? Without SoP output, the EMS must apply conservative blanket power limits, which lowers dispatch revenue.
What isolation resistance threshold does the algorithm enforce, and how is it temperature- and time-compensated? A static threshold with no trend monitoring misses slow isolation decay.
Does the balancing algorithm run passive, active, or both, and what triggers a balancing cycle? Ask for the specific voltage or SOC threshold, not just “the BMS balances cells.”
What RUL algorithm approach is used, and is a confidence interval reported? A point-estimate RUL number with no uncertainty bounds has limited use for financial and warranty planning.
Conclusion: Algorithm Depth Is the Real BMS Differentiator
SOC estimation gets most of the attention in BMS marketing. But the BMS algorithms that actually protect a BESS investment over its 10–20 year life sit one layer deeper. SOH tracking catches aging mechanisms early. SoP and SoE outputs maximize safe dispatch revenue. Balancing logic gets tuned for the specific pack architecture. Safety diagnostics catch deviation before it becomes a fault. RUL models come with defensible confidence intervals.
When you evaluate a BMS or a BESS supplier, ask specifically which of these BMS algorithms are implemented, and how they were validated. Do not settle for “the BMS monitors SOC and SOH.” The answer reveals whether you are buying genuine algorithmic engineering or a basic protection circuit with confident marketing copy.
☀️ Need a BMS Algorithm Review for Your BESS Project? Sunlith Energy reviews BMS algorithm implementations — SOH methodology, SoP/SoE accuracy, balancing logic, and RUL modeling — for BESS projects from 50 kWh upward. Contact us before you commit to a supplier.
Frequently Asked Questions About BMS Algorithms
What algorithms does a BMS run besides SOC estimation?
A production BMS runs several algorithms beyond SOC: SOH estimation (capacity fade tracking, incremental capacity analysis, or DCIR-based methods), SoP and SoE calculations, cell balancing control logic, contactor pre-charge sequencing, isolation monitoring, safety diagnostics such as voltage-deviation and resistance-rate-of-change monitoring, and often RUL prediction models.
What is the difference between the SOH and SoP algorithms in a BMS?
The SOH algorithm measures how much capacity and performance a battery has lost compared to new, shown as a percentage. The SoP algorithm measures how much power the battery can safely deliver or accept right now, based on current SOC, temperature, and internal resistance. SOH looks backward at cumulative aging. SoP looks at the immediate power ceiling for dispatch decisions.
Why does the SoP algorithm matter for BESS dispatch even if SOC looks fine?
A pack can show good SOC while still having a low SoP at cold temperatures or high internal resistance. That means it cannot deliver the power a grid-service event needs without tripping a voltage protection limit. An EMS that only checks SOC before dispatch risks committing to an event the pack cannot actually support.
How does the DCIR-based SOH algorithm work?
The BMS applies a known current pulse and measures the resulting voltage drop. It calculates internal resistance using Ohm’s law, then compares that resistance against a temperature-compensated baseline curve for the specific cell model. This algorithm runs faster than capacity-fade tracking, since it needs no full charge-discharge cycle.
What is a good RUL algorithm confidence level for a utility-scale BESS?
There is no single universal number — it depends on the modeling approach and available fleet data. What matters more is whether the supplier reports a confidence interval at all, rather than a single point estimate, and whether the model has been checked against real fleet degradation data for the same cell chemistry and use profile.
Do I need an active balancing algorithm for a grid-scale BESS, or is passive enough?
Passive balancing works fine for many commercial and lower-cycling systems. For utility-scale BESS with high cycling frequency and large series strings, an active balancing algorithm usually improves round-trip efficiency and cuts accelerated aging in weaker cells. That can justify its added cost over the system’s lifetime.
AC-coupled vs DC-coupled BESS is one of the first choices you’ll face in any solar-plus-storage project. This one decision shapes your system’s efficiency, cost, and how easily you can expand it later. Both architectures store solar energy in a battery for later use. But they connect the battery in different places relative to the inverter, and that single design choice ripples through nearly every other spec on the system. This guide walks through the differences so you can pick the right fit.
What Is AC-Coupled BESS?
An AC-coupled BESS connects the battery to the grid through its own dedicated inverter. This component sits separate from the solar PV inverter. Power from PV and power from the battery meet on the AC side of the system rather than sharing a DC bus. This makes AC-coupled storage the more common choice when you’re adding a battery to solar you already have running. For the full breakdown of components and operation, see What is AC Coupled BESS?.
What Is DC-Coupled BESS?
A DC-coupled BESS connects the battery and the solar PV array on the same DC bus, ahead of a single shared inverter. Because both share one conversion path, DC-coupled systems typically post better round-trip efficiency and lower equipment costs, at the expense of retrofit flexibility. For the full architecture and step-by-step operation, see What is DC Coupled BESS?.
AC-Coupled vs DC-Coupled BESS: Side-by-Side Comparison
Here’s the AC-coupled vs. DC-coupled BESS comparison at a glance — the factors that matter most when you design a solar-plus-storage system:
Factor
AC-Coupled BESS
DC-Coupled BESS
Connection point
Battery connects via its own inverter on the AC side
Battery and PV share one DC bus, ahead of a single inverter
Inverters required
Two — one for PV, one for battery
One shared hybrid inverter
Conversion stages
Multiple DC-AC-DC conversions on some charge paths
Single DC-to-AC conversion for grid/load power
Round-trip efficiency
Lower — extra conversion stages add losses
Higher — fewer conversion losses
Balance-of-system cost
Lower than standalone, but higher than DC-coupled (separate inverters, switchgear)
Lowest of the three — shared inverter and BOS hardware
Best for
Retrofitting storage onto existing solar
New-build, greenfield solar-plus-storage projects
Solar charging during outage
Depends on inverter design; may need extra hardware
Typically yes, in most configurations
Curtailment / clipping capture
Limited — PV inverter still governs PV output
Can capture otherwise-clipped PV energy behind a higher-ILR array
Grid response speed
Slower — control system coordinates multiple inverters
Faster — single inverter, more direct control path
Future expansion
Easier — PV and storage can be sized/upgraded independently
Harder — added battery capacity must match existing DC bus voltage
No single architecture wins on every factor. The right choice depends on your project type and how much you weigh upfront cost against long-term efficiency.
AC-Coupled vs DC-Coupled BESS: Efficiency Compared
Every DC-to-AC conversion wastes some energy as heat. An AC-coupled system can convert PV energy to AC, then back to DC to charge the battery, then to AC again when you use it. That’s up to three conversion stages on some charge paths.
A DC-coupled system skips most of that. It charges the battery straight from the DC bus and converts to AC only once, when you actually need AC power. This is the core reason DC-coupled architectures tend to post higher round-trip efficiency in side-by-side testing.
Both architectures cost less than siting solar and storage separately. DC-coupled systems generally cost less than AC-coupled ones on new-build projects, too.
The U.S. Department of Energy’s Solar-Plus-Storage 101 resource confirms this pattern: co-locating PV and storage on the same site cuts system cost compared to siting them separately, whether you choose AC-coupled or DC-coupled. Most of the savings come from shared balance-of-plant infrastructure.
DC-coupled designs push those savings further. They eliminate a full second inverter and its switchgear. That said, retrofit constraints can narrow this advantage — if AC-coupling is your only practical option, the smaller cost gap may not matter much.
Retrofit vs. Greenfield: Matching Architecture to Project Stage
Project stage often decides the outcome before cost or efficiency even enter the conversation.
If you already run solar, adding a DC-coupled battery means tying into the existing DC bus and matching its voltage. That’s technically possible, but it usually means replacing or reconfiguring your existing inverter. AC-coupled storage sidesteps that problem entirely — the battery gets its own inverter and connects on the AC side, so your existing solar installation stays untouched.
New-build, greenfield projects don’t face that constraint, since you design PV and storage together from day one. That’s why DC-coupled architectures dominate new utility-scale and C&I builds. In the end, this AC-coupled vs. DC-coupled BESS decision usually comes down to one question: are you retrofitting, or building new?
When to Choose AC-Coupled BESS
Adding storage to solar you already have running
Projects where you need to size, optimize, or replace PV and battery independently
Sites where minimizing changes to existing PV wiring and permits matters
Phased projects that add storage well after the solar installation
Systems needing simpler expansion of storage capacity over time
When to Choose DC-Coupled BESS
New solar-plus-storage builds where you design PV and storage together from the start
Utility-scale and C&I projects prioritizing round-trip efficiency
Microgrid and off-grid systems needing solar charging during outages
High inverter-loading-ratio PV arrays looking to capture otherwise-clipped energy
Projects where minimizing equipment count and balance-of-system cost is a priority
AC-Coupled vs DC-Coupled BESS: Trade-offs to Weigh
Efficiency and cost aren’t the only variables to weigh.
DC-coupled systems can be harder to expand later. Additional battery capacity generally needs to match the voltage of your existing DC bus. The tighter integration between PV and storage also means a fault on one side can affect the other.
AC-coupled systems avoid that coupling risk and expand more easily. You pay for that flexibility with two inverters, two sets of switchgear, and a somewhat slower response to fast grid commands like frequency regulation, since the control system has to coordinate multiple inverters instead of one.
Weigh these trade-offs against your project’s timeline, budget, and growth plans. That usually beats picking the ‘better’ architecture in the abstract.
Can You Combine AC-Coupled and DC-Coupled BESS?
Some projects don’t have to choose only one. A hybrid architecture can pair DC-coupled storage on a new PV block with an existing AC-coupled asset elsewhere on-site. Or it can phase in DC-coupled storage over multiple project stages. You’ll see this more often on larger utility-scale sites with modular BESS designs. For a broader look at how AC-coupled, DC-coupled, modular, and hybrid designs fit together, see our guide to Understanding Energy Storage System BESS Architectures.
Frequently Asked Questions
Here are quick answers to the AC-coupled vs DC-coupled BESS questions we hear most often:
What is the main difference between AC-coupled and DC-coupled BESS?
AC-coupled systems use two separate inverters — one for solar PV and one for the battery. DC-coupled systems share a single inverter. PV and battery connect to the same DC bus before the system converts power to AC.
Which is more efficient, AC-coupled or DC-coupled BESS?
DC-coupled BESS is generally more efficient because energy converts from DC to AC only once. AC-coupled systems often involve extra conversion stages, especially when charging the battery from solar, and that raises round-trip losses.
Is AC-coupled or DC-coupled BESS cheaper?
DC-coupled systems typically cost less on the balance-of-system side, since they need only one inverter and one set of switchgear. AC-coupled systems cost more upfront, but you can add them incrementally, which sometimes offsets the gap on retrofit projects.
Can I add a DC-coupled battery to an existing solar system?
You can, but it’s more complex than AC-coupling. The battery must connect to the existing DC bus and match its voltage. For most retrofits, AC-coupled storage is the simpler, more common approach.
Does DC-coupled BESS work off-grid?
Yes. DC-coupled architectures generally support off-grid and islanded operation. They can keep charging from solar during a grid outage, which makes them a common choice for microgrid and remote projects.
Why do DC-coupled systems capture more solar energy?
In a DC-coupled system, the battery can charge directly from PV output that would otherwise get clipped when the inverter loading ratio exceeds 1. That’s because the battery sits on the DC side, before the inverter’s AC output limit applies.
Is there a hybrid option that combines AC and DC coupling?
Yes. Some larger projects use a hybrid architecture that pairs DC-coupled storage with an existing AC-coupled asset, or phases DC-coupled storage in over time. You’ll see this more often on utility-scale sites with modular BESS designs.
AC-Coupled vs DC-Coupled BESS: Final Verdict
AC-coupled and DC-coupled BESS both store solar energy for later use, but they get there differently. That difference shows up in efficiency, cost, and how easily the system grows over time.
AC-coupled storage stays the more flexible choice for retrofits and phased projects. DC-coupled architectures tend to win on efficiency and cost for new-build solar-plus-storage systems. The right call comes down to where your project starts, not which architecture is objectively ‘better’.
Whichever direction fits your project, the Sunlith Energy team can help size and specify the right BESS architecture, PCS, and battery configuration for your site.
BESS oversizing — deliberately installing more nameplate energy capacity than your immediate load demands — is one of the most debated decisions in battery storage project design. Therefore, getting this decision right has direct consequences for project ROI, battery longevity, and contracted performance guarantees. Furthermore, as storage markets mature and the Section 48E Investment Tax Credit continues to reshape project economics, understanding when BESS oversizing helps and when it hurts has never been more important.
In this guide, we break down the real pros and cons of BESS oversizing across residential, commercial and industrial (C&I), and utility-scale applications. Additionally, we provide a practical sizing framework, a direct comparison with the augmentation alternative, and clear guidance on how much oversizing is appropriate for each use case. For background on key BESS performance metrics, see our BESS specifications guide.
Key Takeaway BESS oversizing reduces average depth of discharge, extends cycle life, and provides a degradation buffer — but it carries real costs in capex, idle capacity, and calendar aging risk. Consequently, the right answer depends entirely on your use case, load profile, battery chemistry, and project economics.
What Is BESS Oversizing? Definition and Key Drivers
BESS oversizing means installing more nameplate energy capacity (kWh) or power capacity (kW) than the system is expected to dispatch on a daily basis under normal operating conditions. In other words, it is the deliberate act of selecting a battery system larger than the immediate load or solar coupling requirement.
The Four Main Reasons Projects Choose BESS Oversizing
Project developers and system designers choose BESS oversizing for four primary reasons. First, it provides a built-in degradation buffer — batteries lose capacity over time, so installing extra kWh upfront ensures the system still meets its contractual output at end of life (EOL). Second, it reduces the average depth of discharge (DoD), which significantly reduces electrochemical stress and extends cycle life. Third, it future-proofs the system against load growth — a facility adding EV chargers or expanding solar may outgrow a precisely sized BESS within three to five years. Finally, the ITC captures a larger credit on the full installed capacity at commissioning rather than on augmented modules added later.
BESS Oversizing vs Augmentation: Two Different Strategies
It is important to separate two strategies that are frequently conflated: oversizing (installing more capacity upfront) and augmentation (adding capacity later). Both address the degradation problem, but they carry very different economic and technical profiles. Whereas oversizing locks in capex on Day 1, augmentation defers cost — but at the risk of losing ITC eligibility on the additional modules. We explore this comparison in detail in Section 5.
Pros of BESS Oversizing: 7 Technical and Financial Benefits
1. Extended Cycle Life Through Lower Depth of Discharge
The single most significant technical benefit of BESS oversizing is the reduction in average Depth of Discharge (DoD). Battery cycle life is acutely sensitive to DoD: a LiFePO4 (LFP) cell discharged to 80% DoD typically delivers 3,000–6,000 cycles to 80% capacity retention, whereas the same cell cycled at 40% DoD can exceed 10,000 cycles. Moreover, for NMC chemistry, the spread is even wider. Therefore, oversizing directly reduces the daily DoD, keeping cells in the shallow-cycle, high-longevity operating zone. As a result, the total useful life of the system increases substantially — without any hardware change.
A peer-reviewed sizing study published in MDPI Energies confirmed that an oversized BESS consistently operates at approximately 30% DoD, significantly reducing cycling degradation compared to a precisely sized system. See our BESS cycle life comparison guide for detailed 0.5C vs 1C cycling data across liquid-cooled LFP formats.
2. Built-In Degradation Buffer for End-of-Life Performance
All BESS contracts and revenue agreements are written against end-of-life capacity, not nameplate. Consequently, a project designed to deliver 1 MWh at year 10 must either oversize at commissioning to absorb predicted capacity loss, or augment mid-life. BESS oversizing solves this directly: the 15–20% extra capacity at year 0 becomes the system’s normal operating capacity at year 8–10, after degradation has run its course. In addition, oversizing also enables developers to lock in capital expenditures at project outset, mitigating future cost uncertainty. For a deeper understanding of capacity fade mechanics, see our Battery State of Health (SoH) estimation guide.
3. Improved Round-Trip Efficiency at Partial Loads
Battery inverters and Power Conversion Systems (PCS) operate most efficiently when working well below their rated power ceiling. Therefore, an oversized BESS means the power electronics run at partial load more often, reducing switching losses and thermal stress. Across LFP systems, round-trip efficiency (RTE) typically reaches 90–95% in well-managed partial-load conditions versus 85–88% when the system is pushed to rated limits daily. Furthermore, professional system sizing guidelines recommend oversizing by 5–20% specifically to compensate for RTE losses over the project’s lifetime. For a full breakdown of how RTE impacts your PCS selection, visit our BESS PCS functions and features guide.
4. Future-Proofing for Load Growth
Commercial and industrial facilities are rarely static. An EV fleet charging infrastructure build-out, a new production line, additional HVAC loads, or expanded solar capacity can all push a precisely sized BESS into insufficiency within a few years. As a result, BESS oversizing provides headroom to absorb load growth without a full system redesign or costly inverter upgrades. For residential customers, similarly, oversizing by 10–20% accounts for future appliance electrification — heat pumps, EV charging, induction cooking — that increase household energy consumption over time. This is especially relevant given that electricity rates have increased 32% over the past decade and the trend is expected to continue.
5. Greater Resilience During Extended Outages
An oversized BESS provides substantially longer backup durations during grid outages. For instance, where a precisely sized system may sustain critical loads for 4–6 hours, a 25% oversized system of the same power rating extends that window to 5–7.5 hours without additional hardware. Consequently, for hospitals, data centres, manufacturing facilities, and off-grid microgrids, this resilience buffer is a core design requirement rather than an optional feature. In addition, BESS oversizing enables higher solar self-consumption ratios, because the system can absorb more excess PV generation that would otherwise be curtailed — especially in DC-coupled configurations. Our cylindrical vs prismatic LFP cell guide covers how cell format selection interacts with resilience design.
6. Tax Credit Maximisation Under Section 48E
Under the Section 48E Clean Electricity Investment Tax Credit, the ITC applies to the full installed nameplate capacity at commissioning. Projects beginning construction before 2033 can qualify for a base credit of 6% rising to 30% — or up to 50% with domestic content and labour standards — on the entire installed system. Therefore, oversizing at commissioning rather than augmenting later allows developers to capture ITC on the additional capacity now, when the credit is at its most generous. As documented by Energy-Storage.News, Pivot Energy uses optimisation models specifically to find the ‘sweet spot’ where overbuilding by 15–20% captures the full ITC while also reducing DoD and slowing the degradation curve.
7. Higher Solar Self-Consumption and Clipping Capture
In solar-plus-storage configurations, an oversized BESS absorbs more excess PV generation that would otherwise be curtailed — particularly in DC-coupled systems where the battery captures inverter clipping losses. Projects with aggressively sized solar arrays consequently benefit most from an oversized storage buffer, enabling higher self-consumption ratios and better time-of-use (ToU) arbitrage revenue. Additionally, the flat voltage profile of LFP cells means the battery can accept charge across a wider SoC range without significant efficiency loss, making it well-suited to absorbing variable clipping events.
Cons of BESS Oversizing: 7 Real Drawbacks to Weigh
1. Higher Upfront Capital Expenditure
The most obvious downside of BESS oversizing is cost. At current commercial LFP BESS pricing of $220–$320 per kWh (nameplate, installed), adding 15–25% extra capacity translates directly into a 15–25% larger capital outlay. For example, on a 1 MWh C&I project, the oversizing premium reaches $33,000–$80,000. On a 10 MWh utility-scale project, the figure climbs to $330,000–$800,000. As a result, higher capex extends payback periods, dilutes IRR, and increases financing costs. Moreover, the 20/80 rule for battery SoC management — explored in our 20/80 rule for batteries guide — shows that moving from a 90% DoD strategy to a strict 60% DoD strategy for the same usable energy requires installing roughly 33% more nameplate capacity, at a steep capex premium.
2. Idle Capacity — Stranded Capital
An oversized BESS, by definition, contains capacity that is not used every day. In a system with a 30% oversizing factor, approximately 23% of the installed kWh is functionally stranded under normal operating conditions — generating no direct revenue, not contributing to peak shaving, and not offsetting grid draw. Therefore, for merchant revenue projects where every kWh of contracted discharge must justify its hardware cost, idle capacity directly weakens the financial case. Consequently, a detailed financial model comparing oversized vs precisely sized scenarios is essential before committing to an aggressive oversizing strategy.
3. Calendar Aging at High State of Charge
There is a subtle but real risk in BESS oversizing: a battery that is rarely deeply discharged will consequently spend more time at a high state of charge (SoC) between cycles. For LFP, this matters less due to the flat voltage curve, but for NMC and NCA chemistries, sustained high SoC accelerates calendar aging through lithium plating and electrolyte decomposition. The EMS must therefore be configured with SoC upper limits (typically a 90% ceiling) to mitigate this risk, which further reduces the usable window — partially negating the oversizing benefit.
4. Larger Physical Footprint and Permitting Complexity
A larger BESS means more rack space, additional container units, larger electrical rooms, and more complex fire suppression under NFPA 855 setback requirements. For urban C&I projects, rooftop installations, or sites with constrained footprints, BESS oversizing may simply not be feasible without additional civil and structural engineering. As a result, the incremental cost of accommodating a larger system can erode or eliminate the economic benefit of the additional capacity.
5. Risk of Over-Engineering Against Inaccurate Load Projections
BESS oversizing is typically justified by load growth projections that may not materialise. A facility forecasting 30% energy consumption growth over five years but actually growing 10% has paid a significant capex premium for capacity that will never be fully utilised. Furthermore, the further into the future the projections extend, the less reliable they become — and the weaker the economic case for aggressive oversizing. Therefore, right-sizing discipline, grounded in real interval load data, is essential before committing to an oversizing strategy.
6. Interconnection Limit Conflicts
Utility interconnection agreements define the maximum allowable power at the Point of Common Coupling (PCC). An oversized BESS that exceeds the permitted inverter or PCS rating — or that pushes a project over the interconnection ceiling — may require expensive distribution upgrades, transformer replacements, or grid impact studies. As a result, always validate that the oversized system’s power rating remains within interconnection constraints before finalising the design.
7. Diminishing Returns on ROI for Thin-Margin Projects
For projects where the economics are already marginal — low ToU spreads, limited demand charges, or thin merchant power prices — the additional capex of BESS oversizing may not be recoverable within the project’s financial life. Therefore, a right-sizing discipline, rather than aggressive oversizing, often produces better risk-adjusted returns on projects operating in challenging market conditions. Additionally, if battery prices continue to fall, augmentation at year 5–7 may deliver the same EOL capacity guarantee at a lower total lifecycle cost than oversizing today.
BESS Oversizing Pros and Cons: Quick-Reference Comparison Table
PROS of BESS Oversizing
CONS of BESS Oversizing
Extends cycle life by reducing average DoD
Higher upfront capital expenditure
Slower capacity degradation over project lifetime
Idle capacity — underutilised asset
Buffer for future load growth without re-powering
Larger footprint and space requirements
Improves round-trip efficiency at partial loads
Additional BMS / thermal management complexity
Strengthens resilience during extended outages
Risk of battery sitting at high SoC, accelerating calendar aging
Lock in ITC / 48E tax credits on full capacity now
Diminishing returns if load growth projections are wrong
Reduces depth of discharge and thermal stress
Potentially overshoots interconnection limits
Supports higher solar self-consumption
Makes ROI harder to justify on thin-margin projects
BESS Oversizing vs Augmentation: Which Degradation Strategy Wins?
The BESS oversizing debate is inseparable from its primary alternative: augmentation — the strategy of adding battery modules at year 5 or 7 to restore degraded capacity. However, these strategies are not equivalent, and the right choice depends on several project-specific factors.
Factor
BESS Oversizing (Upfront)
Augmentation (Mid-Life)
Capex Timing
Higher Day-1 cost; lower total lifecycle cost
Lower Day-1 cost; uncertain future capex at year 5–7
ITC Eligibility
Full credit on entire capacity at commissioning
Augmented capacity may miss ITC or face FEOC risk
Degradation Benefit
Reduces DoD and slows degradation from Day 1
Addresses degradation after it has occurred
Space Planning
Must install full footprint upfront
Must reserve physical and electrical space for future modules
Falling Battery Prices
Locks in today’s cost for future capacity
May benefit from lower prices at year 5
Complexity
Lower operational complexity
Requires mid-project procurement and system rebalancing
C&I with budget constraints; markets with falling storage prices
As battery prices continue to fall, augmentation is becoming more attractive for some project types. Nevertheless, as Pivot Energy’s modelling demonstrates, for ITC-sensitive projects, oversizing by 15–20% upfront typically produces better risk-adjusted NPV than augmentation — particularly given the difficulty of qualifying augmented capacity for the same ITC rate under the One Big Beautiful Bill Act.
How Much BESS Oversizing Is Right? A Use-Case Sizing Guide
There is no universal BESS oversizing percentage. Instead, the right buffer depends on your use case, battery chemistry, load profile, and project economics. However, the table below provides a practical reference framework covering the most common project types:
Use Case
Recommended BESS Oversizing
Rationale
Key Risk if Under-Sized
Residential Solar + Storage
10–20%
Compensate for DoD and RTE losses; buffer seasonal variation
Example: 30 kWh/day load × 2 autonomy days = 60 kWh base ÷ 0.85 DoD × 0.92 RTE = 76.6 kWh nameplate minimum + 15% degradation buffer = approximately 88 kWh recommended nameplate capacity
Note: For LFP chemistry with a 90% DoD operating window, adjust DoD factor accordingly.
For LFP chemistry specifically, the degradation benefit of BESS oversizing is more modest than for NMC or NCA, because LFP already exhibits a flatter voltage curve and superior cycle life at high DoD. Therefore, the most rigorous approach — as recommended in NREL’s Energy Storage Modelling guidelines and the IEA’s Batteries and Secure Energy Transitions report — is to use simulation tools such as NREL’s SAM or PVsyst with real 15-minute interval load data to determine the optimal capacity that minimises LCOE while meeting the contracted capacity guarantee at EOL.
Does Battery Chemistry Change the BESS Oversizing Calculus?
Yes — significantly. However, the extent to which BESS oversizing is beneficial varies considerably by chemistry. Here is how the most common BESS chemistries interact with oversizing strategy:
LFP (LiFePO4): The Most Common Choice for Commercial BESS
LFP already offers exceptional cycle life — 6,000–10,000+ cycles at 0.5C to 80% SoH — a flat voltage curve that reduces SoC-related aging, and thermal stability above 270°C. Therefore, the benefit of BESS oversizing for LFP is real but more modest than for NMC. A 10–15% oversizing factor is typically sufficient for residential and C&I LFP projects, unless extended autonomy is a primary requirement. For a detailed comparison of LFP cell formats, see our cylindrical vs prismatic LFP guide.
NMC (Nickel Manganese Cobalt): Greater Benefit from Oversizing
NMC cells are more sensitive to both high SoC and high DoD. The cycle life penalty for deep discharging is steeper, and calendar aging at high SoC is more pronounced. Consequently, for NMC-based systems, BESS oversizing by 20–30% can provide meaningful cycle life extension. However, the EMS must be configured to avoid sustained high-SoC parking, which otherwise accelerates precisely the degradation the oversizing was intended to prevent.
NCA (Nickel Cobalt Aluminium): Strongest Case for Oversizing
NCA is even more sensitive to DoD extremes than NMC. Therefore, BESS oversizing is strongly recommended for NCA systems, alongside strict SoC window management — typically a 20–90% operational band. As a result, NCA-based utility-scale systems frequently carry 20–30% oversizing factors as a standard design requirement.
When to Choose BESS Oversizing — and When to Avoid It
Oversize Your BESS When These Conditions Apply
Your project carries a 10+ year contract or PPA with capacity guarantee provisions that must be met at end of life
You are qualifying for ITC / Section 48E and want to maximise the tax credit on the full installed capacity at commissioning
The site has a clear load growth trajectory — EV charging, electrification roadmap, or solar expansion planned
You are designing an off-grid or critical backup system where autonomy days are non-negotiable
NMC or NCA chemistry is specified and DoD reduction delivers a significant cycle life benefit
Your DC-coupled solar array is oversized relative to the inverter and the battery can capture clipping energy
The incremental capex of BESS oversizing is recoverable within the project financial model
Avoid BESS Oversizing When These Conditions Apply
Project economics are already thin and additional capex pushes IRR below the acceptable threshold
Load forecasts are highly uncertain and growth projections lack solid 15-minute interval data support
Physical space constraints make a larger system impractical or disproportionately expensive to install
The interconnection agreement caps power capacity at a level that already constrains daily dispatch
Battery prices are falling rapidly in your market and augmentation in year 5–6 will be substantially cheaper
LFP chemistry is specified and daily DoD is already inherently low (below 60%) with proper sizing
The Four-Step BESS Oversizing Decision Framework
Rather than guessing at an oversizing percentage, use this structured four-step framework to determine whether BESS oversizing is appropriate for your project and, if so, by how much. As a result, you will arrive at a defensible, financially grounded nameplate capacity rather than an arbitrary rule of thumb.
Step 1 — Load Analysis: Gather Real Interval Data
First, collect at least 12–24 months of 15-minute interval load data. Identify peak demand events, average daily consumption, and seasonal variation patterns. This step is non-negotiable: BESS oversizing justified by rough annual consumption estimates rather than interval data almost always produces either over-engineered or under-performing systems.
Step 2 — Base Capacity Calculation
Next, apply the standard sizing formula — daily load × autonomy days ÷ (DoD × RTE) — to establish the minimum required nameplate capacity. This gives you the floor, not the target. However, it also reveals exactly how sensitive the result is to your DoD and RTE assumptions.
Step 3 — Apply Chemistry and Use-Case Correction
Subsequently, determine your oversizing factor based on battery chemistry (LFP vs NMC vs NCA), use case (peak shaving vs backup vs grid services), and EOL capacity requirement. Reference the sizing guide table in Section 6 for starting-point percentages, then adjust based on site-specific factors including climate, cycling frequency, and interconnection limits.
Step 4 — Financial Validation: Model Both Scenarios
Finally, model the oversized vs precisely sized scenarios in a full project NPV and IRR analysis, incorporating ITC capture, degradation trajectory, load growth assumptions, and augmentation cost projections. As a result, you will arrive at the scenario that maximises risk-adjusted return while meeting contracted performance obligations. Choose the strategy with the superior risk-adjusted NPV — not the one that simply installs the most battery.
Conclusion: BESS Oversizing Is a Strategy, Not a Default
BESS oversizing is one of the most powerful tools in a storage developer’s arsenal — but only when applied with precision. When the economics support it, oversizing by 10–25% delivers longer cycle life, a built-in degradation buffer, greater resilience, higher solar self-consumption, and maximised ITC capture. Conversely, when applied without a sound load analysis and financial model, it simply commits capital to cells that will never discharge.
The right approach is always project-specific. Therefore, an LFP C&I peak shaving project with a 10-year capacity guarantee may need 15–20% BESS oversizing to meet EOL targets. A residential grid-tied backup system with low daily DoD requirements may need only 10%. An off-grid microgrid with strict autonomy requirements and no grid fallback may need 25–30%. Furthermore, as battery prices continue to fall, the break-even point between oversizing and augmentation will shift — making it essential to rerun the financial model on each new project rather than applying a fixed rule.
At Sunlith Energy, every BESS project we design goes through a rigorous sizing and degradation modelling process — using real interval load data, validated chemistry models, and financial sensitivity analysis. To learn more about how we approach BESS design, explore our BESS specifications guide, our Battery SoH estimation guide, or review the NLR Grid-Scale Battery Storage Technology Basics for independent technical context. The goal is never the largest battery — it is the right battery, sized correctly for your project’s lifetime.
Ready to size your BESS correctly? Contact the Sunlith Energy team for a technical consultation. We combine 14+ years of LiFePO4 expertise with advanced degradation modelling to design storage systems that perform at end of life, not just on commissioning day.
Why the Tilt Angle Decision Matters Before You Buy a Single Panel
Most solar buyers spend hours comparing panel brands and inverter models. However, one of the most powerful performance variables costs nothing to optimise. In fact, it is decided before the first bolt is tightened: the solar panel tilt angle. Therefore, setting it correctly for your location means you capture every kilowatt-hour the Sun is offering. If you set it wrong, you permanently leave 20–40% of your system’s lifetime yield on the table — for the entire life of the installation.
This guide is the definitive reference for solar panel tilt angle by location. First, it explains the physics behind the tilt angle rule. Furthermore, it breaks down the optimal values by latitude zone. In addition, it provides a comprehensive 130+ city world database covering every country, all US state capitals, Canadian provinces, and major capitals across every continent. As a result, every value is cross-referenced against NREL and Global Solar Atlas irradiance data so you can act on it with confidence.
Whether you are designing a residential rooftop system, a commercial ground-mount, or a utility-scale solar-plus-storage plant, this guide is therefore your complete reference. Used alongside Sunlith’s Peak Sun Hours by Location guide and the Energy Storage Calculation guide, it gives you the complete input data you need to size a system correctly from the ground up.
Key Takeaway
Solar panel tilt angle rule: Set your tilt angle equal to your site latitude for maximum annual yield.
• Northern Hemisphere → Face TRUE SOUTH.
• Southern Hemisphere → Face TRUE NORTH.
• Equatorial zone (0°–15°) → Minimum 10–15° tilt for drainage.
• High latitudes → Steepen tilt toward 60–70°.
Single-axis trackers recover 15–25% more energy at any tilt angle setting.
1. The Physics Behind Solar Panel Tilt Angle
1.1 Why Tilt Angle Exists: Solar Declination and the Ecliptic Plane
The Earth orbits the Sun on a tilted axis — 23.5° relative to the ecliptic plane. As a result, the Sun’s path across the sky varies by season and latitude. In summer, the Sun arcs high; in winter, it tracks low and short. Consequently, a fixed solar panel set at the wrong tilt angle misses the bulk of available irradiance for large parts of the year. Setting the correct solar panel tilt angle therefore compensates for this by orienting the panel face as close to perpendicular to the Sun’s average annual path as possible.
Two angles fully define a solar panel’s orientation relative to the Sun. In addition, both must be set correctly for maximum output:
Azimuth angle: the compass direction the panel face points toward (e.g., 180° = true south in the Northern Hemisphere).
Tilt angle (inclination angle): how steeply the panel is inclined from horizontal — 0° is perfectly flat, 90° is vertical. This is therefore the primary focus of this guide.
1.2 Azimuth Direction: The Companion Setting to Tilt Angle
Tilt angle and azimuth direction must therefore be set together — each amplifies or undermines the other. The Sun transits across the sky from east to west. In the Northern Hemisphere, the Sun’s arc peaks in the southern sky. In the Southern Hemisphere, it consequently peaks in the northern sky. A panel tilted at the correct solar panel tilt angle but facing the wrong direction consequently captures far less irradiance than its theoretical potential.
Northern Hemisphere (latitudes > 0°): pair any tilt angle with azimuth 180° — TRUE SOUTH.
Southern Hemisphere (latitudes < 0°): pair any tilt angle with azimuth 0° — TRUE NORTH.
Near the Equator (±5°): tilt angle is the dominant variable; azimuth east-west deviation has minimal impact.
Important: compass south and TRUE geographic south can differ by several degrees depending on magnetic declination at your site. Therefore, always calibrate to true south using GPS coordinates or solar simulation tools such as PVGIS or the Global Solar Atlas — do not rely on a standard magnetic compass alone.
1.3 The Latitude Rule: How to Calculate Your Optimal Solar Panel Tilt Angle
Quick Summary: How to Orient Solar Panels by Location
Northern Hemisphere: Face panels true south (180° azimuth) at a tilt angle equal to the site latitude.
Southern Hemisphere: Face panels true north (0° azimuth) at a tilt angle equal to the site latitude.
Equatorial Regions (0°–15°): Set a minimum tilt angle of 10° to 15° to ensure proper rain drainage and self-cleaning.
High Latitudes (Above 55°): Steepen the tilt angle toward 60°–70° to capture the low-tracking winter sun.
The optimal solar panel tilt angle for a fixed-mount system is generally equal to the geographic latitude of your location. Setting the tilt angle to match your latitude balances seasonal solar changes, positioning the panels perpendicular to the sun’s average annual path to maximize total yearly energy yield.
London (51.5°N) → solar panel tilt angle ≈ 51°
New York (40.7°N) → solar panel tilt angle ≈ 41°
Dubai (25.2°N) → solar panel tilt angle ≈ 25°
Sydney (33.9°S) → solar panel tilt angle ≈ 34°, facing true north
Singapore (1.3°N) → solar panel tilt angle ≈ 10–15° (equatorial minimum for drainage)
Seasonal tilt adjustments can furthermore improve output by 5–10% for systems with adjustable racking. For example, increasing the tilt angle by 10–15° in winter compensates for the lower Sun; conversely, decreasing it by 10–15° in summer maximises longer daylight hours. As a result, fixed systems should use the annual average tilt angle equal to latitude as the default. The world city database in Section 4 applies this rule to 130+ locations globally so you have a ready reference for any site.
2. Solar Panel Tilt Angle by Latitude Zone: Five Regional Guides
Zone 1: Equatorial Region — Solar Panel Tilt Angle 10°–15° (0° – 15° Latitude)
Countries: Indonesia, Malaysia, Singapore, Kenya, Ecuador, Colombia, Nigeria, Ghana, Uganda, Sri Lanka
Optimal solar panel tilt angle: 10–15° minimum. Do not go lower — near-flat panels accumulate dust and water pools, accelerating soiling losses and potential corrosion.
Optimal direction: Can face either north or south — the Sun’s noon altitude is very high year-round (75°–90°), so azimuth deviation has minimal impact at these latitudes.
Key consideration: diffuse irradiance from overcast tropical skies contributes significantly to total annual yield. Bifacial panels recover 5–12% additional energy from sky-diffuse and ground-reflected radiation.
Seasonal variation: minimal — no major adjustment required.
Pro Tip
In equatorial climates, the biggest output losses are soiling and high cell temperatures — not tilt angle errors. Once you clear the 10–15° minimum tilt angle required for natural rain self-cleaning, shift your focus to establishing a regular panel washing routine and choosing modules featuring a low temperature coefficient (ideally below –0.35%/°C).
Zone 2: Subtropical Region — Solar Panel Tilt Angle 15°–35° (15° – 35° Latitude)
Countries/regions: India (south), Australia (north), Saudi Arabia, UAE, Mexico, Texas (USA), Egypt, South Africa (north), Morocco
Optimal solar panel tilt angle: 15°–35° — apply the latitude rule directly.
Optimal direction: True south (Northern Hemisphere) or true north (Southern Hemisphere) is important here, because the Sun arc is not as overhead as in the equatorial zone.
Desert sites in this zone carry the world’s highest Direct Normal Irradiance (DNI). However, soiling losses from fine dust can reach 15–25% without monthly panel cleaning — soiling management is therefore as critical as tilt angle optimisation.
Temperature coefficient loss: At a cell temperature of 70°C — common on black rooftop panels in subtropical summer — a standard monocrystalline panel consequently loses approximately 16% of its STC-rated output. This is separate from, and additive to, any tilt angle loss.
Zone 3: Temperate Region — Solar Panel Tilt Angle 35°–55° (35° – 55° Latitude)
Countries/regions: Most of Europe, northern USA, northern China, Japan, South Korea, New Zealand (South Island), southern Australia
Optimal solar panel tilt angle: 35°–55° matching latitude. This range consequently sees the greatest absolute yield difference between a correct and incorrect tilt angle — much more so than in tropical zones.
Optimal direction: True south (Northern Hemisphere) or true north (Southern Hemisphere). At these latitudes, a 45° azimuth deviation (e.g., facing SE instead of S) therefore costs 5–8% of annual yield — far more than in lower latitudes.
Winter considerations: Increasing the solar panel tilt angle by 10–15° above latitude (e.g., 55° instead of 45° in London) trades a small summer yield reduction for meaningfully better winter output — often the right trade-off where winter heating or storage demand is highest.
Bifacial panels on snowy ground: Reflected light from snow cover can increase bifacial yield by 10–25% in northern Europe, Canada, and the northern USA — an often-overlooked benefit of a steeper tilt angle in these climates.
Zone 4: Subarctic Region — Solar Panel Tilt Angle 55°–70° (55° – 70° Latitude)
Optimal solar panel tilt angle: 55°–70°. At these latitudes the winter Sun barely clears the horizon, so a steep tilt angle is therefore essential to face the panel more directly toward the low solar disc.
Optimal direction: True south is non-negotiable. Any significant eastward or westward deviation consequently sharply reduces the already-limited winter irradiance.
System design consideration: Annual yield is dominated by the long summer days. As a result, the BESS must be sized to time-shift summer surplus and bridge the extended winter shortfall. Sizing decisions therefore begin with the correct tilt angle, then apply the minimum winter peak sun hours to determine storage requirements.
Trackers: dual-axis trackers can boost summer harvest by 30–40%, substantially improving the seasonal energy balance for subarctic sites.
Zone 5: Polar Region — Solar Panel Tilt Angle 70°–90° (70° – 90° Latitude)
Countries/regions: Northern Greenland, Svalbard, Arctic research stations, Antarctica
Optimal solar panel tilt angle: 70°–90° (near-vertical). The Sun never rises high in polar skies — a near-vertical panel therefore faces the low solar disc most directly during the brief productive hours.
Optimal direction: True south (Northern Hemisphere). During polar summer, when the Sun circles the sky for 24 hours, east-west orientation splits may consequently be considered to distribute capture around the clock.
Key consideration: Systems must be massively oversized relative to winter demand, or paired with complementary generation (wind, diesel) to survive multi-month polar night. As a result, the tilt angle decision at these latitudes is secondary to the fundamental seasonal energy gap.
3. Panel Facing Direction vs. Tilt Angle: The Combined Impact Table
3.1 How Direction Deviations Reduce Annual Yield
The solar panel tilt angle and azimuth direction interact closely. Therefore, the table below shows annual yield relative to a perfectly south-facing, latitude-matched tilt angle installation in the Northern Hemisphere. Use it to evaluate what you lose when roof orientation or planning constraints force a compromise on either variable.
West-facing panels paired with a steeper tilt angle have gained significant commercial interest under Time-of-Use (TOU) tariff structures—a trend reflecting the shifting grid dynamics noted in the IEA World Energy Outlook 2024. The reason is that they shift generation toward peak afternoon grid pricing periods. As a result, even though west-facing arrays produce 18–22% less annual energy than true-south arrays, the higher value of that afternoon energy can consequently close the revenue gap. Furthermore, a Battery Energy Storage System (BESS) can maximise revenue from any panel orientation by decoupling solar generation time from dispatch time — making optimal tilt angle therefore the most important fixed parameter when the direction is constrained.
4. Solar Panel Tilt Angle Database: 130+ World Cities by Country, State & Capital
4.0 How to Use This Database
The following database provides the recommended solar panel tilt angle and optimal facing direction for 130+ world cities. Values are derived from geographic latitude and, furthermore, cross-referenced against PVGIS and Global Solar Atlas irradiance data. These are therefore authoritative starting values. However, always run a site-specific simulation using PVGIS or PVWatts to account for local shading, horizon obstructions, and microclimate before finalising your installation design.
4.1 USA State Capitals & Major Cities — Southern & Central States (A–N)
All US states in the Northern Hemisphere use true south (180°) as the optimal azimuth. Therefore, the tilt angle is the only variable that changes by location — set it equal to your state capital’s latitude for maximum annual output.
City / State
Latitude
Optimal Direction
Tilt Angle
Annual PSH (avg)
Phoenix, AZ
33.4°N
True South (180°)
33°
5.5–6.5 hrs
Los Angeles, CA
34.1°N
True South (180°)
34°
5.0–6.0 hrs
Sacramento, CA
38.6°N
True South (180°)
39°
4.8–5.6 hrs
Denver, CO
39.7°N
True South (180°)
40°
5.0–5.8 hrs
Hartford, CT
41.8°N
True South (180°)
42°
4.2–4.8 hrs
Tallahassee, FL
30.4°N
True South (180°)
30°
4.8–5.5 hrs
Atlanta, GA
33.7°N
True South (180°)
34°
4.5–5.2 hrs
Honolulu, HI
21.3°N
True South (180°)
21°
5.5–6.3 hrs
Boise, ID
43.6°N
True South (180°)
44°
4.5–5.3 hrs
Springfield, IL
39.8°N
True South (180°)
40°
4.2–5.0 hrs
Indianapolis, IN
39.8°N
True South (180°)
40°
4.0–4.8 hrs
Des Moines, IA
41.6°N
True South (180°)
42°
4.2–5.0 hrs
Topeka, KS
39.0°N
True South (180°)
39°
4.5–5.3 hrs
Frankfort, KY
38.2°N
True South (180°)
38°
4.0–4.8 hrs
Baton Rouge, LA
30.5°N
True South (180°)
31°
4.5–5.2 hrs
Augusta, ME
44.3°N
True South (180°)
44°
3.8–4.5 hrs
Annapolis, MD
38.9°N
True South (180°)
39°
4.0–4.8 hrs
Boston, MA
42.4°N
True South (180°)
42°
4.0–4.7 hrs
Lansing, MI
42.7°N
True South (180°)
43°
3.8–4.5 hrs
St. Paul, MN
44.9°N
True South (180°)
45°
3.8–4.5 hrs
Jackson, MS
32.3°N
True South (180°)
32°
4.5–5.2 hrs
Jefferson City, MO
38.6°N
True South (180°)
39°
4.2–5.0 hrs
Helena, MT
46.6°N
True South (180°)
47°
4.0–5.0 hrs
Lincoln, NE
40.8°N
True South (180°)
41°
4.5–5.3 hrs
Carson City, NV
39.2°N
True South (180°)
39°
5.5–6.5 hrs
4.1b USA State Capitals — Northern & Western States (N–W) + DC & Territories
As a result of increasing latitude, northern states consistently require steeper tilt angles. For example, Juneau, Alaska (58.3°N) uses a 58° tilt angle — nearly twice that of Honolulu, Hawaii (21°). Furthermore, northern states also see lower peak sun hours, which makes setting the correct tilt angle even more critical to capturing every available hour of irradiance.
City / State
Latitude
Optimal Direction
Tilt Angle
Annual PSH (avg)
Concord, NH
43.2°N
True South (180°)
43°
3.9–4.6 hrs
Trenton, NJ
40.2°N
True South (180°)
40°
4.0–4.8 hrs
Santa Fe, NM
35.7°N
True South (180°)
36°
5.5–6.5 hrs
Albany, NY
42.7°N
True South (180°)
43°
3.9–4.6 hrs
New York City, NY
40.7°N
True South (180°)
41°
4.0–4.8 hrs
Raleigh, NC
35.8°N
True South (180°)
36°
4.5–5.2 hrs
Bismarck, ND
46.8°N
True South (180°)
47°
4.2–5.0 hrs
Columbus, OH
40.0°N
True South (180°)
40°
3.9–4.7 hrs
Oklahoma City, OK
35.5°N
True South (180°)
36°
4.8–5.5 hrs
Salem, OR
44.9°N
True South (180°)
45°
3.5–4.5 hrs
Harrisburg, PA
40.3°N
True South (180°)
40°
4.0–4.8 hrs
Providence, RI
41.8°N
True South (180°)
42°
4.0–4.7 hrs
Columbia, SC
34.0°N
True South (180°)
34°
4.5–5.2 hrs
Pierre, SD
44.4°N
True South (180°)
44°
4.5–5.2 hrs
Nashville, TN
36.2°N
True South (180°)
36°
4.5–5.0 hrs
Austin, TX
30.3°N
True South (180°)
30°
5.0–5.8 hrs
Salt Lake City, UT
40.8°N
True South (180°)
41°
5.0–5.8 hrs
Montpelier, VT
44.3°N
True South (180°)
44°
3.8–4.5 hrs
Richmond, VA
37.5°N
True South (180°)
38°
4.2–5.0 hrs
Olympia, WA
47.0°N
True South (180°)
47°
3.2–4.0 hrs
Charleston, WV
38.4°N
True South (180°)
38°
3.8–4.5 hrs
Madison, WI
43.1°N
True South (180°)
43°
3.8–4.5 hrs
Cheyenne, WY
41.1°N
True South (180°)
41°
5.0–5.8 hrs
Juneau, AK
58.3°N
True South (180°)
58°
2.5–3.5 hrs
Washington, DC
38.9°N
True South (180°)
39°
4.0–4.8 hrs
4.2 Canada — Provincial & Territorial Capitals
City / Province
Latitude
Optimal Direction
Tilt Angle
Annual PSH (avg)
Victoria, BC
48.4°N
True South (180°)
48°
3.5–4.5 hrs
Edmonton, AB
53.5°N
True South (180°)
54°
3.5–4.5 hrs
Regina, SK
50.5°N
True South (180°)
51°
4.0–5.0 hrs
Winnipeg, MB
49.9°N
True South (180°)
50°
4.0–5.0 hrs
Toronto, ON
43.7°N
True South (180°)
44°
3.8–4.5 hrs
Quebec City, QC
46.8°N
True South (180°)
47°
3.8–4.5 hrs
Fredericton, NB
45.9°N
True South (180°)
46°
3.7–4.4 hrs
Halifax, NS
44.6°N
True South (180°)
45°
3.7–4.4 hrs
Charlottetown, PEI
46.2°N
True South (180°)
46°
3.6–4.3 hrs
St. John’s, NL
47.6°N
True South (180°)
48°
3.5–4.2 hrs
Whitehorse, YT
60.7°N
True South (180°)
61°
3.0–4.0 hrs
Yellowknife, NT
62.5°N
True South (180°)
63°
3.0–4.0 hrs
Iqaluit, NU
63.7°N
True South (180°)
64°
2.5–3.5 hrs
4.3 Europe — Country Capitals & Major Cities
City / Country
Latitude
Hemisphere
Optimal Direction
Tilt Angle
PSH (avg)
Reykjavik, Iceland
64.1°N
Northern
True South (180°)
64°
2.5–3.5 hrs
Helsinki, Finland
60.2°N
Northern
True South (180°)
60°
2.8–3.8 hrs
Oslo, Norway
59.9°N
Northern
True South (180°)
60°
2.8–3.8 hrs
Stockholm, Sweden
59.3°N
Northern
True South (180°)
59°
3.0–4.0 hrs
Tallinn, Estonia
59.4°N
Northern
True South (180°)
59°
2.9–3.8 hrs
Riga, Latvia
56.9°N
Northern
True South (180°)
57°
3.0–3.9 hrs
Vilnius, Lithuania
54.7°N
Northern
True South (180°)
55°
3.1–4.0 hrs
Moscow, Russia
55.8°N
Northern
True South (180°)
56°
3.0–4.0 hrs
Copenhagen, Denmark
55.7°N
Northern
True South (180°)
56°
3.0–4.0 hrs
Edinburgh, Scotland
55.9°N
Northern
True South (180°)
56°
2.8–3.8 hrs
Amsterdam, Netherlands
52.4°N
Northern
True South (180°)
52°
3.0–4.0 hrs
Brussels, Belgium
50.9°N
Northern
True South (180°)
51°
3.0–4.0 hrs
Warsaw, Poland
52.2°N
Northern
True South (180°)
52°
3.2–4.2 hrs
Prague, Czech Rep.
50.1°N
Northern
True South (180°)
50°
3.3–4.2 hrs
Berlin, Germany
52.5°N
Northern
True South (180°)
53°
3.2–4.2 hrs
Vienna, Austria
48.2°N
Northern
True South (180°)
48°
3.5–4.5 hrs
Bern, Switzerland
46.9°N
Northern
True South (180°)
47°
3.5–4.8 hrs
Paris, France
48.9°N
Northern
True South (180°)
49°
3.2–4.2 hrs
London, UK
51.5°N
Northern
True South (180°)
52°
2.7–3.7 hrs
Dublin, Ireland
53.3°N
Northern
True South (180°)
53°
2.6–3.5 hrs
Lisbon, Portugal
38.7°N
Northern
True South (180°)
39°
4.5–5.5 hrs
Madrid, Spain
40.4°N
Northern
True South (180°)
40°
4.5–5.5 hrs
Rome, Italy
41.9°N
Northern
True South (180°)
42°
4.2–5.2 hrs
Athens, Greece
37.9°N
Northern
True South (180°)
38°
4.5–5.5 hrs
Nicosia, Cyprus
35.2°N
Northern
True South (180°)
35°
5.0–6.0 hrs
Valletta, Malta
35.9°N
Northern
True South (180°)
36°
5.0–6.0 hrs
Zagreb, Croatia
45.8°N
Northern
True South (180°)
46°
3.8–4.8 hrs
Sarajevo, Bosnia
43.9°N
Northern
True South (180°)
44°
3.8–4.8 hrs
Belgrade, Serbia
44.8°N
Northern
True South (180°)
45°
3.8–4.8 hrs
Bucharest, Romania
44.4°N
Northern
True South (180°)
44°
4.0–5.0 hrs
Sofia, Bulgaria
42.7°N
Northern
True South (180°)
43°
4.0–5.0 hrs
Budapest, Hungary
47.5°N
Northern
True South (180°)
48°
3.7–4.7 hrs
Bratislava, Slovakia
48.2°N
Northern
True South (180°)
48°
3.6–4.6 hrs
Ljubljana, Slovenia
46.1°N
Northern
True South (180°)
46°
3.7–4.7 hrs
Kyiv, Ukraine
50.5°N
Northern
True South (180°)
51°
3.5–4.5 hrs
Minsk, Belarus
53.9°N
Northern
True South (180°)
54°
3.2–4.2 hrs
Chisinau, Moldova
47.0°N
Northern
True South (180°)
47°
3.8–4.8 hrs
Tirana, Albania
41.3°N
Northern
True South (180°)
41°
4.2–5.2 hrs
Skopje, N. Macedonia
42.0°N
Northern
True South (180°)
42°
4.2–5.2 hrs
Podgorica, Montenegro
42.4°N
Northern
True South (180°)
42°
4.2–5.2 hrs
Pristina, Kosovo
42.7°N
Northern
True South (180°)
43°
4.0–5.0 hrs
Andorra la Vella
42.5°N
Northern
True South (180°)
43°
4.5–5.5 hrs
Luxembourg City
49.6°N
Northern
True South (180°)
50°
3.2–4.2 hrs
Valletta, Malta
35.9°N
Northern
True South (180°)
36°
5.0–6.0 hrs
4.4 Asia — Country Capitals & Major Cities
City / Country
Latitude
Hemisphere
Optimal Direction
Tilt Angle
PSH (avg)
Tokyo, Japan
35.7°N
Northern
True South (180°)
36°
3.8–4.8 hrs
Beijing, China
39.9°N
Northern
True South (180°)
40°
4.5–5.5 hrs
Shanghai, China
31.2°N
Northern
True South (180°)
31°
3.8–4.8 hrs
Seoul, South Korea
37.6°N
Northern
True South (180°)
38°
3.8–4.8 hrs
Pyongyang, N. Korea
39.0°N
Northern
True South (180°)
39°
4.0–5.0 hrs
Ulaanbaatar, Mongolia
47.9°N
Northern
True South (180°)
48°
4.5–5.8 hrs
New Delhi, India
28.6°N
Northern
True South (180°)
29°
4.5–5.5 hrs
Mumbai, India
19.1°N
Northern
True South (180°)
19°
5.0–6.0 hrs
Chennai, India
13.1°N
Northern
True South (180°)
13°
5.0–6.0 hrs
Islamabad, Pakistan
33.7°N
Northern
True South (180°)
34°
5.0–6.0 hrs
Dhaka, Bangladesh
23.7°N
Northern
True South (180°)
24°
4.5–5.5 hrs
Kathmandu, Nepal
27.7°N
Northern
True South (180°)
28°
4.5–5.5 hrs
Colombo, Sri Lanka
6.9°N
Northern
True South/Flat
10–15°
5.0–6.0 hrs
Male, Maldives
4.2°N
Equatorial
True South/Flat
10–15°
5.5–6.5 hrs
Kabul, Afghanistan
34.5°N
Northern
True South (180°)
35°
5.5–6.5 hrs
Tehran, Iran
35.7°N
Northern
True South (180°)
36°
5.0–6.0 hrs
Baghdad, Iraq
33.3°N
Northern
True South (180°)
33°
5.5–6.5 hrs
Riyadh, Saudi Arabia
24.7°N
Northern
True South (180°)
25°
5.5–6.5 hrs
Dubai, UAE
25.2°N
Northern
True South (180°)
25°
5.5–6.5 hrs
Doha, Qatar
25.3°N
Northern
True South (180°)
25°
5.5–6.5 hrs
Kuwait City, Kuwait
29.4°N
Northern
True South (180°)
29°
5.5–6.5 hrs
Muscat, Oman
23.6°N
Northern
True South (180°)
24°
5.5–6.5 hrs
Sana’a, Yemen
15.4°N
Northern
True South (180°)
15°
5.5–6.5 hrs
Amman, Jordan
31.9°N
Northern
True South (180°)
32°
5.0–6.0 hrs
Beirut, Lebanon
33.9°N
Northern
True South (180°)
34°
5.0–6.0 hrs
Jerusalem, Israel
31.8°N
Northern
True South (180°)
32°
5.0–6.0 hrs
Ankara, Turkey
39.9°N
Northern
True South (180°)
40°
4.5–5.5 hrs
Tashkent, Uzbekistan
41.3°N
Northern
True South (180°)
41°
4.8–5.8 hrs
Almaty, Kazakhstan
43.3°N
Northern
True South (180°)
43°
4.5–5.5 hrs
Bishkek, Kyrgyzstan
42.9°N
Northern
True South (180°)
43°
4.5–5.5 hrs
Dushanbe, Tajikistan
38.6°N
Northern
True South (180°)
39°
4.8–5.8 hrs
Ashgabat, Turkmenistan
37.9°N
Northern
True South (180°)
38°
5.0–6.0 hrs
Baku, Azerbaijan
40.4°N
Northern
True South (180°)
40°
4.5–5.5 hrs
Tbilisi, Georgia
41.7°N
Northern
True South (180°)
42°
4.3–5.3 hrs
Yerevan, Armenia
40.2°N
Northern
True South (180°)
40°
4.5–5.5 hrs
Kuala Lumpur, Malaysia
3.1°N
Equatorial
South/Flat
10–15°
4.5–5.5 hrs
Singapore
1.3°N
Equatorial
South/Flat
10–15°
4.3–5.3 hrs
Bangkok, Thailand
13.8°N
Northern
True South (180°)
14°
4.8–5.8 hrs
Hanoi, Vietnam
21.0°N
Northern
True South (180°)
21°
4.5–5.5 hrs
Manila, Philippines
14.6°N
Northern
True South (180°)
15°
4.8–5.8 hrs
Jakarta, Indonesia
6.2°S
Southern
True North (0°)
10–15°
4.5–5.5 hrs
Phnom Penh, Cambodia
11.6°N
Northern
True South (180°)
12°
5.0–6.0 hrs
Vientiane, Laos
17.9°N
Northern
True South (180°)
18°
5.0–6.0 hrs
Naypyidaw, Myanmar
19.7°N
Northern
True South (180°)
20°
4.8–5.8 hrs
Kathmandu, Nepal
27.7°N
Northern
True South (180°)
28°
4.8–5.8 hrs
Thimphu, Bhutan
27.5°N
Northern
True South (180°)
28°
4.5–5.5 hrs
4.5 Africa — Country Capitals & Major Cities
City / Country
Latitude
Hemisphere
Optimal Direction
Tilt Angle
PSH (avg)
Cairo, Egypt
30.1°N
Northern
True South (180°)
30°
5.5–6.5 hrs
Tunis, Tunisia
36.8°N
Northern
True South (180°)
37°
5.0–6.0 hrs
Algiers, Algeria
36.7°N
Northern
True South (180°)
37°
5.0–6.0 hrs
Rabat, Morocco
34.0°N
Northern
True South (180°)
34°
5.0–6.0 hrs
Tripoli, Libya
32.9°N
Northern
True South (180°)
33°
5.5–6.5 hrs
Khartoum, Sudan
15.6°N
Northern
True South (180°)
16°
6.0–7.0 hrs
Addis Ababa, Ethiopia
9.0°N
Northern
True South (180°)
9°
5.5–6.5 hrs
Nairobi, Kenya
1.3°S
Southern
True North (0°)
10–15°
5.5–6.5 hrs
Kampala, Uganda
0.3°N
Equatorial
South/Flat
10–15°
5.0–6.0 hrs
Dar es Salaam, Tanzania
6.8°S
Southern
True North (0°)
7–15°
5.5–6.5 hrs
Kigali, Rwanda
1.9°S
Southern
True North (0°)
10–15°
5.5–6.5 hrs
Bujumbura, Burundi
3.4°S
Southern
True North (0°)
10–15°
5.5–6.5 hrs
Lusaka, Zambia
15.4°S
Southern
True North (0°)
15°
5.5–6.5 hrs
Harare, Zimbabwe
17.8°S
Southern
True North (0°)
18°
5.5–6.5 hrs
Maputo, Mozambique
25.9°S
Southern
True North (0°)
26°
5.5–6.5 hrs
Lilongwe, Malawi
14.0°S
Southern
True North (0°)
14°
5.5–6.5 hrs
Gaborone, Botswana
24.7°S
Southern
True North (0°)
25°
5.5–6.5 hrs
Windhoek, Namibia
22.6°S
Southern
True North (0°)
23°
5.8–6.8 hrs
Pretoria, South Africa
25.7°S
Southern
True North (0°)
26°
5.5–6.5 hrs
Cape Town, S. Africa
33.9°S
Southern
True North (0°)
34°
5.0–6.0 hrs
Johannesburg, S. Africa
26.2°S
Southern
True North (0°)
26°
5.5–6.5 hrs
Lagos, Nigeria
6.5°N
Northern
True South (180°)
10–15°
4.5–5.5 hrs
Abuja, Nigeria
9.1°N
Northern
True South (180°)
9°
5.0–6.0 hrs
Accra, Ghana
5.6°N
Northern
True South (180°)
10–15°
5.0–6.0 hrs
Dakar, Senegal
14.7°N
Northern
True South (180°)
15°
5.5–6.5 hrs
Bamako, Mali
12.6°N
Northern
True South (180°)
13°
5.5–6.5 hrs
Niamey, Niger
13.5°N
Northern
True South (180°)
14°
6.0–7.0 hrs
Ouagadougou, Burkina
12.4°N
Northern
True South (180°)
12°
6.0–7.0 hrs
Ndjamena, Chad
12.1°N
Northern
True South (180°)
12°
6.0–7.0 hrs
Kinshasa, DRC
4.3°S
Southern
True North (0°)
10–15°
4.5–5.5 hrs
Brazzaville, Congo
4.3°S
Southern
True North (0°)
10–15°
4.5–5.5 hrs
Libreville, Gabon
0.4°N
Equatorial
South/Flat
10–15°
4.5–5.5 hrs
Yaounde, Cameroon
3.8°N
Equatorial
South/Flat
10–15°
4.5–5.5 hrs
Malabo, Eq. Guinea
3.8°N
Equatorial
South/Flat
10–15°
4.5–5.5 hrs
Mogadishu, Somalia
2.0°N
Equatorial
South/Flat
10–15°
5.5–6.5 hrs
Djibouti City
11.6°N
Northern
True South (180°)
12°
6.0–7.0 hrs
Asmara, Eritrea
15.3°N
Northern
True South (180°)
15°
6.0–7.0 hrs
Antananarivo, Madagascar
18.9°S
Southern
True North (0°)
19°
5.0–6.0 hrs
4.6 South America — Country Capitals & Major Cities
City / Country
Latitude
Hemisphere
Optimal Direction
Tilt Angle
PSH (avg)
Bogota, Colombia
4.7°N
Equatorial
South/Flat
10–15°
4.5–5.5 hrs
Caracas, Venezuela
10.5°N
Northern
True South (180°)
11°
5.0–6.0 hrs
Georgetown, Guyana
6.8°N
Equatorial
South/Flat
10–15°
5.0–6.0 hrs
Paramaribo, Suriname
5.9°N
Equatorial
South/Flat
10–15°
4.5–5.5 hrs
Cayenne, French Guiana
5.0°N
Equatorial
South/Flat
10–15°
4.5–5.5 hrs
Quito, Ecuador
0.2°S
Equatorial
South/Flat
10–15°
4.8–5.8 hrs
Lima, Peru
12.0°S
Southern
True North (0°)
12°
4.5–5.5 hrs
La Paz, Bolivia
16.5°S
Southern
True North (0°)
17°
5.5–6.5 hrs
Brasilia, Brazil
15.8°S
Southern
True North (0°)
16°
5.0–6.0 hrs
Sao Paulo, Brazil
23.5°S
Southern
True North (0°)
24°
4.5–5.5 hrs
Rio de Janeiro, Brazil
22.9°S
Southern
True North (0°)
23°
4.8–5.8 hrs
Asuncion, Paraguay
25.3°S
Southern
True North (0°)
25°
5.0–6.0 hrs
Montevideo, Uruguay
34.9°S
Southern
True North (0°)
35°
4.5–5.5 hrs
Buenos Aires, Argentina
34.6°S
Southern
True North (0°)
35°
4.5–5.5 hrs
Santiago, Chile
33.5°S
Southern
True North (0°)
34°
4.8–5.8 hrs
Punta Arenas, Chile
53.1°S
Southern
True North (0°)
53°
3.0–4.0 hrs
4.7 Oceania — Capitals & Major Cities
City / Country
Latitude
Hemisphere
Optimal Direction
Tilt Angle
PSH (avg)
Canberra, Australia
35.3°S
Southern
True North (0°)
35°
4.8–5.8 hrs
Sydney, Australia
33.9°S
Southern
True North (0°)
34°
4.8–5.8 hrs
Melbourne, Australia
37.8°S
Southern
True North (0°)
38°
4.3–5.3 hrs
Brisbane, Australia
27.5°S
Southern
True North (0°)
28°
5.0–6.0 hrs
Perth, Australia
31.9°S
Southern
True North (0°)
32°
5.5–6.5 hrs
Adelaide, Australia
34.9°S
Southern
True North (0°)
35°
5.0–6.0 hrs
Darwin, Australia
12.5°S
Southern
True North (0°)
13°
5.5–6.5 hrs
Wellington, New Zealand
41.3°S
Southern
True North (0°)
41°
4.0–5.0 hrs
Auckland, New Zealand
36.9°S
Southern
True North (0°)
37°
4.3–5.3 hrs
Port Moresby, PNG
9.4°S
Southern
True North (0°)
10–15°
4.8–5.8 hrs
Suva, Fiji
18.1°S
Southern
True North (0°)
18°
5.0–6.0 hrs
Nuku’alofa, Tonga
21.1°S
Southern
True North (0°)
21°
5.0–6.0 hrs
Honiara, Solomon Is.
9.4°S
Southern
True North (0°)
10–15°
4.8–5.8 hrs
Apia, Samoa
13.8°S
Southern
True North (0°)
14°
5.0–6.0 hrs
Port Vila, Vanuatu
17.7°S
Southern
True North (0°)
18°
5.0–6.0 hrs
Tarawa, Kiribati
1.3°N
Equatorial
South/Flat
10–15°
5.5–6.5 hrs
Funafuti, Tuvalu
8.5°S
Southern
True North (0°)
10–15°
5.5–6.5 hrs
Palikir, Micronesia
7.0°N
Northern
True South (180°)
10–15°
5.5–6.5 hrs
Majuro, Marshall Is.
7.1°N
Northern
True South (180°)
10–15°
5.5–6.5 hrs
Ngerulmud, Palau
7.5°N
Northern
True South (180°)
10–15°
5.5–6.5 hrs
5. Fixed Tilt Angle vs. Solar Trackers: Yield Gain vs. Cost Trade-Off
#image_title
Solar trackers dynamically adjust the solar panel tilt angle and/or azimuth throughout the day to follow the Sun’s path. The yield benefit is consequently well-established. However, trackers add cost, moving parts, and maintenance requirements. Therefore, here is a clear framework for when each approach makes engineering and financial sense:
For residential and commercial rooftop systems, a fixed tilt angle at latitude therefore remains the dominant choice for its simplicity and zero maintenance. For ground-mount projects on flat terrain, single-axis trackers consequently deliver the best LCOE improvement. When paired with a Battery Energy Storage System, even a fixed tilt angle installation can furthermore be optimised for revenue through intelligent charge and dispatch scheduling — the BESS compensates for suboptimal solar timing rather than suboptimal panel geometry.
6. Real-World Constraints: When You Cannot Set the Ideal Tilt Angle
6.1 Fixed Roof Pitch — Working With What You Have
Most residential rooftops have a fixed pitch that may not match the ideal solar panel tilt angle for the site latitude. Therefore, here is a practical decision hierarchy for constrained installations:
Measure the existing roof pitch angle. A 4/12 pitch = approximately 18°; a 6/12 pitch = approximately 27°. This is consequently your actual tilt angle before any additional racking.
Compare the existing pitch to your target solar panel tilt angle (= your latitude). Calculate the deficit.
Evaluate tilt-up racking mounts that can add 5–15° of additional tilt angle without significant structural impact. In addition, check manufacturer wind load ratings for your region.
Check for shading from chimneys, neighboring buildings, and trees using winter solstice Sun angles — shading loss often exceeds the yield gain from correcting tilt angle on a partially shaded plane.
If multiple roof planes exist, compare yield across orientations. Sometimes the secondary roof plane at a better tilt angle and azimuth consequently outperforms the primary plane, even at a smaller usable area.
6.2 Flat Roof Installations — Full Tilt Angle Freedom
Flat-roof commercial buildings have complete freedom to set any solar panel tilt angle and azimuth direction. Best practices for flat roof systems:
Use ballasted racking to achieve the optimal tilt angle (= site latitude) without roof penetrations. Ballasted systems are reversible and avoid waterproofing risk.
Orient all rows in the true south direction (Northern Hemisphere) or true north (Southern Hemisphere) before setting the tilt angle — direction lock-in is permanent once installed.
Apply correct inter-row spacing to prevent self-shading. The minimum row gap = panel height × sin(tilt angle) / tan(winter solstice solar altitude angle at the site latitude).
In very hot climates, a tilt angle of 10–15° rather than the full latitude value reduces wind uplift loads and soiling accumulation at the cost of a 2–5% yield reduction — often acceptable in exchange for lower structural requirements.
7. Tools to Calculate Your Site-Specific Solar Panel Tilt Angle
7.1 Free Online Tilt Angle Calculators
The tilt angle values in this guide are reliable starting points derived from the latitude rule. However, every site has unique shading, horizon obstructions, albedo, and microclimate factors that therefore affect the optimal tilt angle. As a result, always use one of these authoritative free tools to confirm your site-specific solar panel tilt angle before installation:
PVGIS (European Commission JRC): — The gold standard for tilt angle optimisation in Europe, Africa, and Asia. Enter GPS coordinates; the tool consequently returns the optimal tilt angle, azimuth, and monthly energy yield for any fixed or tracking configuration.
PVWatts (NREL):— The primary tool for US sites, with global coverage. Input your tilt angle and azimuth to get annual and monthly energy output. In addition, it calculates financial payback estimates.
Global Solar Atlas (World Bank):— Provides irradiance maps and explicitly states the optimal tilt angle for any location worldwide. Furthermore, it is completely free with no registration required.
7.2 On-Site Verification Tools
After calculating your solar panel tilt angle using the tools above, verify it on-site before committing to a racking layout. The following tools help you confirm true south direction and check shading:
Solargis:— High-resolution irradiance data with tilt angle optimisation tools. Free prospecting tier available for initial screening.
Sun Surveyor / SunCalc: mobile and web tools for visualising the Sun’s path and checking horizon shading at your exact tilt angle and azimuth before installation day.
Once you have confirmed your solar panel tilt angle and direction, the next step is full system sizing. Use Sunlith’s Energy Storage Calculation Guide and Peak Sun Hours by Location together — both tools use your tilt-angle-corrected peak sun hours as the key input for battery and solar capacity calculations.
8. Solar Panel Tilt Angle and BESS Integration: How They Interact
The solar panel tilt angle is not an isolated parameter — it directly shapes how your BESS must be sized and controlled. Understanding this interaction prevents the common mistake of under-sizing storage to compensate for a suboptimal panel setup, or over-building solar capacity to make up for an incorrect tilt angle.
8.1 How Tilt Angle Shapes the BESS Charge Profile
A south-facing array at the correct solar panel tilt angle (= site latitude) produces a symmetrical bell-curve output peaking at solar noon. This predictable profile makes BESS scheduling highly efficient: the charge controller begins ramping up in the early irradiance rise, reaches full state of charge before midday peak, and begins discharging as afternoon irradiance declines. The Power Conversion System (PCS) manages this charge-to-discharge transition bidirectionally, responding to real-time irradiance readings and grid price signals. An incorrect tilt angle that flattens or shifts the generation curve forces the PCS to operate across a wider, less predictable range — reducing dispatch efficiency.
8.2 East-West Split Arrays and Tilt Angle with BESS
When a ridge-line roof forces an east-west split, the tilt angle on each plane becomes even more important. A steeper tilt angle on the west plane (closer to site latitude) captures more afternoon irradiance and complements a BESS discharging into the evening peak. East-facing panels at a shallower tilt produce a morning surge ideal for charging the BESS before the midday load period. Matching tilt angles to each plane’s orientation and season is the most cost-effective optimisation step before adding storage.
Every degree of tilt angle error that reduces annual solar yield must be compensated by either more panel capacity or more battery storage — both add cost. A correctly set solar panel tilt angle is the cheapest system optimisation available. For complete sizing methodology using tilt-angle-corrected peak sun hours, see the Sunlith How to Choose Solar Panels and Batteries guide and the kWp vs kWh Solar Guide.
9. Frequently Asked Questions on Solar Panel Tilt Angle
What is the correct solar panel tilt angle for my location?
The correct solar panel tilt angle for a fixed system is equal to your site’s geographic latitude. For example: New York (41°N) → tilt angle 41°; London (51.5°N) → tilt angle 52°; Dubai (25.2°N) → tilt angle 25°; Sydney (33.9°S) → tilt angle 34°. In equatorial regions below 15° latitude, use a minimum tilt angle of 10–15° for panel self-cleaning regardless of latitude. See the full city database in Section 4 for your specific location.
What direction should the solar panel face at the correct tilt angle?
In the Northern Hemisphere, set the tilt angle facing TRUE SOUTH (azimuth 180°). In the Southern Hemisphere, set the tilt angle facing TRUE NORTH (azimuth 0°). At equatorial latitudes (within 5° of the equator), the tilt angle is the primary variable and the facing direction matters far less. Always calibrate to true geographic south, not magnetic compass south, as magnetic declination can introduce several degrees of error.
Does changing the solar panel tilt angle by season improve output?
Yes. Adjusting the tilt angle seasonally can improve annual yield by 5–10% compared to a fixed tilt angle at latitude. In winter, increase the tilt angle by 10–15° above latitude to compensate for the lower Sun. In summer, reduce the tilt angle by 10–15° below latitude. Adjustable racking systems or dual-axis trackers automate this optimization. For fixed systems, the latitude-matched tilt angle remains the best single setting for maximum annual energy.
What solar panel tilt angle should I use on a flat roof?
On a flat roof, you have complete freedom to set any tilt angle. Use your site latitude as the target tilt angle. In very hot or dusty climates, a tilt angle of 10–15° is often used to reduce wind load and racking cost, with only a 2–5% yield reduction. For latitudes above 35°, always use the full latitude-matched tilt angle for maximum winter performance.
Does a wrong solar panel tilt angle really make a significant difference?
Yes — significantly. A tilt angle that is 20° too shallow or too steep can reduce annual yield by 8–15% in temperate climates and by 15–25% at high latitudes above 50°. Over a 25-year system life, that compounds into a very large energy and revenue loss. Correcting the tilt angle at installation costs nothing — correcting it post-installation on a racked rooftop system can require new mounting hardware.
What solar panel tilt angle should I use in Australia?
In Australia, face panels TRUE NORTH and set the tilt angle equal to your site latitude. Sydney (34°S) → tilt angle 34°, Melbourne (38°S) → 38°, Brisbane (27.5°S) → 28°, Perth (32°S) → 32°, Darwin (12.5°S) → 13°, Adelaide (35°S) → 35°, Canberra (35.3°S) → 35°. Use PVGIS or PVWatts for site-specific validation, especially if your roof pitch differs significantly from your latitude value.
Conclusion: Get the Solar Panel Tilt Angle Right First — Everything Else Follows
The Universal Tilt Angle Rules
The solar panel tilt angle is the most underrated variable in solar system design. It costs nothing to set correctly at installation. However, a wrong tilt angle silently drains 10–40% of your system’s lifetime output depending on your latitude. As a result, getting it right before installation is the single highest-ROI decision in solar system design. The rules are simple and consistent everywhere on Earth:
Set solar panel tilt angle = your site latitude for maximum annual yield.
Northern Hemisphere: combine that tilt angle with true south facing (azimuth 180°).
Southern Hemisphere: combine that tilt angle with true north facing (azimuth 0°).
Equatorial zone: use a minimum tilt angle of 10–15° regardless of latitude — never install flat.
High latitudes (above 55°): steepen the tilt angle toward 60–70° to capture the low winter Sun.
Your Next Steps
First, use the world city database in Section 4 to find your city’s recommended tilt angle. Then validate it with PVGIS or PVWatts using your exact GPS coordinates and horizon data. As a result, you will have a site-specific confirmed tilt angle rather than a generic approximation. Finally, size your complete system — panels, inverter, and BESS — using tilt-angle-corrected peak sun hours as the foundational input for all capacity calculations.
Choosing a charge rate for a battery energy storage system affects more than dispatch speed; it determines how long the asset lasts and what it costs to keep running. This comprehensive engineering guide compares liquid-cooled BESS 0.5C vs 1C cycle life using published LFP cell data, real thermal load calculations, and DCIR degradation analysis to give EPCs, developers, and asset managers the technical foundation they need to write a bankable specification. All cycle figures refer to LFP prismatic cells — the dominant technology in grid-scale and C&I liquid-cooled BESS today.
C-rate is defined here using the standard BESS C-rate definition — the ratio of power to energy capacity expressed as a multiple per hour. A 1C rate on a 1,000 kWh BESS means the system draws or delivers 1,000 kW. A 0.5C rate on the same system means 500 kW over two hours.
What Is C-Rate and Why Does It Matter for Cycle Life?
Why 1C Heat Generation Grows Faster Than 0.5C BESS Expectations
Heat inside a lithium-ion cell scales with the square of current. This is the I²R relationship. Doubling the C-rate from 0.5C to 1C therefore quadruples cell-level heat generation — not doubles it. Moreover, liquid cooling becomes essential above 0.5C because air cooling cannot remove heat fast enough to keep cells below the 35°C threshold needed for rated cycle life.
However, the heat penalty does not stop at the cell level. System efficiency also falls at higher C-rate. Both effects compound simultaneously. The formula below shows how to size the thermal management loop for each rate.
Pheat = Pdischarge × (1 − ηone-way)
Where: Pheat = Thermal power the cooling loop must reject (kW) Pdischarge = Rated discharge power (kW) = C-rate × Capacity (kWh) ηone-way ≈ √RTE (One-way efficiency, from round-trip efficiency)
Result: Moving from 0.5C to 1C increases continuous thermal rejection by ~50% per second.
Consider a 1 MWh system. At 0.5C, P_discharge = 500 kW and the cooling loop must reject roughly 20.5 kW. At 1C, P_discharge = 1,000 kW and the cooling load rises to roughly 62 kW — a 3× increase in absolute thermal load, not 2×. Both the power level and the efficiency penalty increase together. Consequently, a cooling system sized for 0.5C is materially undersized when the operator later dispatches the same asset at 1C.
Practical Takeaway: Sizing the Cooling Loop
Cold-plate loops for 0.5C typically need 8–15 litres per minute per module. At 1C, that requirement rises to 15–25 L/min. Furthermore, the heat exchanger, pump, and glycol reservoir must all be upsized accordingly. Under-specifying the cooling loop is one of the most common causes of field degradation exceeding warranted projections.
Therefore, always specify the maximum continuous C-rate in the thermal management scope of work — not the average dispatch rate. For detailed TMS component sizing, see the C&I BESS thermal management guide.
How Liquid Cooling Interacts with C-Rate Stress
0.5C Operation: Steady-State Thermal Comfort
When evaluating liquid-cooled BESS 0.5C vs 1C profiles, the 0.5C operation represents a state of steady thermal comfort where a well-designed cooling loop easily keeps module temperatures in the 20–30°C optimal band. It does this with low coolant flow rates and minimal pump parasitic load. Heat generation is steady. The electrochemical stress on the LFP cathode, graphite anode, and separator stays well within the cell design envelope. Consequently, cycle life aligns closely with manufacturer specification.
1C Operation: Where the Cooling Loop Is Tested
At 1C, heat generation rises substantially. Looking at liquid-cooled BESS 0.5C vs 1C dynamics, the formula shows that moving to a 1C rate increases thermal strain by more than a simple doubling. The coolant loop must run harder. Higher flow rates, lower coolant inlet temperature, and more frequent pump cycling are all necessary. Additionally, any partial blockage of a cold plate channel creates a localised hot spot. The BMS may not detect this fast enough to prevent accelerated cell ageing.
Key Engineering Specification for 1C Liquid-Cooled BESS The cooling system must reject up to 50% more thermal energy per second than a 0.5C equivalent. All cells must stay below 35°C. Module-level ΔT must remain ≤3°C at peak ambient temperature (typically 40–45°C for outdoor containerised systems). A cooling loop sized only for 0.5C will deliver shorter cycle life when dispatched at 1C.
Liquid-Cooled BESS 0.5C vs 1C Cycle Life: The Data
The table below draws on manufacturer specifications for 280Ah and 314Ah LFP prismatic cells, including the EVReporter BESS cycle-life dataset. Values marked (*) are interpolated from published trend data. Note that 1C BESS-level specifications are less commonly published because most manufacturers rate their systems at 0.5C.
Parameter
0.3C/0.3C
0.5C/0.5C
1C/1C
Notes
Cell-level cycles to 80% SoH (100% DoD, 25°C)
10,000
8,000
~4,000–5,000*
Manufacturer datasheet
Cell-level cycles to 70% SoH (100% DoD, 25°C)
15,000
12,000
~6,500*
Cell level only
BESS-level cycles to 70% SoH (90% DoD, ≤35°C)
8,000
6,000
~3,500–4,000*
Includes calendar ageing
Calendar life at BESS level
Up to 20 yrs
Up to 15 yrs
~10–12 yrs*
Liquid-cooled, ≤35°C
Heat generated per cycle
Low
Moderate
High
Scales with I²R
DCIR rise rate (relative to 0.3C baseline)
Baseline
+15–25%
+30–50%*
SEI-driven resistance growth
Cell ΔT in liquid-cooled system
<3°C
<3°C
3–6°C*
Higher at 1C without adequate flow
Round-trip efficiency (liquid-cooled)
~92–93%
~91–92%
~88–90%
Lower at 1C due to I²R
Typical grid application
Arbitrage (4-hr)
Frequency reg. / solar
Fast-response / C&I peak shaving
* 1C BESS-level figures are extrapolated from cell-level trend data and peer-reviewed fast-charging studies. DCIR rise values are relative to 0.3C baseline; absolute values vary by manufacturer and operating temperature.
Three findings stand out. First, moving from 0.5C to 1C cuts cell-level cycle life by roughly 37–50% at the 80% SoH threshold. Second, the BESS-level penalty is proportionally worse. Calendar ageing, thermal gradients, cell imbalance, and DCIR rise all compound the stress at system level. Third, DCIR grows 30–50% faster at 1C than at baseline. This matters because rising DCIR causes voltage sag — an effect that reduces usable capacity well before the cell reaches 80% SoH.
Consider a 10 MWh BESS cycled once per day. At 0.5C, it accumulates 7,300 equivalent full cycles over 20 years. The 6,000-cycle BESS warranty covers most of that period. However, at 1C, the ~3,500–4,000-cycle BESS warranty runs out after roughly 10–11 years. Mid-life augmentation then becomes unavoidable — and expensive.
Four Degradation Mechanisms in 0.5C vs 1C BESS Assets
Understanding why 1C cycling degrades LFP cells faster helps with both cell selection and BMS configuration. According to Energy-Storage.News, higher C-rates drive four distinct degradation pathways.
1. SEI Layer Growth
The solid electrolyte interphase (SEI) forms on the graphite anode during the first cycle. It keeps growing throughout cell life. SEI growth consumes lithium irreversibly, reducing usable capacity. Higher C-rates accelerate this in two ways. They raise cell temperature and increase local current density at the anode. Both effects thicken the SEI faster. As a result, liquid cooling’s primary role in 1C BESS is to suppress the temperature component of this growth.
2. DCIR Rise and Voltage Sag — the Hidden Cycle Life Cost
Direct Current Internal Resistance (DCIR) is the most operationally significant metric for a deployed BESS. It combines ohmic resistance, charge-transfer resistance at the electrode-electrolyte interface, and diffusion polarisation. In a new LFP prismatic cell, DCIR typically sits at 0.10–0.25 mΩ per Ah of rated capacity. The Sunlith DCIR technical article covers IEC 61960-standard measurement in detail.
At 1C, SEI growth accelerates — and each nanometre of additional SEI adds ionic transport resistance. DCIR rises faster as a result. Moreover, elevated temperature (harder to suppress at 1C even with liquid cooling) further accelerates this resistance drift.
Rising DCIR causes voltage sag. The voltage drop under load equals V_sag = I × DCIR. At 1C, discharge current is double that of 0.5C. Therefore, the same DCIR increase produces twice the voltage drop. In practice, this triggers the inverter’s low-voltage cutoff — typically 2.5–2.8V per cell — at a higher residual SoC than intended. The discharge cycle ends early. Consequently, the usable SoC window shrinks from, say, 10–90% to roughly 15–85%. That lost throughput compounds over project life, reducing effective revenue by 10–15% before the cell even reaches 80% SoH.
DCIR → Voltage Sag → Effective SoC Shrinkage A BMS that tracks per-cell DCIR and adjusts the voltage cutoff dynamically can recover a significant portion of this lost SoC window. This DCIR-adaptive cutoff is one of the highest-value firmware configurations for 1C liquid-cooled BESS assets.
3. Lithium Plating on the Anode
When charge current exceeds the anode’s intercalation rate, metallic lithium plates on the graphite surface instead of inserting into it. This is irreversible. It can also lead to dendritic growth that eventually penetrates the separator — the main path to internal short circuits. At 0.5C, LFP cells stay well within the safe intercalation envelope. At 1C, that margin narrows. Furthermore, if the cooling system is undersized, elevated temperature narrows the margin further, making thermal management the deciding factor in liquid-cooled BESS 0.5C vs 1C longevity.
LFP cathode particles expand and contract as lithium ions move in and out. Higher C-rates speed up this mechanical cycling. Cumulative electrode stress rises as a result. Research in ScienceDirect confirms that fast-charging produces macroscopic electrode detachment and microscopic particle cracking alongside SEI growth. LFP’s olivine structure resists this better than NMC. However, the effect is still measurable at sustained 1C operation.
Together, these four mechanisms explain why the cycle-life gap between 0.5C and 1C is not linear. Liquid cooling suppresses the thermal contribution. However, it cannot eliminate the electrochemical stress, DCIR accumulation, or mechanical fatigue that higher current imposes on the cell.
How Liquid Cooling Mitigates 1C BESS Cycle Life Degradation
What the TMS Controls
Liquid cooling does not eliminate the 1C cycle-life penalty, but it cuts it significantly compared to air-cooled 1C operation. Research shows that liquid cooling reduces peak cell temperature by approximately 3°C at moderate C-rates. Additionally, it nearly doubles attainable cycle life versus unmanaged thermal conditions. However, the margin shrinks at 1C, so correct TMS sizing becomes critical.
For a 1C liquid-cooled LFP BESS, four parameters determine how well the TMS performs: inlet coolant temperature (target 20–25°C), coolant flow rate sized to keep ΔT below 3°C, cold plate contact area and thermal resistance, and BMS curtailment of discharge above 38–40°C per cell.
Industry Benchmark — CATL EnerOne CATL’s EnerOne liquid-cooled system limits cell-to-cell ΔT to 3°C across the module stack. This enables a warranted 10,000-cycle life at 1C for the 280Ah cell. Achieving comparable performance at 1C with a less capable TMS is not supported by published data.
Immersion vs Cold Plate at 1C
Immersion cooling — direct cell contact with a dielectric fluid — reduces degradation further than cold-plate systems at high C-rates. Data from EticaAG’s immersion cooling research shows a 22% battery life extension versus cold-plate cooling. Moreover, immersion eliminates localised hot spots entirely by surrounding every cell surface with fluid.
Nevertheless, immersion cooling carries higher capital cost. It is therefore used primarily in data centre UPS and research installations rather than grid-scale BESS. For most C&I projects, cold-plate liquid cooling is the appropriate balance of cost and performance. The C&I BESS thermal management guide covers sizing requirements in detail.
Which C-Rate Fits Your Application?
C-rate selection must match the application’s power-to-energy ratio — not simply the lowest purchase price. A system specified at 0.5C and dispatched at 1C will fail to meet its warranted cycle life. Conversely, a 1C system used only for overnight arbitrage at 0.25C wastes capital on oversized power electronics.
Application
Recommended C-Rate
Expected BESS Cycles
Liquid Cooling Tier
Grid arbitrage (4-hour)
0.25C–0.5C
8,000–10,000+ cell-level
Cold plate, ΔT <3°C
Solar farm smoothing
0.5C
8,000 cell / 6,000 BESS
Cold plate, ΔT <3°C
Frequency regulation (2-hour)
0.5C–1C
5,000–8,000 BESS
Cold plate or enhanced liquid
C&I peak shaving (1-hour)
1C
4,000–5,000 BESS
Cold plate, higher coolant flow
EV fast-charge buffer
2C–3C
<3,000 BESS
Immersion or high-flow cold plate
Frequency regulation sits at 0.5C–1C because market requirements vary. UK FFR and Australian FCAS markets need sub-second response, so 1C is justified. US CAISO and MISO markets are often serviceable at 0.5C. Always confirm the specific market’s power-to-energy ratio before finalising the C-rate specification. For a full breakdown, see the BESS C-rate guide.
LCOS and Project Finance: The Cost of Getting C-Rate Wrong
Augmentation Timing
LCOS depends on total energy throughput divided by lifetime cost. That lifetime cost includes capital, augmentation, and O&M. A system that exhausts its warranted cycle count in half the intended project life triggers mid-life augmentation — typically 20–35% of original capital cost. This single event can materially damage project returns.
Consider a 10 MWh system at $250/kWh installed ($2.5M total). At 0.5C with 6,000 BESS-level cycles, augmentation is deferred to roughly year 16–18. At 1C with ~3,500–4,000 BESS-level cycles, augmentation arrives at year 9–10. That earlier event costs approximately $600,000–$850,000. Furthermore, it must be modelled in the financial plan from day one.
RTE and DCIR Revenue Loss
Round-trip efficiency differences also compound over time. A liquid-cooled LFP BESS achieves roughly 91–92% RTE at 0.5C versus 88–90% at 1C. Over 20 years at one cycle per day, a 2-percentage-point gap represents approximately 1,460 MWh of lost throughput on a 10 MWh system.
Additionally, DCIR-driven voltage sag reduces the effective SoC window by 10–15% in mid-to-late project life at 1C. This compounds the revenue shortfall beyond what the RTE difference alone would predict. Consequently, LCOS models that account only for RTE — and not DCIR-driven capacity erosion — will consistently underestimate the true cost of 1C operation. For a project-level cost breakdown, see the C&I BESS thermal management article.
BMS and EMS Settings That Protect Cycle Life
The battery management system (BMS) is the first line of defence for cycle life at any C-rate. At or near 1C, these six settings directly affect degradation rate:
Temperature de-rating: Automatically derate current when any cell exceeds 35°C. Step down to 0.5C above 38°C. Halt discharge above 45°C. Without this, summer peak events push cells into the accelerated degradation zone.
DCIR-adaptive voltage cutoff: Adjust the discharge termination voltage in real time based on measured DCIR. As DCIR rises over thousands of cycles, this prevents the inverter from cutting off early due to resistive voltage sag — recovering up to 10% of effective throughput in mid-to-late project life.
SoC window management: Restrict operation to 10–90% SoC rather than 0–100%. The marginal capacity gained by widening the SoC window at 1C does not offset the electrode stress cost.
Cell-to-cell voltage balancing: Set balancing thresholds to ±5mV rather than ±10mV. At 1C, voltage polarisation amplifies cell divergence during high-rate events and can mask true SoC.
Coolant temperature monitoring: Log and alarm on coolant inlet temperature deviations. A 3°C rise in inlet temperature at 1C translates to a 5–7°C rise in peak cell temperature — enough to push the system outside the warranty envelope.
Cycle and throughput logging: Track both cycle count and energy throughput (MWh) alongside DCIR trend data. Use these to trigger augmentation planning before field performance diverges from the financial model.
For grid-scale projects, the EMS dispatch algorithm should include a C-rate override that blocks 1C dispatch when ambient conditions prevent the TMS from maintaining ΔT below 3°C. This is especially important during summer peaks, when grid dispatch urgency and ambient temperature peak together. For more on how BMS, EMS, and TMS integrate at the system level, see the microgrid BESS technical guide.
Frequently Asked Questions
Does liquid cooling eliminate the 0.5C vs 1C cycle life gap?
No. Liquid cooling reduces the thermal component of degradation at 1C. However, it cannot eliminate the electrochemical stress — SEI growth, DCIR rise, lithium plating risk, and electrode mechanical strain — that increases with current. Published LFP data consistently shows a 37–50% reduction in cell-level cycle count at 80% SoH when moving from 0.5C to 1C, even with best-in-class liquid cooling.
What cycle life does a liquid-cooled LFP BESS achieve at 0.5C?
Published data for 280Ah and 314Ah LFP prismatic cells shows approximately 6,000 BESS-level cycles to 70% SoH at 0.5C/0.5C, 90% DoD, and ambient temperatures up to 35°C — with calendar ageing included. At the 80% SoH threshold, cell-level data shows 8,000 cycles at 25°C.
How does DCIR rise affect a 1C liquid-cooled BESS over time?
As DCIR grows from SEI accumulation, the voltage drop under 1C discharge doubles versus 0.5C for the same resistance increase. The inverter’s low-voltage cutoff triggers at a higher residual SoC. This shrinks the usable SoC window by 10–15% in mid-to-late project life. A DCIR-adaptive voltage cutoff in the BMS firmware can recover a significant portion of this lost throughput.
How do I calculate the cooling load difference between 0.5C and 1C?
Use P_heat = P_discharge × (1 − √RTE). At 0.5C with 92% RTE, a 1 MWh system rejects roughly 20.5 kW. At 1C with 88% RTE, that rises to roughly 62 kW — a 3× increase, not 2×. Always size the cooling loop for the maximum continuous C-rate, not the average dispatch rate.
Which applications justify 1C despite the shorter cycle life?
Applications with revenue tied to peak power — frequency regulation in FFR or FCAS markets, C&I peak demand charge reduction, and high-power grid-stabilisation services — can justify 1C. The key test is whether the revenue uplift from 1C dispatch outweighs the higher LCOS from shorter cycle life, earlier augmentation, and DCIR-driven SoC shrinkage.
Conclusion
The comparison of liquid-cooled BESS 0.5C vs 1C cycle life reveals a clear and consequential difference. Moving from 0.5C to 1C cuts cell-level cycle count by 37–50% at the 80% SoH threshold. The BESS-level penalty is larger still because calendar ageing, thermal gradients, and DCIR accumulation all compound on top of the C-rate stress.
Liquid cooling is essential for any BESS operating above 0.5C. However, it mitigates the degradation penalty — it does not eliminate it. The thermal sizing formula in this guide gives procurement teams a concrete starting point. The DCIR-adaptive BMS setting gives asset managers a practical tool to recover lost throughput in mid-project life.
Sunlith Energy provides technical consultancy for BESS specification, thermal management design, and lifecycle modelling. Contact us to discuss the right C-rate design for your project.